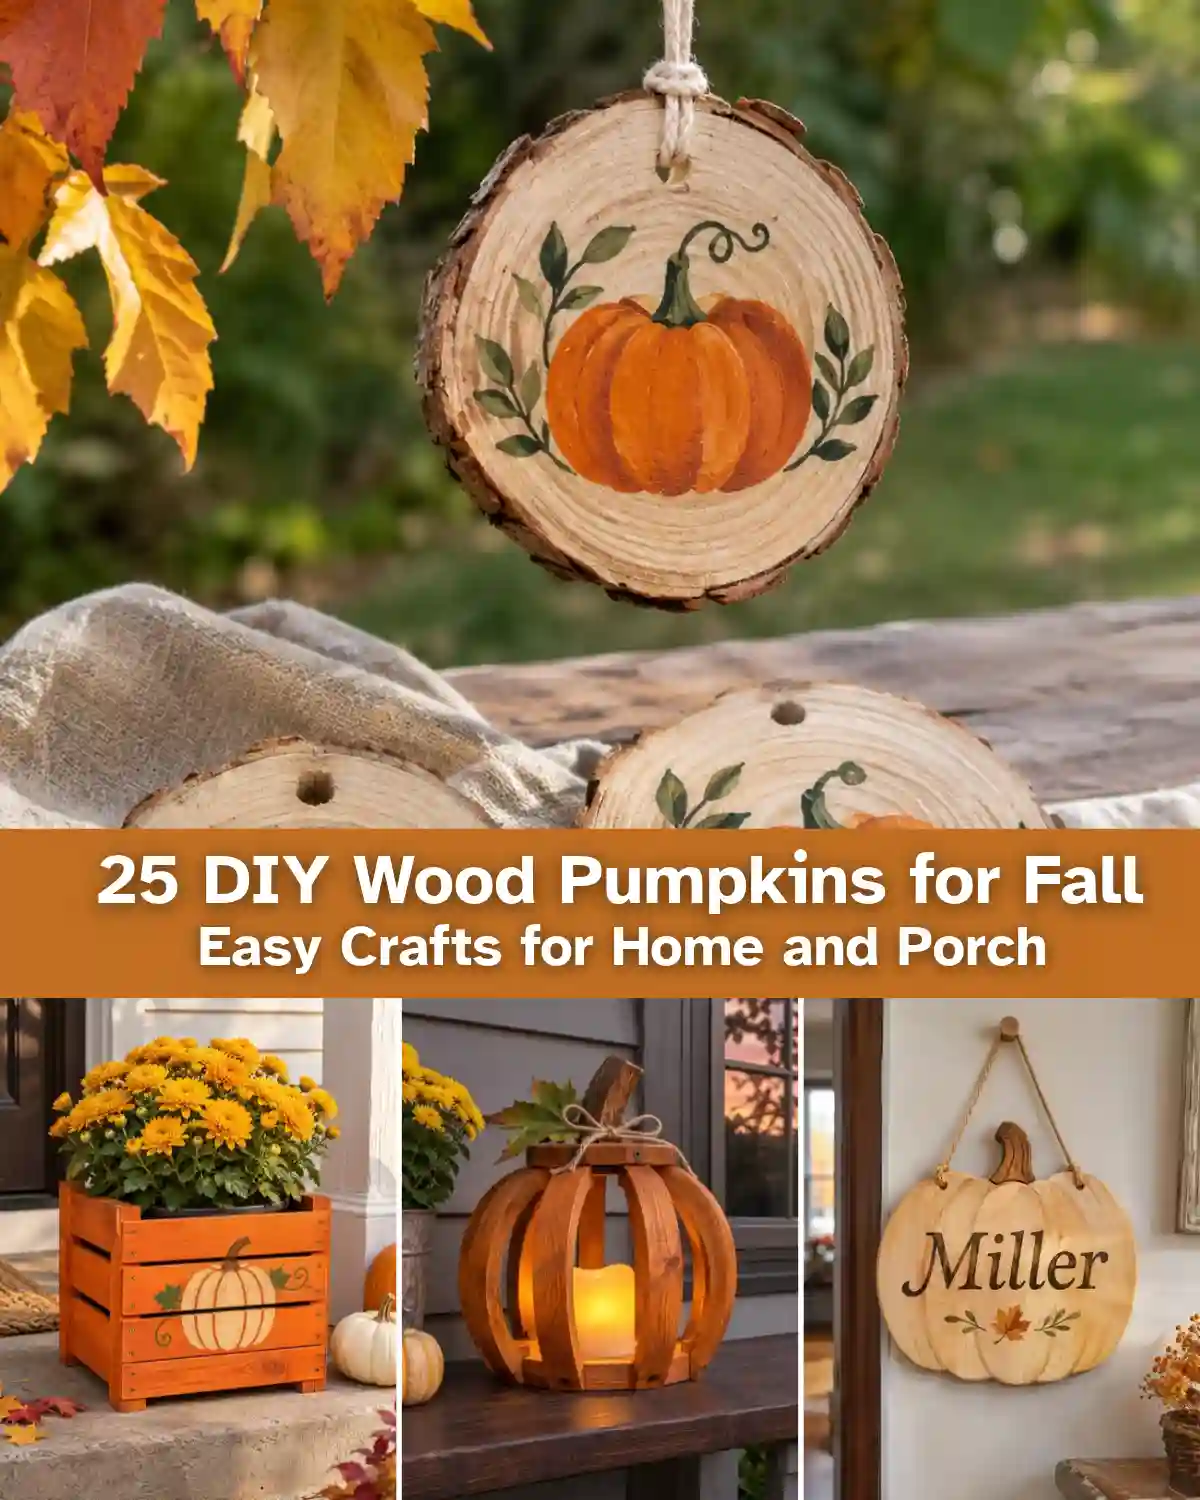






















DIY wooden pumpkins are reusable fall decorations you can make from 4×4 blocks, wood slices, scrap boards, and ready-cut craft shapes. The easiest projects need only paint and glue; more involved versions use basic cutting and assembly to create porch signs, planters, and lanterns. These 25 ideas cover both approaches, so you can choose a project that fits your tools, space, and decorating style.
A pile of leftover wood may not look like much, but add a twig stem and a little autumn color and it starts looking surprisingly festive. You don’t need to turn your home into an orange pumpkin patch, either. Soft cream, weathered brown, terracotta, and sage can look just as seasonal.
The fun of wood pumpkins diy fall crafts is choosing one small project that looks at home among decorations you already own. For more seasonal inspiration, explore these fall wood crafts for creative ways to reuse simple materials. You could paint a few ready-cut blocks for a shelf, turn wood slices into ornaments, or put leftover boards to work on the porch. The materials are simple, but the finish makes each project feel different. Start with the space you want to decorate, and the right idea usually becomes clear.
Key Takeaways
- Start with pre-cut blanks for easy, saw-free projects.
- Use 4×4 blocks for chunky pumpkins in different heights.
- Paint wood slices for ornaments and indoor garlands.
- Choose clean reclaimed boards for rustic signs.
- Weatherproof outdoor pieces and anchor porch displays securely.
- Use battery-operated LEDs inside wooden lanterns.
Wood Pumpkins DIY Fall Crafts: Which Project Should You Start With?
If you’re new to wood pumpkins DIY fall crafts, start with pre-cut cubes or smooth wooden slices. If you already have a saw and usable offcuts, block pumpkins and reclaimed-board silhouettes give you more freedom over size and shape.
| Project style | Good starting material | Tools or skills | Best place to display |
|---|---|---|---|
| Chunky pumpkins | Pre-cut 4×4 or 2×4 blocks | Sanding, paint, glue | Mantel or shelf |
| Painted wood slices | Dry, pre-cut wood rounds | Brush and acrylic paint | Garland or wall |
| Rustic silhouettes | Clean scrap boards | Cutting and assembly | Porch or entry |
| Mini table crafts | Wooden blanks and cubes | Paint and simple glue | Dining table |
| Lantern or planter | Slats or a small crate | Careful assembly | Sheltered porch |
Basic supplies: dry wood or pre-cut blanks, medium and fine sandpaper, craft paint or stain, brushes, wood glue, a few twigs or dowels, and optional twine or raffia. Use eye protection and suitable dust control when cutting or sanding. The Occupational Safety and Health Administration (OSHA) warns that airborne wood dust can irritate the respiratory system and cause other health problems.
How Can You Turn Wood Blocks into DIY Pumpkin Decor?
Use pre-cut or sanded 4×4 and 2×4 blocks to make standing pumpkins, and add paint, stems, or name tags to suit the space.
At a Glance
- Group three different heights for a balanced display.
- Whitewash blocks for neutral farmhouse decor.
- Turn mini blocks into reusable place cards.
25 DIY Wood Pumpkins for Fall: Easy Crafts for Home and Porch
1. Chunky 4×4 Wooden Pumpkin Trio
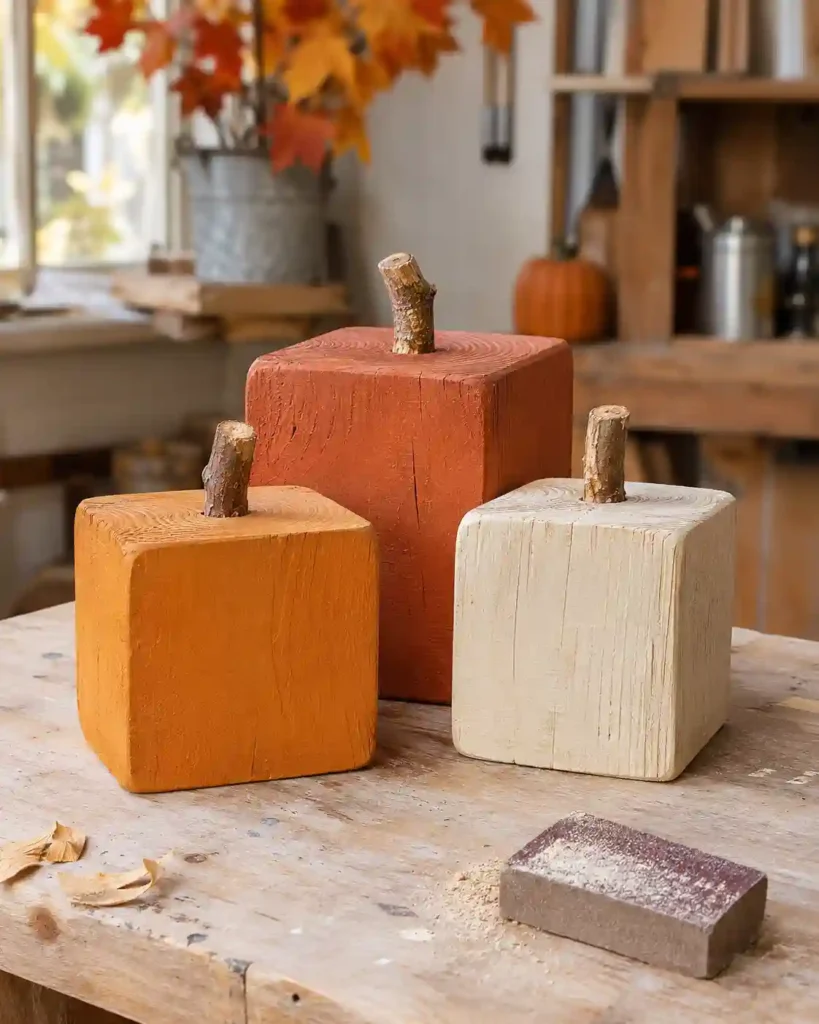
Three chunky 4×4 pumpkins instantly make a little fall display feel complete. A single block can look lonely, but three different heights give you that collected-over-time look without adding clutter. They’re especially nice on an entry table beside a small bowl of pinecones. Choose this project when you have sturdy lumber scraps and want a decoration you can bring back every autumn.
Cut or purchase three short 4×4 lengths, sand the cut ends, and paint them rust, cream, and mustard. Attach a short twig stem to each top with an appropriate wood adhesive; use a drilled socket or suitable fastener for heavier pieces. Try one natural-stained block in the trio so the wood grain stays visible.
2. How Do You Make Rustic 2×4 Standing Wood Pumpkins?
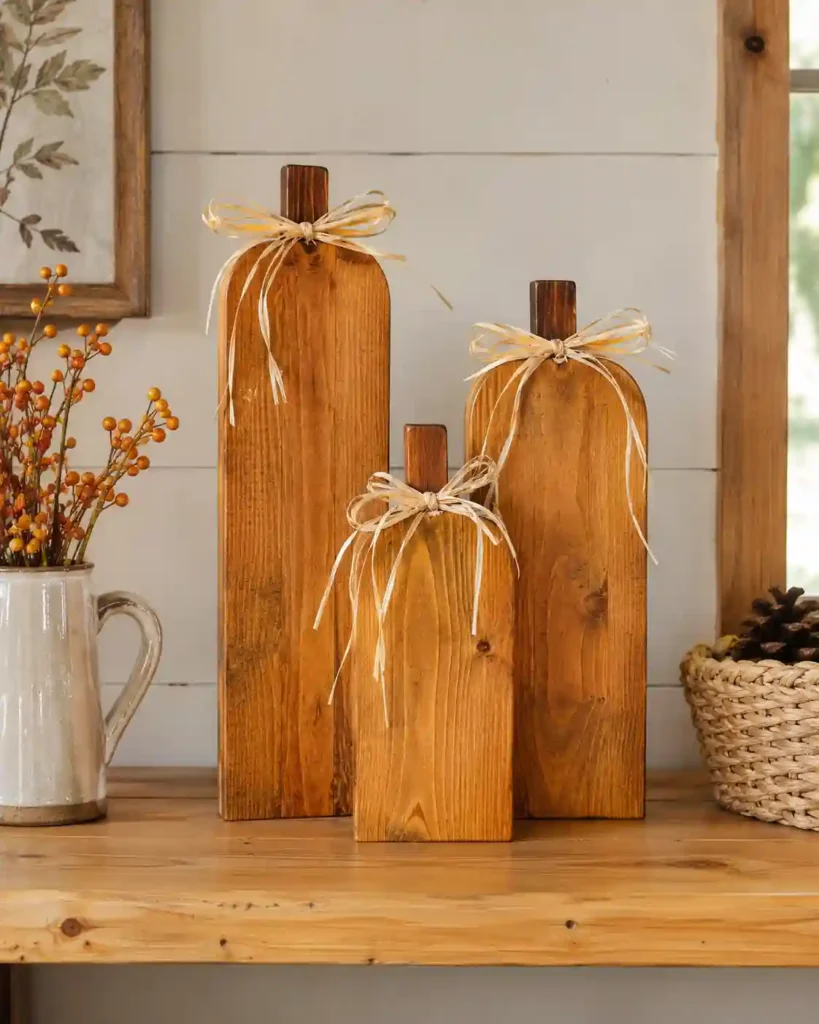
Don’t throw away those skinny 2×4 offcuts. Standing them upright creates taller pumpkins that fit narrow shelves much better than rounded cutouts. A small group looks right at home on a windowsill or along a staircase landing. This is a good first woodworking project if you can make straight cuts or ask the hardware store for pre-cut pieces.
Sand the sharp corners, lightly round the top edges, and brush on a warm brown stain or diluted orange paint. Tie a small raffia bow around each stem. Keep the base flat so the pieces stand securely rather than rocking.
3. Whitewashed Farmhouse Block Pumpkins
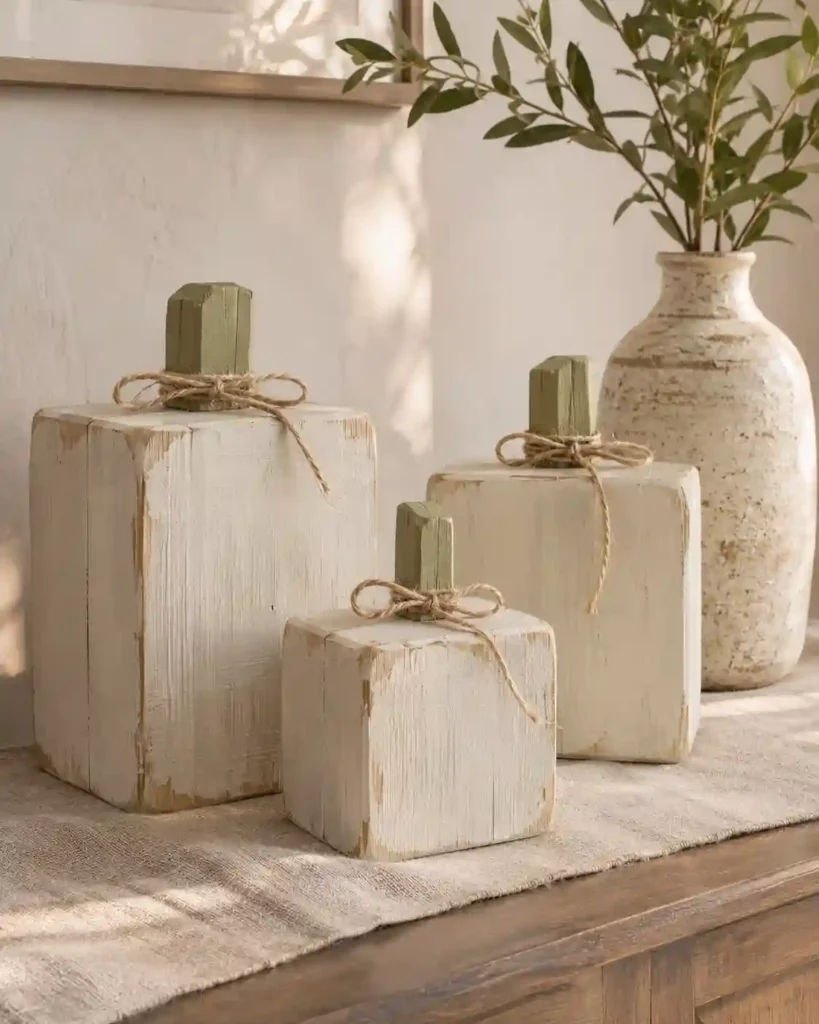
A whitewashed pumpkin is what I’d choose for a room already filled with soft neutrals. You can also explore these fall decor diy crafts for more ways to create a cozy seasonal atmosphere at home. Bright orange can compete with that palette, while a thin white finish lets the natural grain peek through. Try a pair on a linen-covered console with a little dried eucalyptus. It’s an easy way to get farmhouse fall decor without buying an entirely new collection of accessories.
Brush a thin layer of white paint over clean blocks, then wipe back excess before it dries. Once dry, gently distress the edges and add a muted sage or natural-wood stem. Use a compatible outdoor-rated finish if the pumpkins will sit in an exposed area.
4. Can Mini Wood Block Pumpkins Double as Place Cards?
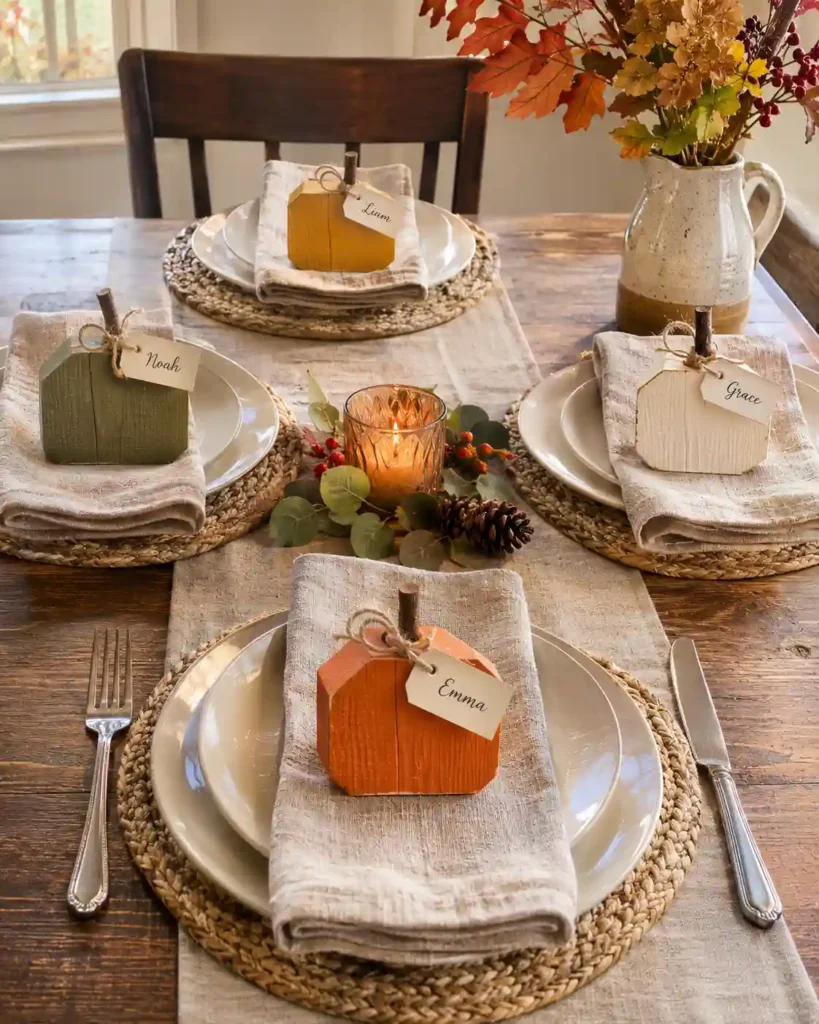
Tiny block pumpkins are cute on their own, but giving each one a guest’s name makes them useful, too. Unlike paper place cards, these can come back out for Thanksgiving year after year if you use removable tags. Set one beside each folded napkin for a simple harvest table. They’re perfect for anyone who prefers crafting to cutting wood.
Paint small pre-cut blocks in coordinating shades, glue on miniature twig stems, and tie on little name cards. Check that the bases sit steadily. For easier reuse, write names on detachable tags rather than directly onto the wood.
What Can You Make with Painted Wood Slices?
Paint ready-cut wood rounds as hanging ornaments, a layered wall sign, or a lightweight fall garland.
At a Glance
- Leave some wood grain or bark edges showing.
- Use pre-drilled holes for hanging projects.
- Keep garlands away from flames and heat.
5. Painted Wood Slice Pumpkin Ornaments
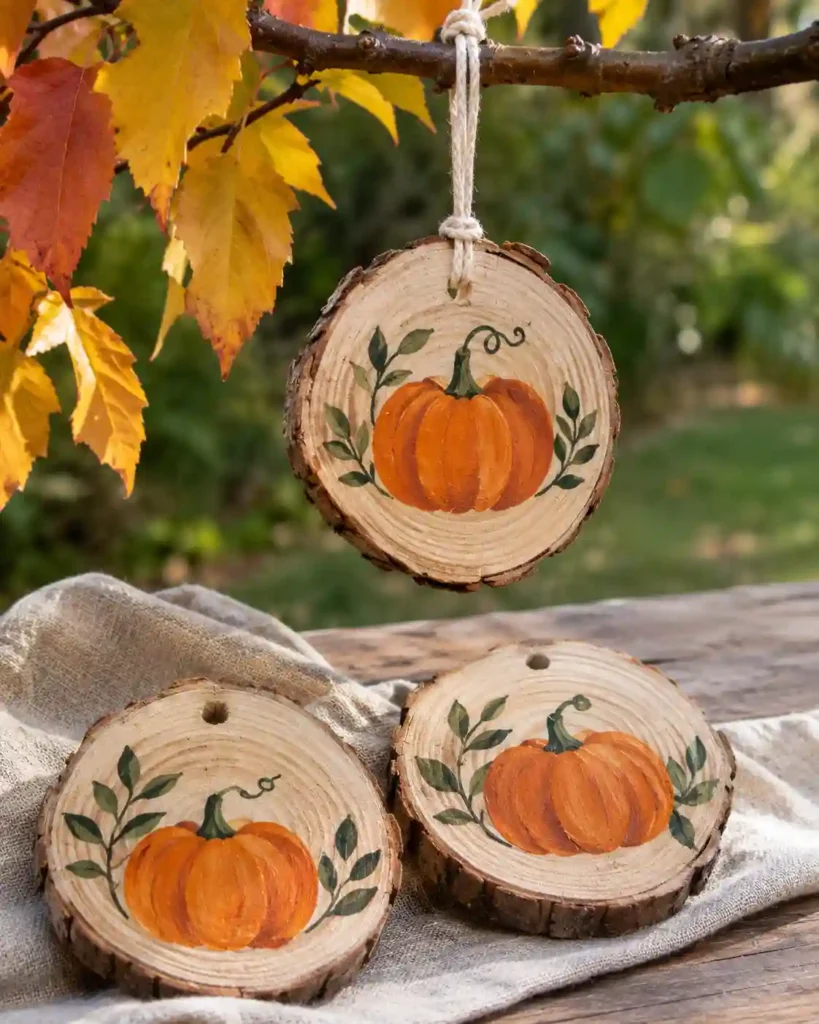
Wood slices already have lovely rings and bark edges, so they don’t need much decoration. Paint a simple orange pumpkin on each round and leave some natural wood showing around it. These make sweet accents for a branch arrangement or autumn gift wrapping. If you’re searching for wood slice pumpkins diy fall crafts, this is the easiest place to begin.
Start with thoroughly dry, pre-cut rounds. Sand rough surfaces, paint a pumpkin silhouette with a green leaf, and add cotton cord through a pre-drilled hole. A simple shape is often more charming than a heavily detailed illustration.
6. How Can You Build a Stacked Wood-Round Pumpkin Wall Sign?
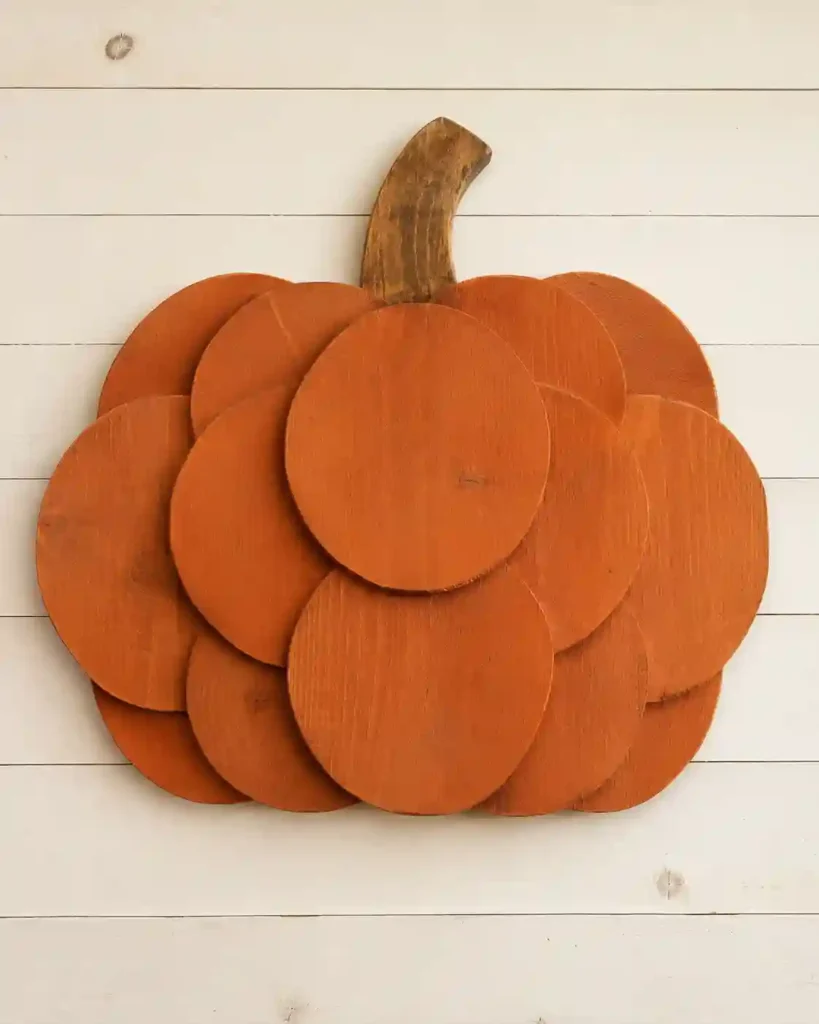
Three overlapping wooden circles can create a pumpkin shape without carving a curved outline. That makes this wall sign a clever choice when you’re comfortable with glue and mounting but not a jigsaw. Hang it near a mudroom hook or an autumn wreath for a layered look. The best part is that the round edges give the pumpkin its shape before you even start painting.
Arrange one center round with two overlapping side rounds on a backing board. Secure the pieces appropriately, add a small stem, then paint the connected shape in cinnamon or leave it natural. Use hanging hardware rated for the finished weight.
7. Wood Slice Pumpkin Garland
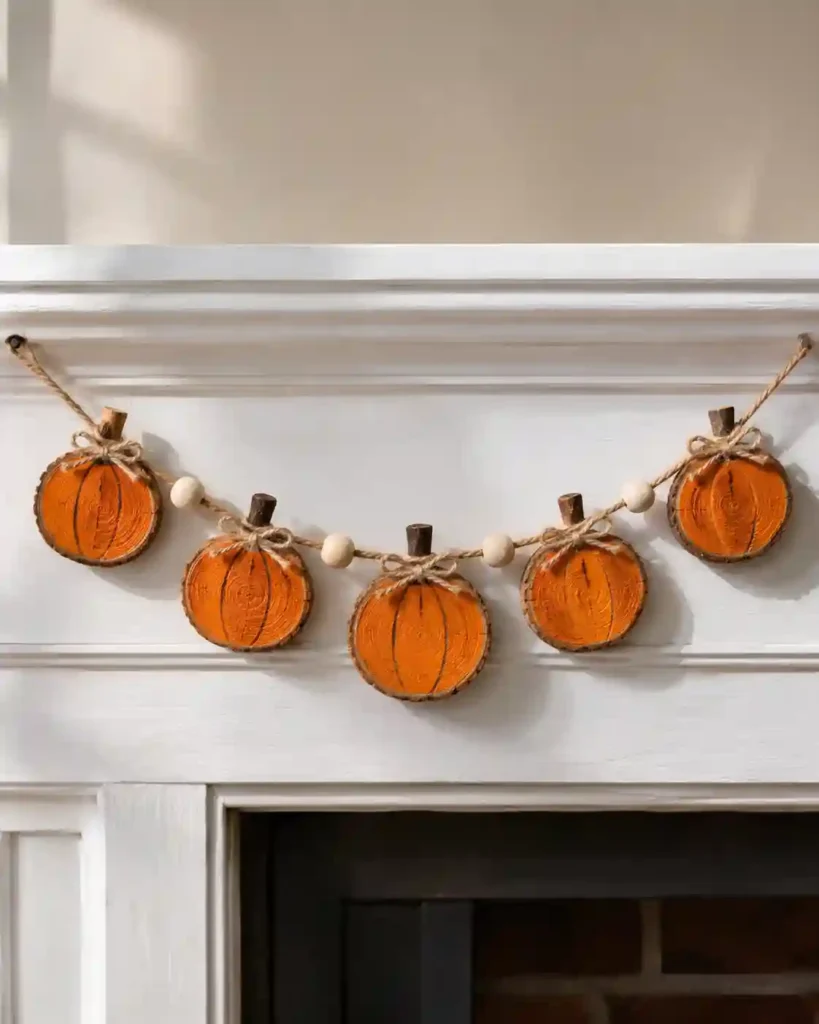
A row of little pumpkin slices makes a mantel festive without covering the whole surface. For more seasonal inspiration, these fall pumpkin crafts offer additional ways to decorate with pumpkin shapes and autumn materials. Compared with one large seasonal sign, a garland is easier to tuck into a drawer when fall is over. Drape it across a shelf, a cabinet, or an indoor doorway. This is an especially appealing craft for a relaxed afternoon with ready-cut supplies.
Paint five to seven small slices, then string them on cotton twine with optional wooden beads between them. Use pre-drilled holes and secure knots. Keep the garland away from candles, fireplaces, and other heat sources.
Which Reclaimed-Wood Pumpkins Work for Rustic Fall Decor?
Build pumpkin silhouettes, patchwork decorations, or door hangers from clean reclaimed boards whose origin and condition you can verify.
At a Glance
- Check boards for nails and damaged edges.
- Use rear braces for joined plank shapes.
- Avoid painted or contaminated wood of uncertain origin.
8. How Do You Make Reclaimed Pallet Board Pumpkin Silhouettes?
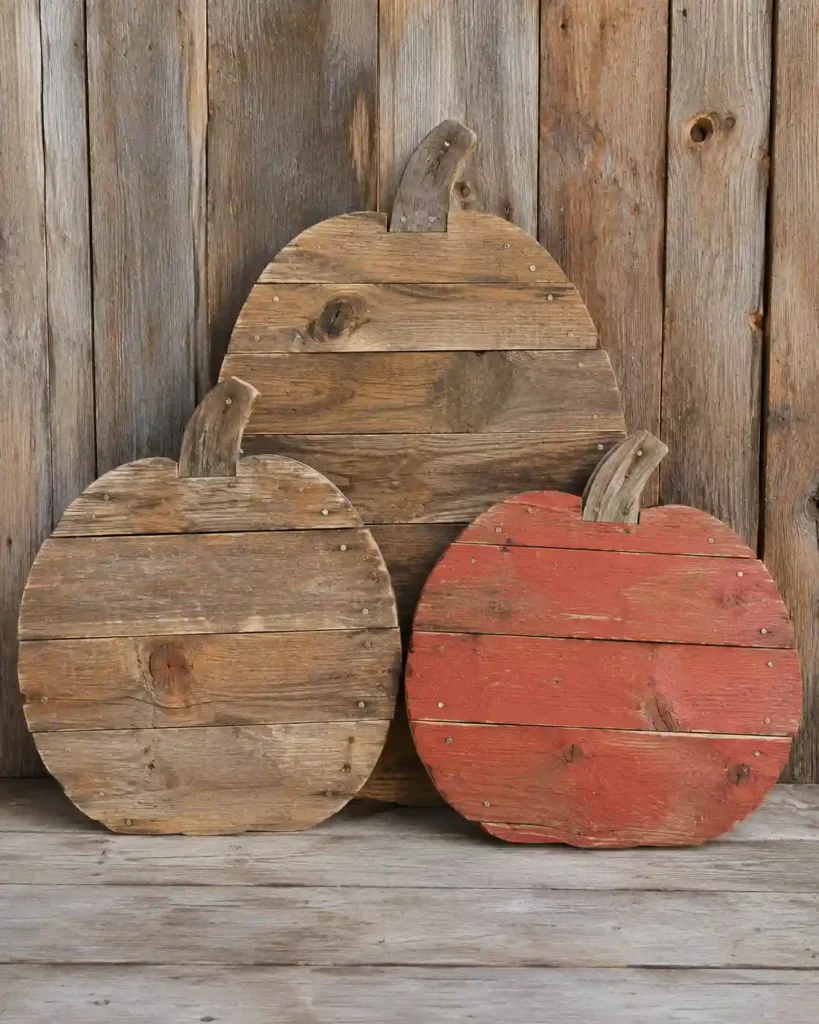
Pallet-board pumpkins have a naturally uneven texture that’s hard to copy with fresh craft wood. The seams and knots become part of the design, making even a simple silhouette look interesting. Lean a trio against a sheltered porch wall for an unfussy rustic display. Pick this idea if you enjoy assembling boards and don’t mind a little extra preparation.
Use clean boards of known origin, check for embedded nails, and reject pieces with staining, chemical smells, or unknown contamination. Fasten planks to rear braces before tracing and cutting a pumpkin outline; smooth every edge. If the pallet’s history is uncertain, choose clean new lumber instead.
9. Patchwork Scrap-Wood Pumpkin
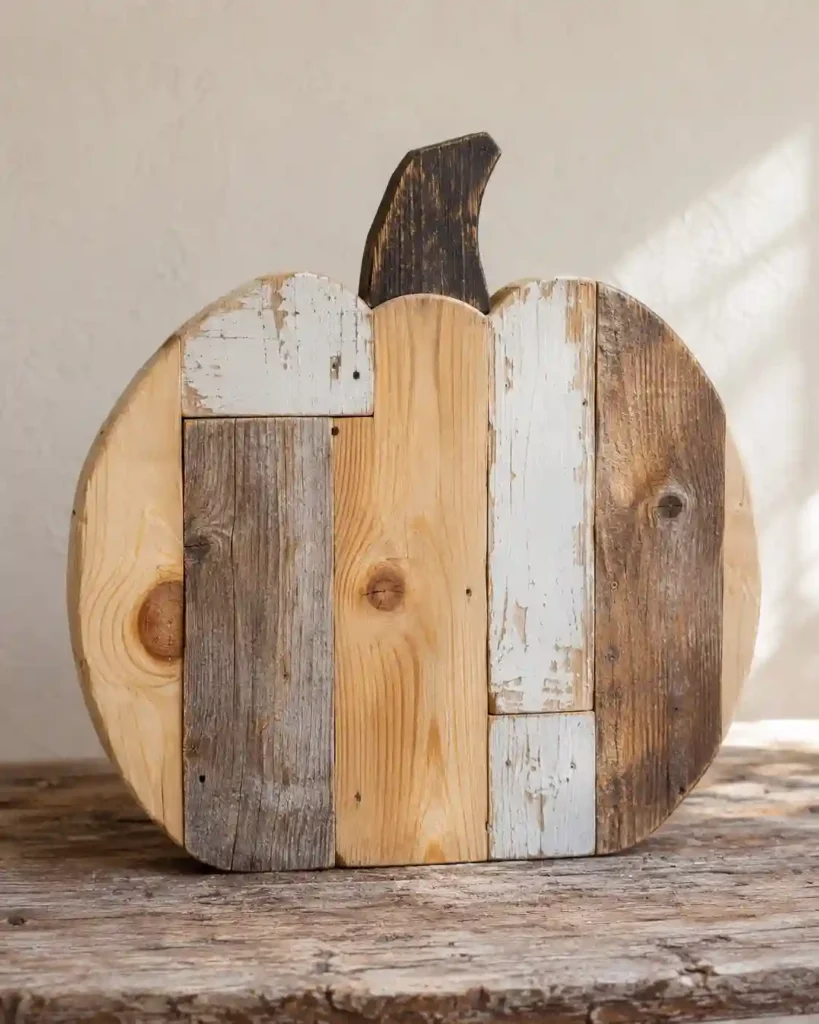
Got scraps in mismatched widths and colors? Make that the whole point. If you enjoy making decorations from leftover materials, explore these fall crafts for adults for more creative seasonal projects. A patchwork pumpkin feels more playful than a perfectly uniform cutout, especially when a few natural boards sit beside painted pieces. It works beautifully on a workshop shelf or as a handmade gift for someone who loves reclaimed decor. The charm comes from variety rather than precision matching.
Lay out clean offcuts until the silhouette looks balanced, trim as needed, and secure them to sturdy rear supports. Stain only a few sections so the contrast remains visible. Check the assembly for exposed screws or sharp corners before displaying it.
10. Can a Barn-Wood Pumpkin Become a Door Hanger?
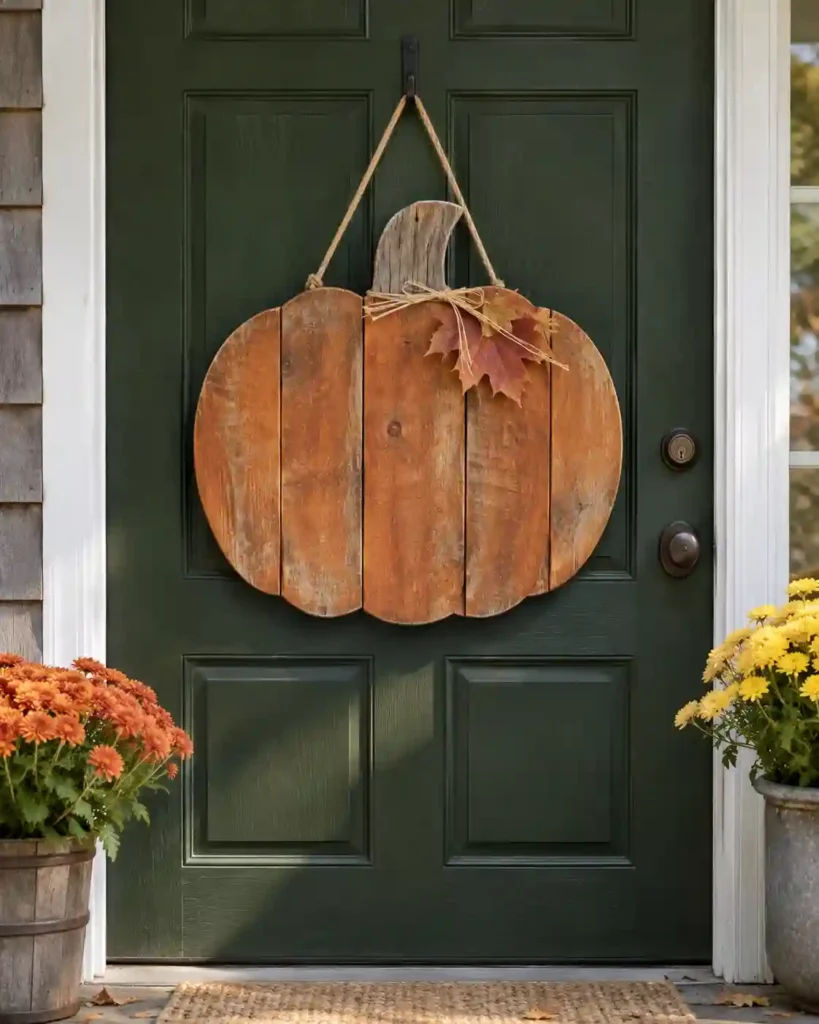
A flat wooden pumpkin can welcome guests without taking up any porch floor space. That makes it a smart alternative to bulky stacked decorations, especially if your entry is narrow. Weathered boards and a simple twine loop look lovely against a dark front door. Choose a lightweight build so the hanger is practical, not just pretty.
Join clean thin boards, trace a pumpkin outline, cut and sand it, then fit an adequately rated hanger. Check that it won’t strike the doorframe or interfere with the handle. Seal the wood for the exposure it will receive.
How Do You Make Wooden Pumpkin Decorations for the Porch?
For a fall porch, try a wooden crate planter, pumpkin stakes, a welcome sign, or a securely anchored pumpkin stack.
At a Glance
- Match the decoration’s size to your entryway.
- Protect exposed wood with compatible exterior finishes.
- Keep displays stable and clear of walkways.
11. Wooden Crate Pumpkin Planter
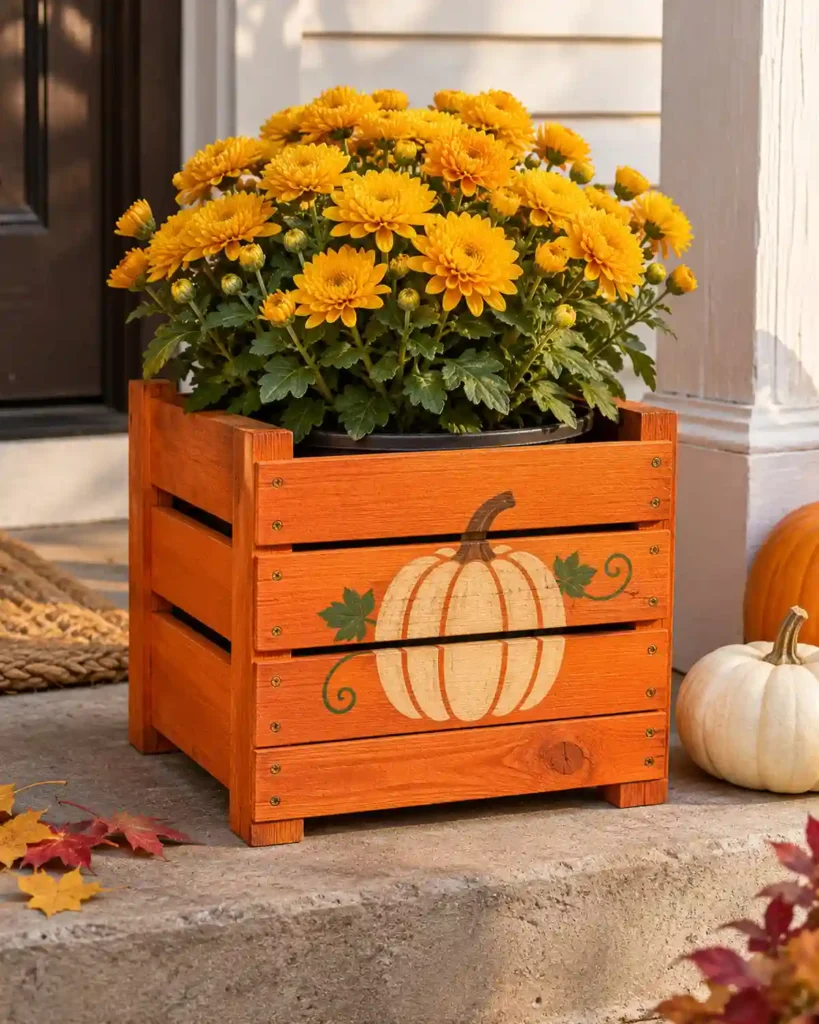
A little wooden crate can become pumpkin-inspired fall decor without losing its original purpose. Paint the front with a simple pumpkin motif, then fill it with a removable pot of mums. It offers more texture than a plain plastic planter and gives a porch step something seasonal to anchor the space. This is ideal if you want a project that blends crafts and plants.
Clean and sand the crate before painting it. Place the plant inside its own draining pot and use a liner or tray to protect the wood from standing moisture. Avoid letting water collect at the bottom.
12. How Do You Make Tall Wooden Pumpkin Porch Stakes?
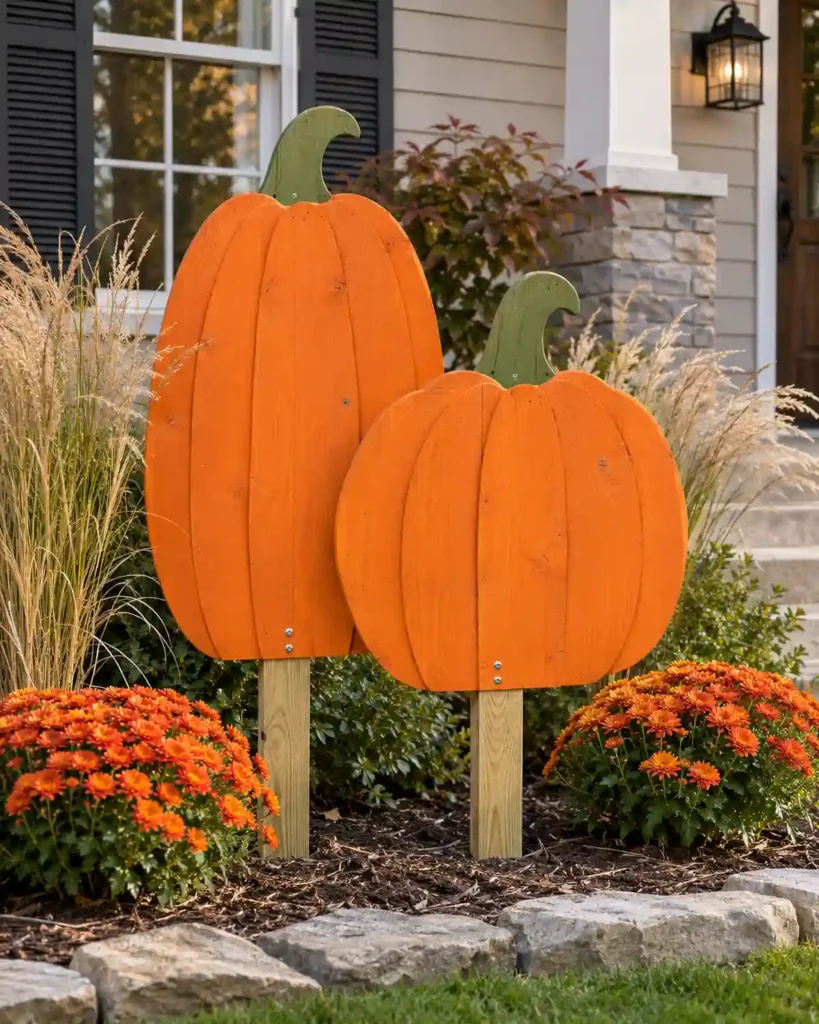
Tall pumpkin stakes add fall color to a garden bed without crowding your steps. They’re easier to spot from the sidewalk than tiny shelf pumpkins, and you can make them in a coordinated pair. Try placing them among ornamental grasses or late-season flowers. They’re best for crafters who can safely cut flat shapes and install stakes securely.
Trace pumpkin silhouettes on suitable exterior wood, cut and sand them, and attach sturdy stakes with exterior-rated fasteners. Paint and protect all surfaces, including cut edges. Position the stakes away from walkways and check that they cannot tip into a path.
13. Rustic Pumpkin Porch Welcome Sign
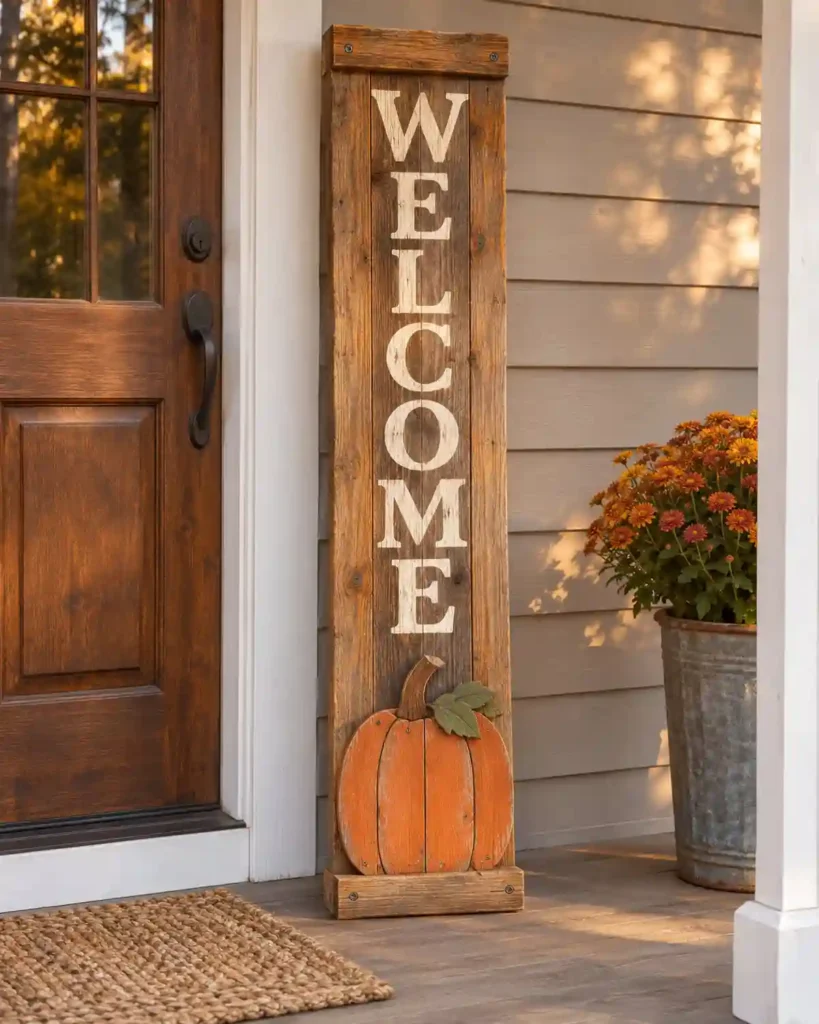
One tall sign can pull together a front entrance faster than a dozen little accents. Adding a modest pumpkin cutout at the base keeps it seasonal without making the lettering feel busy. It’s especially effective beside a woven doormat and a simple wreath. Choose this project if you like decorative signs and have room for a stable vertical display.
Start with a smooth upright plank, add stenciled lettering, and mount a small pumpkin shape near the bottom. Keep the text readable from a few steps away. Build a stable base or secure the sign as appropriate for wind and foot traffic.
14. How Can You Stack Wooden Pumpkins for an Outdoor Display?
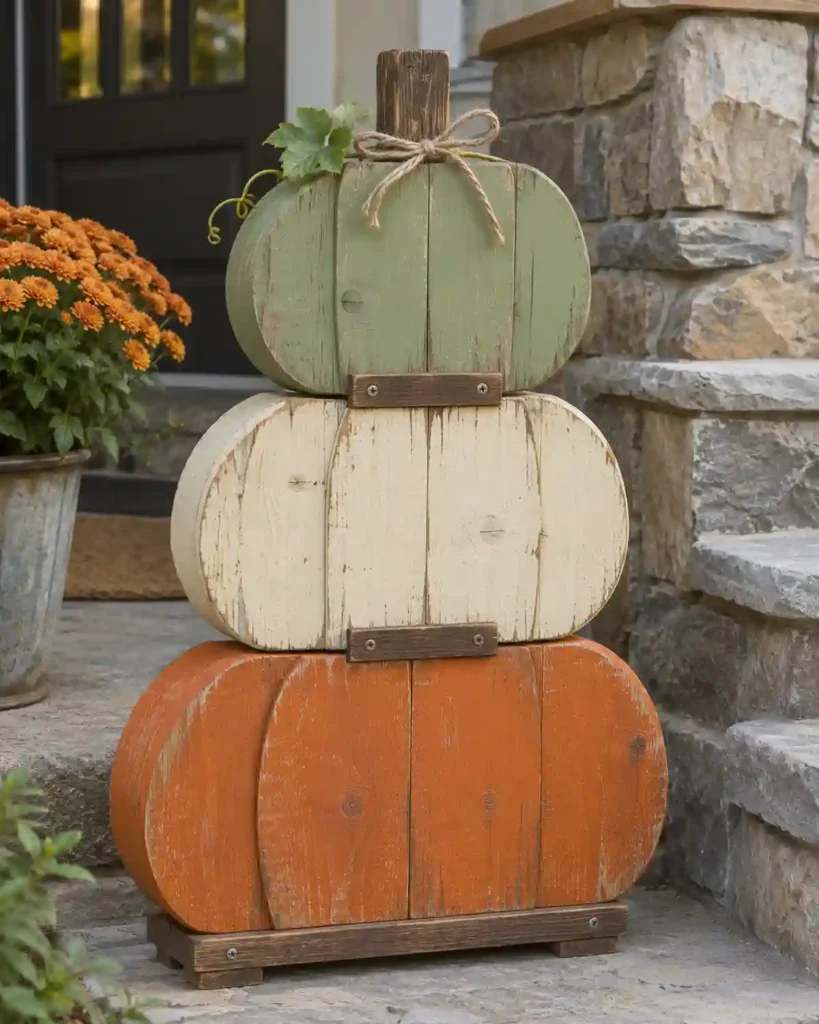
A stack of three wooden pumpkins gives a porch some height while using less floor area than separate decorations. The trick is making it look balanced rather than precarious. Place it beside a broad step or a wall where it won’t be bumped. This project suits someone who wants a statement piece and can build a properly supported base.
Use wide, low pumpkin forms, with the largest at the bottom. Connect and anchor the parts rather than balancing them loosely, and choose an exterior finish. Don’t place the stack where a child or pet could knock it over.
Can You Make a Wooden Pumpkin Lantern or Tabletop Crafts?
15. How Do You Make a Wooden Pumpkin Lantern with an LED Glow?
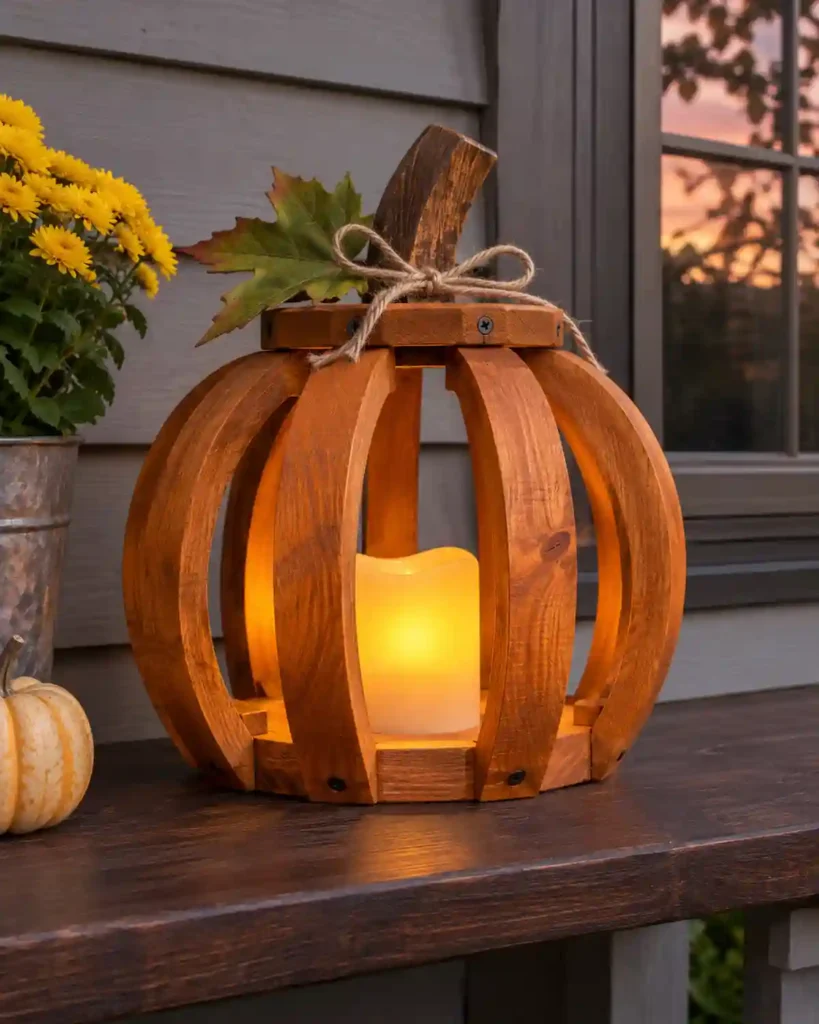
A wooden pumpkin lantern looks especially cozy as the evenings get darker. Slatted sides let warm light escape, giving you a softer effect than a solid painted block. Place one on a sheltered porch shelf for Halloween and keep it through Thanksgiving. It’s a lovely project for someone comfortable with careful assembly, but the light source matters.
Construct a ventilated, open-sided lantern from smooth wood slats and use a battery-operated LED light only. Leave access to the battery compartment and protect any electronics from moisture. The U.S. Fire Administration recommends flameless candles to avoid the risks of open flames near combustible materials. Never put a real candle inside a wooden lantern.
16. Small Tabletop Wood Pumpkin Pair
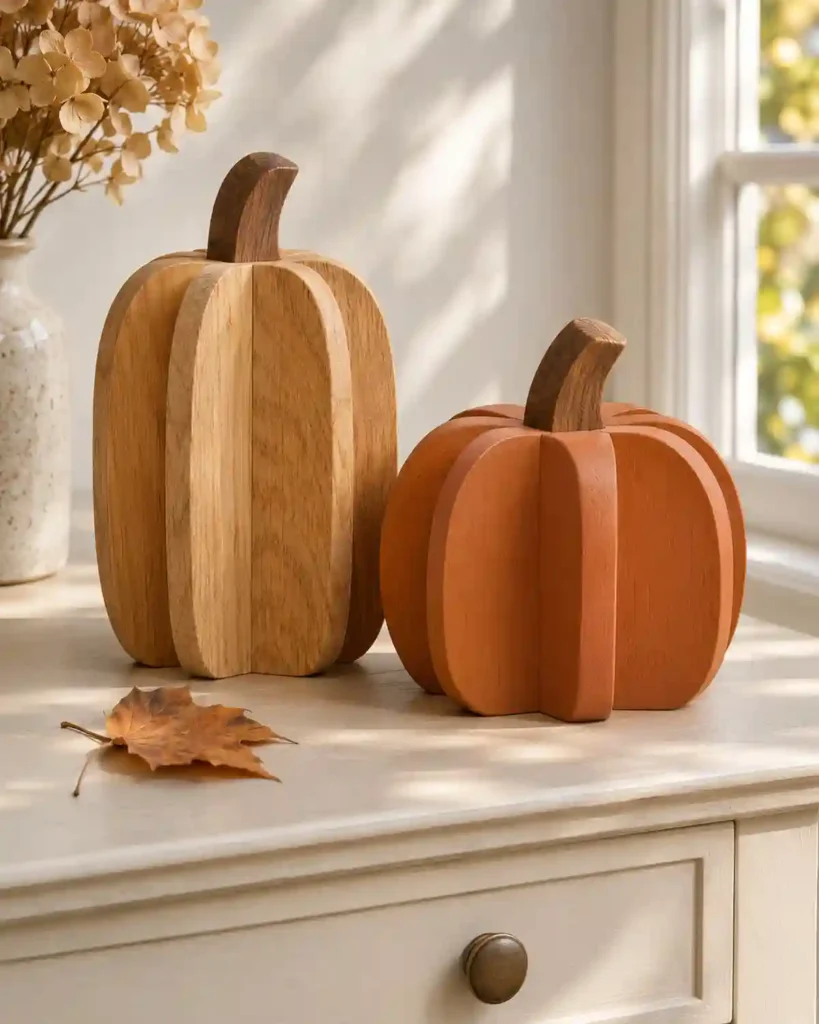
Sometimes two pumpkins are all a room needs. A small natural-wood pumpkin beside a painted terracotta one makes a side table feel seasonal without overwhelming it. It’s easier to move around than a larger centerpiece and works in apartments or small rooms. This is a good project when you have just a couple of pre-cut blanks.
Sand both pieces smooth, paint one, and leave the other lightly stained or natural. Keep their heights different for contrast and add matching twig stems. A small tray underneath can make the pairing feel intentional.
17. Can You Make Wooden Pumpkin Napkin Rings?
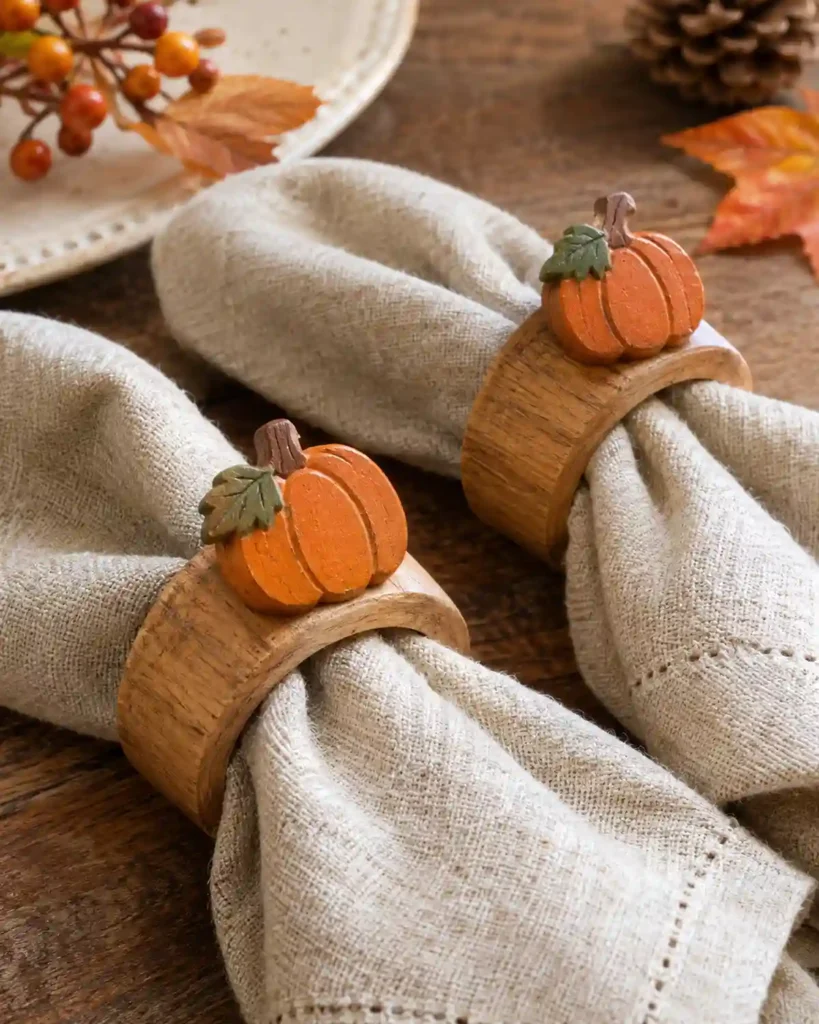
Tiny wooden pumpkin shapes are surprisingly effective on a Thanksgiving table. They add an autumn accent right where guests will notice it, without using more centerpiece space. Compared with bulky table decorations, these are easier to store and reuse. Make a matched set if you enjoy small, detailed crafts rather than sawing and building.
Attach smooth pre-cut pumpkin embellishments to plain reusable wooden napkin rings with an adhesive suitable for both materials. Let the glue cure fully and keep decorative coatings away from direct food contact. Pair them with the mini place cards from idea four.
18. Pumpkin-Shaped Wood Coasters
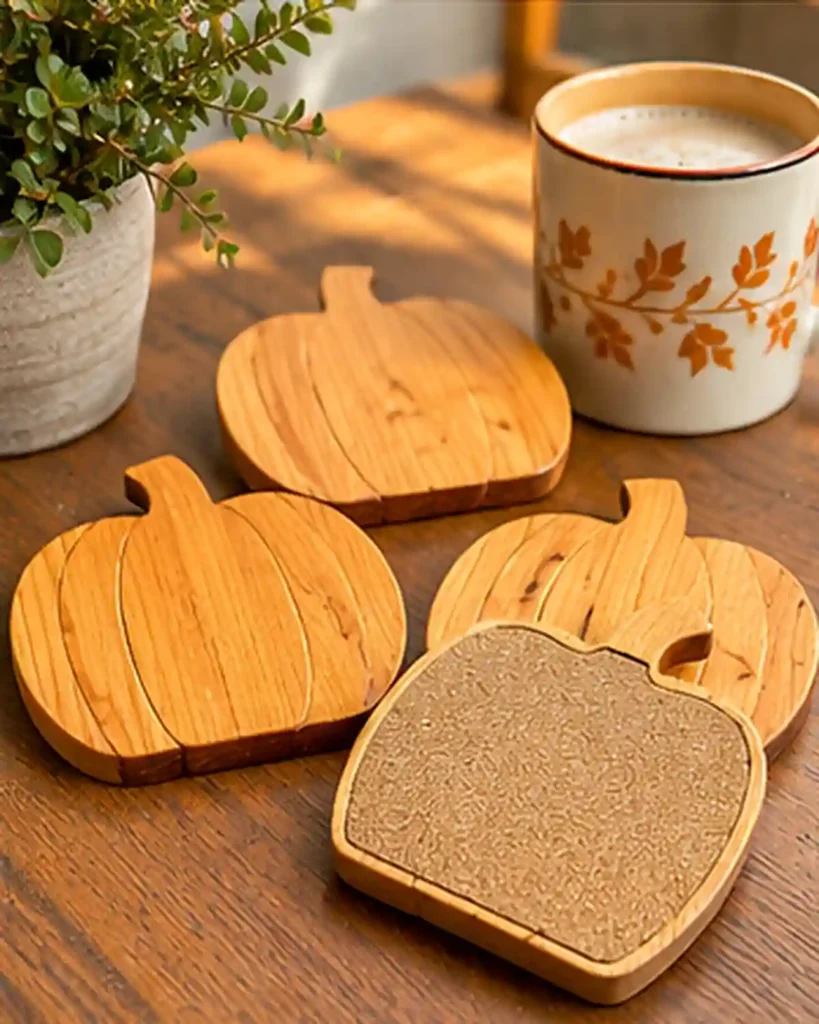
A set of pumpkin coasters gives fall decorating a practical side. They look good beside hot cider or coffee, and guests can actually use them instead of moving them out of the way. Add cork backing and the set becomes a thoughtful hostess gift. This is ideal when you want a small project with a clear purpose.
Start with four uniform pumpkin-shaped blanks. Smooth the edges, apply a moisture-resistant finish according to its instructions, and attach cork to the bottoms. Let everything cure before putting the coasters under drinks.
Which Pumpkin Painting and Seasonal Sign Ideas Are Worth Trying?
19. How Do You Paint Distressed Terracotta Wood Pumpkins?
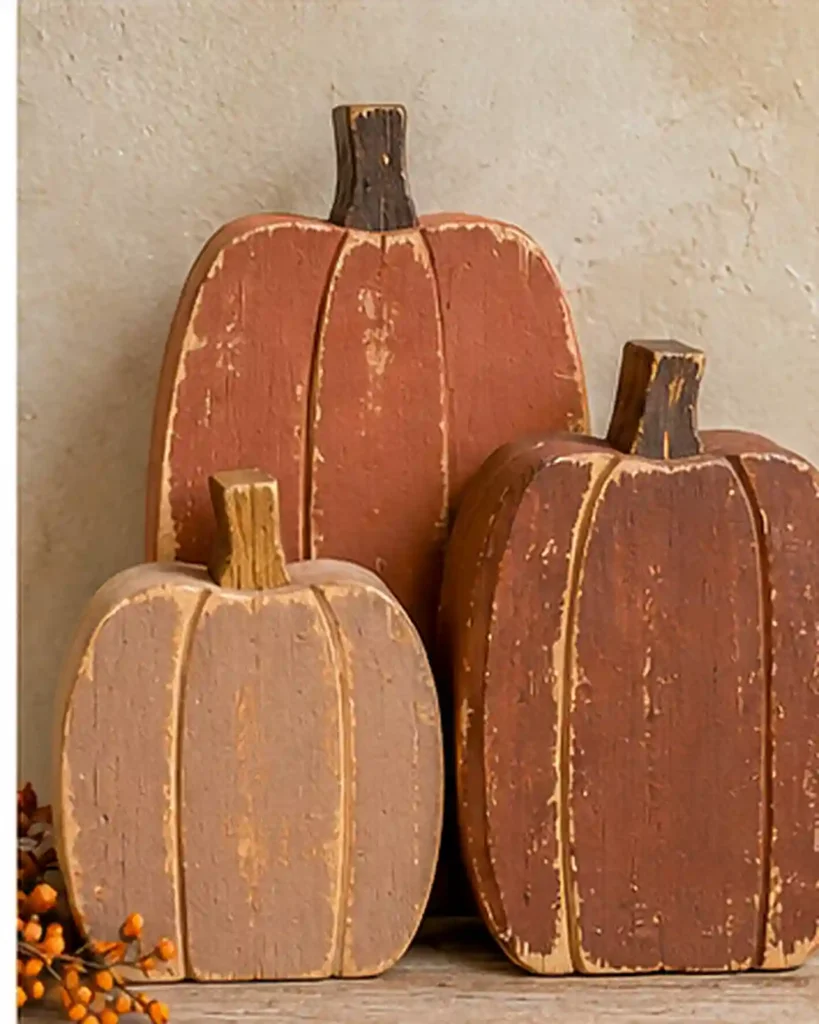
Terracotta paint gives wooden pumpkins a warmer, more earthy look than bright craft-store orange. A little sanding after painting brings out the edges and makes each piece feel handmade. Try these on a cream mantel with brown glass bottles or dried stems. It’s an easy upgrade for plain wooden blocks you already own.
Test a terracotta shade on scrap first, then apply two thin coats as directed. Once dry, lightly distress edges with sandpaper to expose the wood beneath. Stop early; too much sanding can make the finish look patchy instead of softly worn.
20. Buffalo-Check Painted Wood Pumpkins
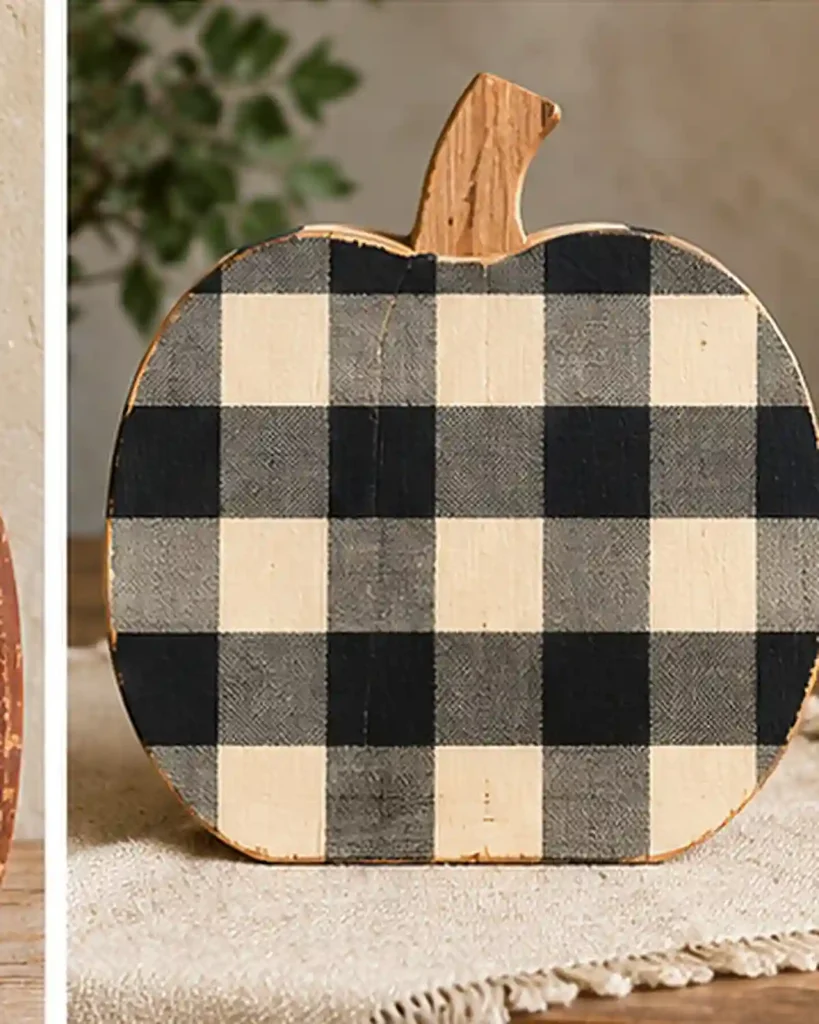
Buffalo check is a fun way to turn a simple flat pumpkin into a graphic fall accent. The black-and-cream grid stands out among natural wood and muted pumpkins, so you don’t need many of them. Put one on a shelf with plain pottery for a farmhouse look. This is a nice painting challenge if you enjoy careful measuring.
Paint a pale base, let it dry, then use painter’s tape and measured spacing to build the check pattern in layers. Remove tape according to the paint manufacturer’s instructions. Keep the stem natural to soften the strong pattern.
21. Can One Pumpkin Sign Work from Halloween to Thanksgiving?
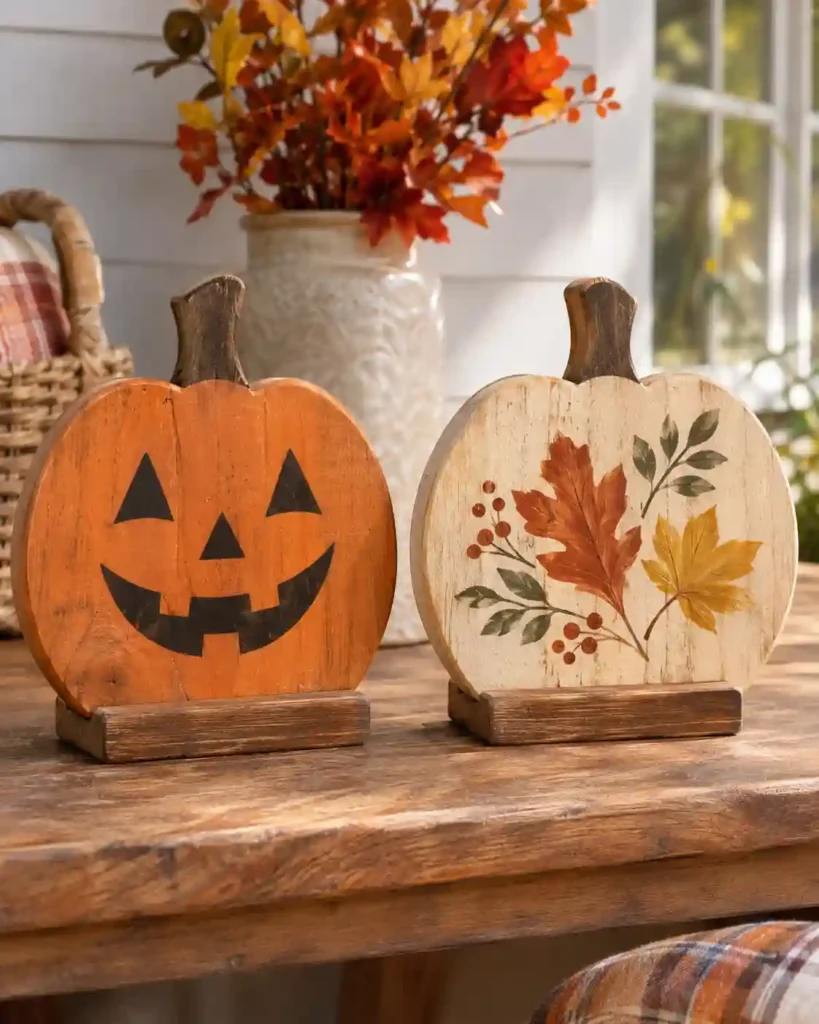
A reversible pumpkin sign saves you from changing every decoration when October ends. You can find more seasonal inspiration in these fall arts and crafts for additional ways to decorate and create throughout autumn. Put a gentle jack-o’-lantern face on one side and a simple leaf design on the other. Flip it over in November and the same piece feels fresh again. This is for anyone who loves seasonal decor but dislikes storing separate signs for every holiday.
Paint both sides of a smooth pumpkin-shaped plaque, allowing each coat to dry before turning it over. Fit a removable stand that holds the plaque securely either way. Use restrained colors so both designs work with the rest of your fall display.
What Are the Best Beginner, Budget, and Gift Projects?
Pre-cut pumpkin blanks, small wood cubes, coordinated gift sets, and personalized plaques offer craft options without complicated construction.
At a Glance
- Use smooth, pre-cut pieces for supervised family painting.
- Choose craft cubes when you don’t have a saw.
- Personalize a plaque or coordinate a gift set.
22. Kid-Friendly Pre-Cut Wood Pumpkin Painting
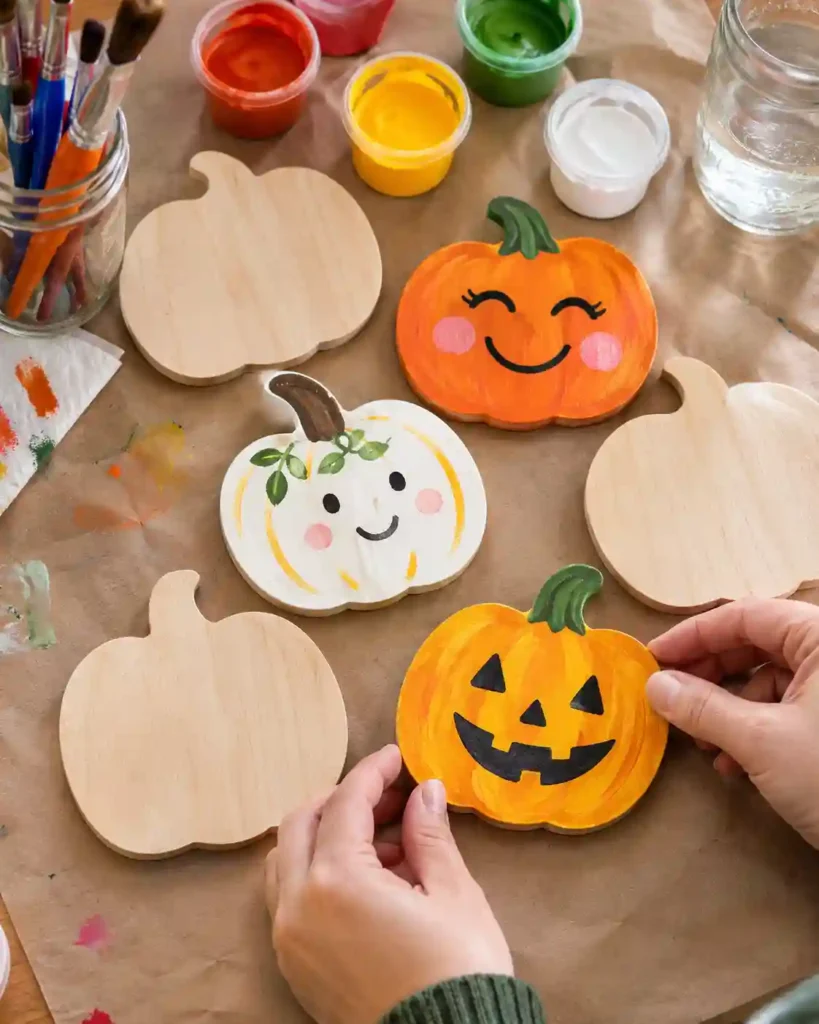
Pre-cut pumpkin blanks make family craft time much easier because the sharp-tool stage is already done. For more child-friendly seasonal activities, explore these fall kids crafts for creative projects to enjoy together. Children can concentrate on colors, faces, and simple patterns instead of construction. Lay out a protected table with a few paint choices and let every pumpkin look different. This is a good supervised activity for families who want a keepsake rather than a perfect finish.
An adult should check that all blanks are smooth and splinter-free. Use age-appropriate, water-based washable paint and supervise the activity; adults handle any drilling, cutting, or hot glue. Let the pumpkins dry completely before hanging or stacking them.
23. How Can You Make Budget Wood-Cube Pumpkins Without a Saw?
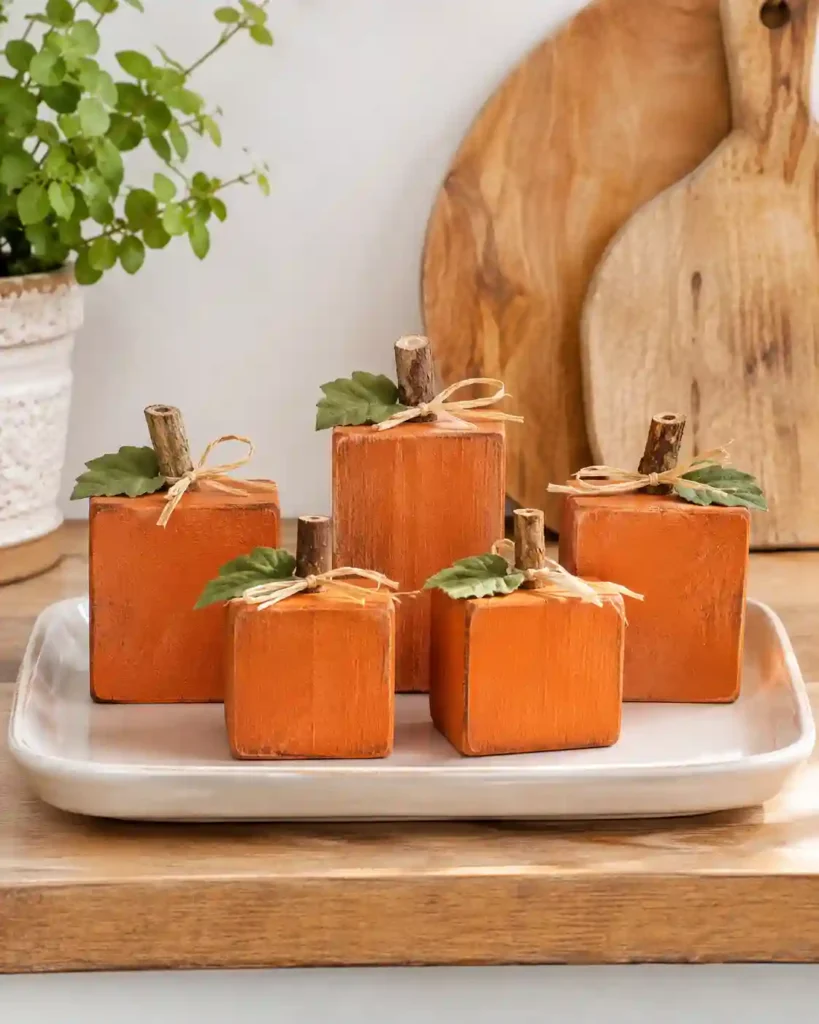
Small craft-store cubes can make a cheerful pumpkin cluster for very little effort. The shapes are already uniform, so the fun is in changing the colors and stems. Arrange five on a tray in a kitchen or home-office nook. If you want wood block pumpkins diy fall crafts without owning woodworking tools, start here.
Paint pre-cut cubes in several autumn shades, then attach short twig stems with an appropriate adhesive. Add tiny raffia bows to one or two rather than every cube. Stock and pricing vary, so use whatever plain wooden shapes you can find locally.
24. Coordinated Wooden Pumpkin Craft-Market Sets
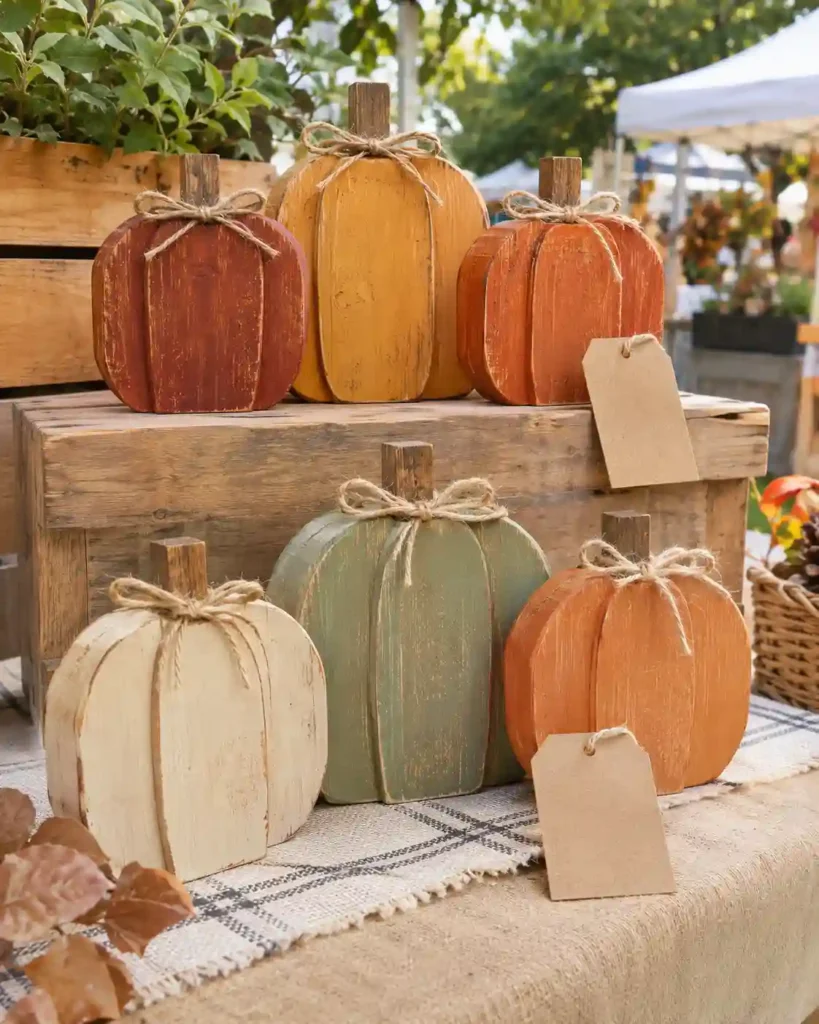
Matching pumpkin sets look more intentional than a table filled with unrelated pieces. Try making trios in two consistent palettes: warm oranges and soft neutrals. They’re easy to photograph as a group and can be packaged as autumn gifts. This idea fits crafters who enjoy repeating a process and keeping their finish quality consistent.
Standardize your sizes, sand all edges thoroughly, and keep a record of materials and time. Use suitable finishes, make honest product descriptions, and photograph each set in clear daylight. Test local interest before committing to a large batch; sales are never guaranteed.
25. How Do You Make a Personalized Family-Name Wood Pumpkin Plaque?
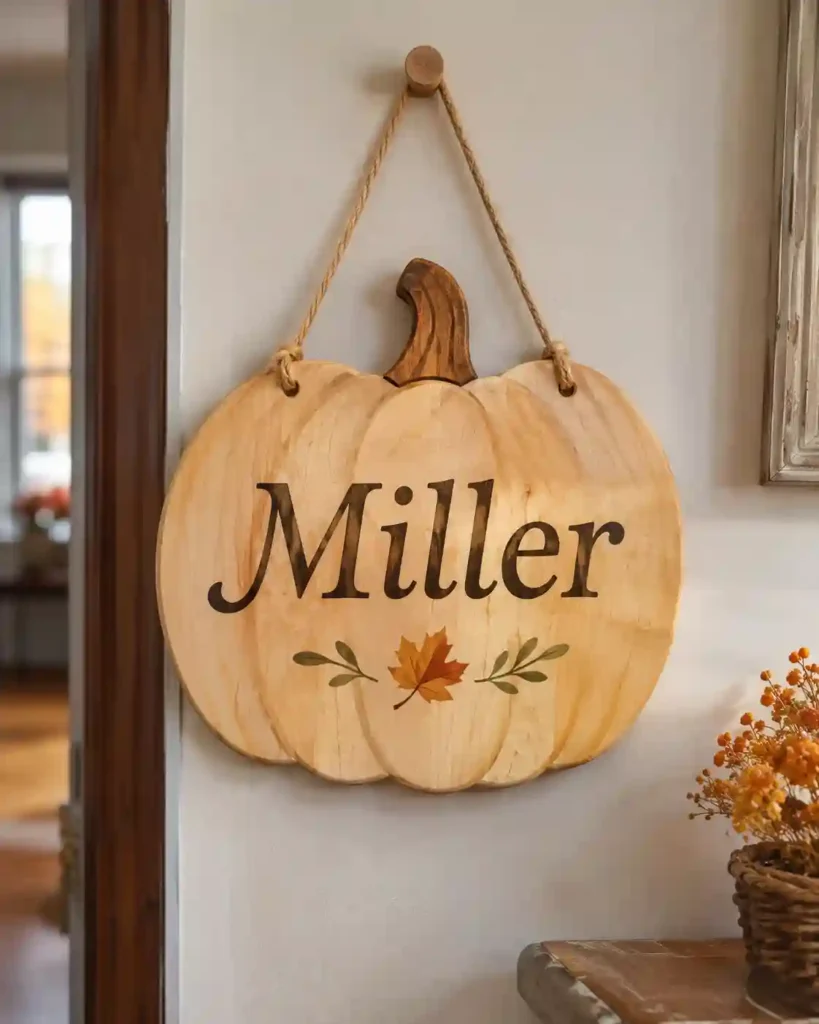
A name on a wooden pumpkin turns everyday fall decor into a personal gift. The design doesn’t need much: natural grain, neat lettering, and a tiny leaf detail can be enough. It works well in an entryway or tucked into a seasonal gift basket. Choose this project if you prefer careful painting over complicated woodworking.
Use a smooth pre-cut pumpkin plaque and mark the center lightly in pencil. Apply a stencil or hand-letter a name, then add a secure hanger and a compatible clear finish. Double-check spelling before painting, especially if you’re making the plaque for someone else.
What Supplies and Finishes Are Best for DIY Wooden Pumpkins?
Choose clean, dry wood; use paints and adhesives suited to the material; and protect outdoor decorations from moisture and sunlight.
At a Glance
- Sand safely and control airborne wood dust.
- Choose outdoor coatings for exposed decorations.
- Reject suspect salvaged boards and old painted finishes.
For indoor crafts, clean dry pine blocks, wood rounds, and smooth pre-cut plywood or craft blanks are convenient starting materials. Use paint or stain formulated for the wood and your intended use. If you’ll cut or sand, work with ventilation, dust collection where feasible, eye protection, and the protective equipment appropriate to your tools. Follow OSHA’s wood dust safety guidance to understand the risks of airborne wood particles and suitable workplace controls.
For outdoor pumpkins, choose wood suited to exterior conditions and use a compatible exterior coating on the faces, edges, and ends. According to the USDA Forest Service’s Wood Handbook, protecting wood from water, sunlight, and weathering is especially important outdoors. A sheltered spot and occasional finish touch-ups can help extend the life of the decoration.
Be careful with salvaged material. Old painted boards can contain hazardous coatings, and the U.S. Environmental Protection Agency (EPA) cautions that disturbing older lead-based paint through sanding or cutting can create dangerous dust. Avoid suspect painted or contaminated wood; don’t sand it just to see what’s underneath.
How Should You Style and Store Wooden Pumpkins?
Give each group a little breathing room. Two small pumpkins can sit on a sideboard, three chunky blocks can fill an entry table, and a flat sign works better than a freestanding stack on a narrow porch. Mix one painted finish with natural grain so the display doesn’t feel too coordinated.
When the season ends, wipe away dust with a suitable dry or lightly damp cloth, let pieces dry, and wrap delicate stems before packing them. Store indoor crafts somewhere dry; check outdoor pieces for loose attachments or worn finishes before displaying them again.
Frequently Asked Questions About wood pumpkins diy fall crafts
What wood works best for DIY wooden pumpkins?
Dry, easy-to-sand wood is a practical choice. Use 4×4 and 2×4 pieces for standing pumpkins, clean boards for larger signs, and smooth pre-cut blanks for paint-only crafts.
For wood slice pumpkins diy fall crafts, dry, pre-cut rounds are a convenient option.
Can you make wooden pumpkins without a saw?
Yes. Buy pre-cut wood cubes, rounds, or pumpkin-shaped blanks, then decorate them with paint, twine, and glued-on stems. Ideas 5, 22, and 23 are good starting points.
How do you make wooden pumpkins look rustic?
Start with a muted stain or thin whitewash. Once dry, gently sand a few edges, leave some natural grain visible, and add a simple twig stem instead of lots of embellishments.
Can DIY wooden pumpkins stay outside?
They can be displayed outdoors when the wood, finish, fasteners, and base are appropriate for the conditions. Place them securely, limit standing moisture, and inspect the finish from season to season.
What can you use for wooden pumpkin stems?
Short clean branches, wood dowels, and smooth wooden offcuts all work. Secure the stem to suit the pumpkin’s weight, and avoid sharp or splintered ends.
Final Thoughts
Creating DIY wood pumpkins is a simple and rewarding way to bring a warm, rustic touch to your fall decor. Whether you use painted wood blocks, reclaimed boards, wood slices, or handmade porch signs, each project offers a chance to add your own personality to your seasonal decorations. Start with an easy design, choose materials that suit your space, and experiment with colors and finishes that complement your home. Remember to follow basic safety precautions when cutting, sanding, or using salvaged wood. With a little creativity and a few simple supplies, you can make beautiful wooden pumpkins that brighten your home throughout autumn and can be enjoyed for many seasons to come.