


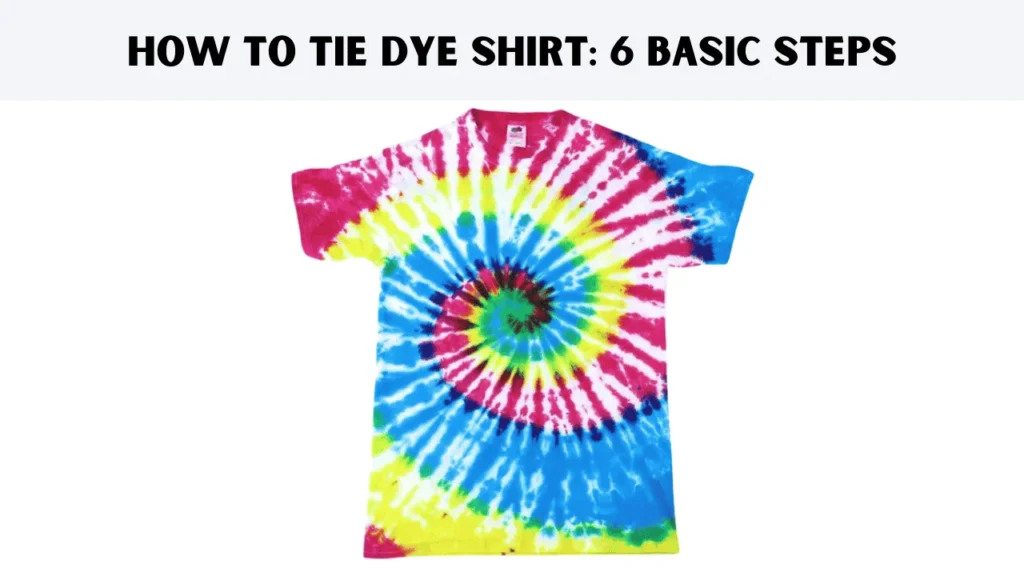
Ever wanted to make a tie dye shirt patterns that is unique and stylish? Tie-dye is all about turning plain fabric into bursts of color and creativity. The fun part is shaping the shirt in different ways. Twist, fold, or scrunch it, then tie it with rubber bands. After that, add dyes to create colorful designs! The tied spots resist the color, creating awesome designs like swirling spirals, zig-zag stripes, or even rainbow splatters. When you rinse and untie you’ve got a wearable work of art.
Tie-dye isn’t just messy fun it’s full of surprises. Try different techniques like crumpling the fabric for a nebula look, and folding it into triangles for sharp lines. You can even roll it up for a psychedelic swirl. Bright neon colors? Soft pastels? You decide! Every pattern is one-of-a-kind, just like your imagination.
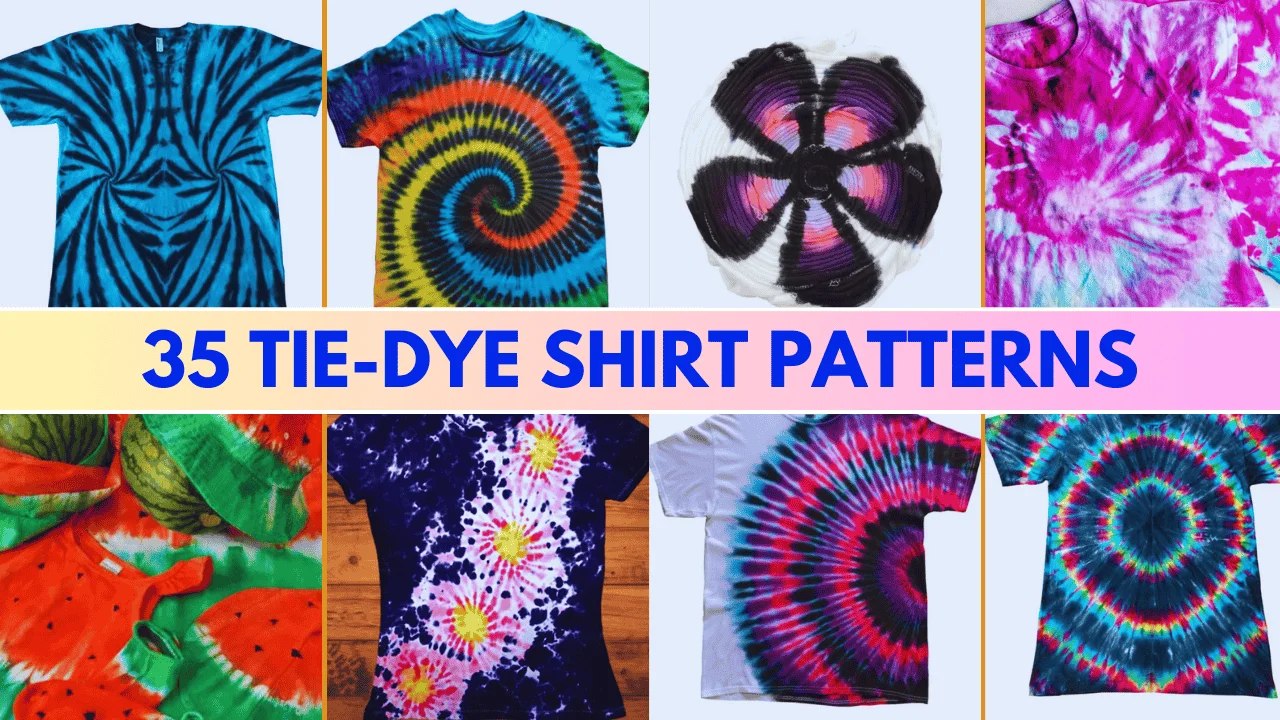
I’ve included 35 easy patterns to try, like hearts, and waves. Just follow the steps, and you’ll make shirts that wow your friends. No stress every pattern comes with simple instructions. Grab your kit, and choose a design. Let’s make magic with color.
In This Post
- What Are Tie Dye Shirts?
- What Materials You Need For Tie Dye Shirts?
- How to Tie Dye Shirt [6 Basic Steps]
- Tie-Dye Patterns and Folding Techniques
- Spiral Or Swirl Tie Dye Shirt
- Scrunch Or Crumple Tie Dye Shirt
- Bullseye Tie Dye Shirt Pattern
- Sunburst Design
- Horizontal Stripes
- Diagonal Stripes
- Vertical Stripes
- Square Box Folds
- Triangle Folds
- Mandala Aka Kaleidoscope Tie Dye Shirt
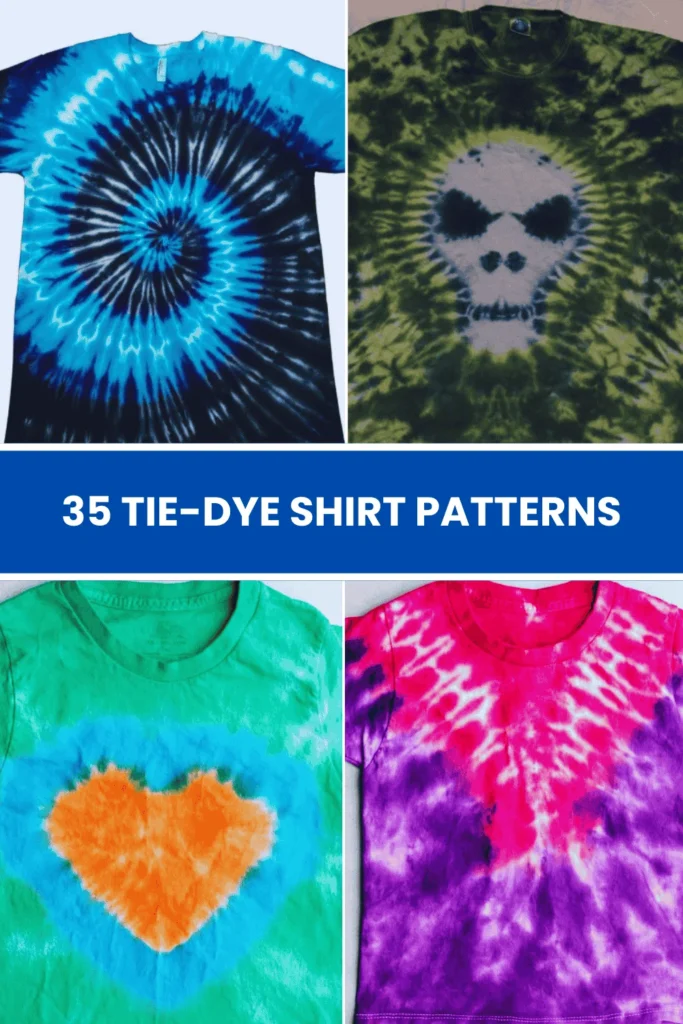
- Heart Tie Dye Shirt
- Rainbow Tie Dye Shirt
- Chevron Tie Dye Shirt
- Blue Lightning
- Ice Dye
- Pokemon Ball Design
- Heart Tie Dye Shirt Pattern
- Skull Tie Dye Shirt
- Yin Yang Design Tie Dye Shirt
- Watermelon Tie Dye Pattern
- Blooming Tie Dye
- Chain Links
- Spirograph Tie-Dye Pattern
- Wedge Wig-Wag Tie-Dye Pattern
- Ombre Tie-Dye Pattern
- Cherry Blossoms
- Complex Spiral
- Fan Fold Wig-Wag
- Ripple Peacock
- Peacock
- Black Hole
- Criss-Cross
- Shifting Spiral
- Diagonal Pleat Tie Dye Pattern
- Fireworks Tie Dye Shirt Pattern
- How To Choose Color Combinations For Tie Dye
- In Closing
- Frequently Asked Questions (FAQs)
What Are Tie Dye Shirts?
A tie dye shirt is a colorful shirt made by twisting and tying parts with rubber bands. Then, you add different dye colors to each section. When you untie it, the tied spots stay white or blend colors. This creates swirly, rainbow patterns. Each shirt turns out unique and fun.
What Materials You Need For Tie Dye Shirts?
Tie-dying a shirt is fun and colorful! To start, gather a white cotton shirt, fabric dye, rubber bands, gloves, plastic bags, and water. Different folding styles create unique patterns!
Here are the materials that you need for the tie dye shirt. Including –
1. White Shirt (100% Cotton): Choose a 100% cotton white shirt. White works best because colors look super bright on it. It is like drawing on blank paper! Dark shirts hide the colors. Cotton is best because it soaks up dye better than polyester. Cotton soaks up dye better than other fabrics like polyester, so the colors stay vibrant.
2. Tie-Dye Kit: The kit has special dyes made to stick to the fabric. Colors like red, and yellow mix to create cool patterns. It’s easy for beginners. Without dye, your shirt stays boring and plain.
3. Rubber Bands: These stretchy bands pinch and twist the fabric to create patterns. Where the rubber bands squeeze, dye can’t reach. With these, you’ll get cool stripes or circles!
4. Plastic Squeeze Bottles: These let you squirt dye exactly where you want it. Without them, the dye might spill everywhere and make a muddy mess instead of neat designs.
5. Plastic Gloves: Gloves keep your hands clean so you don’t walk around with rainbow fingers for days. Wear these to keep your hands from turning rainbow-colored
6. Plastic Table Cover/Garbage Bag: While tie-dying dye can drip and splatter! The plastic protects tables or floors from turning into a colorful disaster zone.
7. Plastic Wrap or Bags: Plastic wrap or a bag is also needed for making a tie-dye pattern. After you add the dye, wrap the shirt up. This keeps it wet so the colors can soak in better. It helps make the colors bright and bold. If it dries too fast, the colors might fade.
8. Laundry Detergent: For doing a tie dye you also need a laundry detergent. Washing the shirt with detergent removes leftover dye. With these colors stay bright and don’t bleed onto other clothes later.
How to Tie Dye Shirt [6 Basic Steps]
Here are the step-by-step instructions on tie dye shirt folding techniques with pictures. Including-
Materials That You Need For Tie Dye Shirts:
Here are the materials you need for your tie-dye shirts. Including –
- Procion Dye
- Rubber Bands
- Rubber Gloves
- Squeeze Bottles For The Dye
- Urea And Soda Ash
- Large Ziplock Bags
- A Tub For Soaking The Shirts
- Wooden Dowel Or Something Similar For Creating The Twist In The Shirt
- Funnel And A Measuring Curt
- Paper Towels And Paper Plates
Step 1: Soaking The Shirt
For tie-dying a shirt choose a 100% cotton white shirt. This type of shirt is best for tie-dying. You can even choose 50% cotton and 50% polyester.
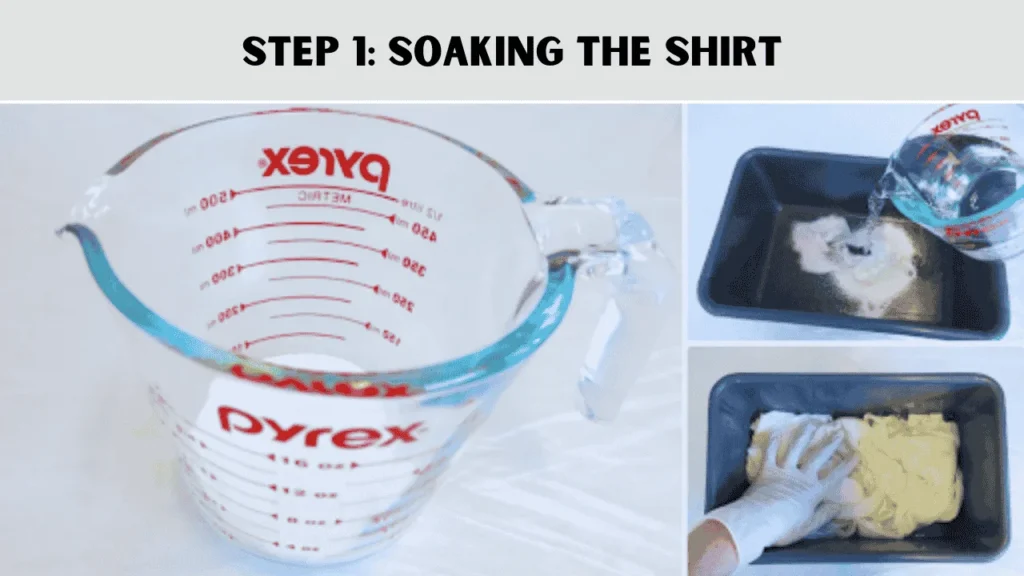
You need to soak it in a special solution to help the Procion dyes stick to the shirt. Mix warm water with soda ash to make the solution. Then, put the shirt in and let it soak for about 10 minutes. This helps the dye stay bright and last longer! After soaking, squeeze out all the water using a washing machine spin cycle so the dye sticks better.
If your shirt is brand new, wash it first to get rid of weird factory chemicals that stop the dye from working. Now your shirt is ready for dyeing.
Note: For soaking don’t use super hot or icy water keep it just right.
Step 2: Fold The Shirt According To Your Pattern
After socking the shirt into the water, place it on a table to do the pattern. There are lots of ways to fold and tie your fabric for tie-dye. Some patterns are super easy, while others are really detailed. You can twist and scrunch. Even you can fold the fabric in different ways. Each technique creates a unique and colorful design!

I will use the Rainbow Swirl Pattern. In this pattern, you need to place a dowel rod in the center of the shirt. You can even use your fingers or wooden clothespins. Now, start turning it in clockwise. Keep going until it looks like a flat pie shape. If you want you can also turn it counterclockwise.
Step 3: Join The Band
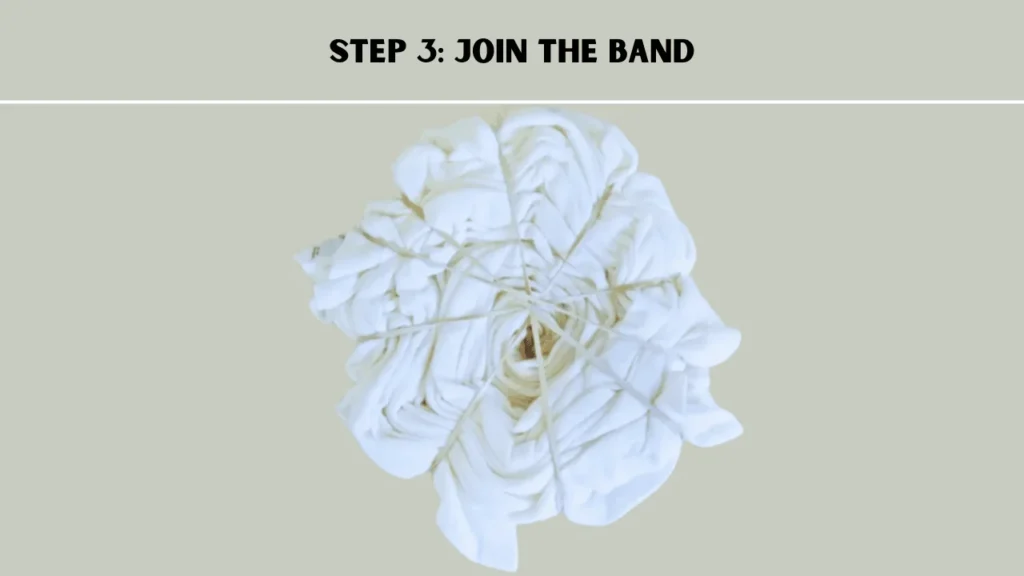
When you gain the space according to your pattern, then start putting rubber bands. Slide a few rubber bands onto the shirt and look at the picture. Then, flip the shirt over and add more bands. This helps it keep its shape while you dye it.
Step 4: Using The Dyes
When you start dyeing, make sure to cover your workspace with plastic. This helps protect the surface from getting messy. A plastic tablecloth works great for this.
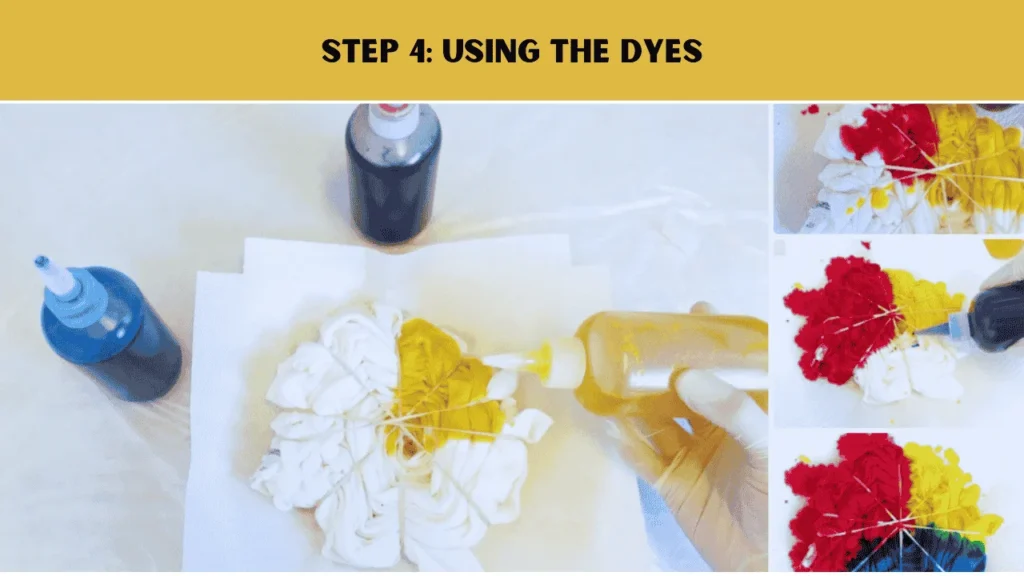
Put your shirt on top of a few paper towels. Then, place a paper plate under it. Make sure it’s all on your plastic-covered workspace to keep things clean.
You can add dye to fabric in lots of ways. Like squirting it with bottles, dipping the shirt in buckets. Even you can be painting it with brushes. Use as many colors as you want. If you mix the dye with more water, you’ll get lighter, softer shades.
Remember how colors mix in art class? If you put red next to yellow, they’ll blend into orange. Blue next to green makes teal! But if opposites like red and green touch, they might turn brown where they mix. So plan your colors like a rainbow puzzle.
Step 5: Let The Dye Set
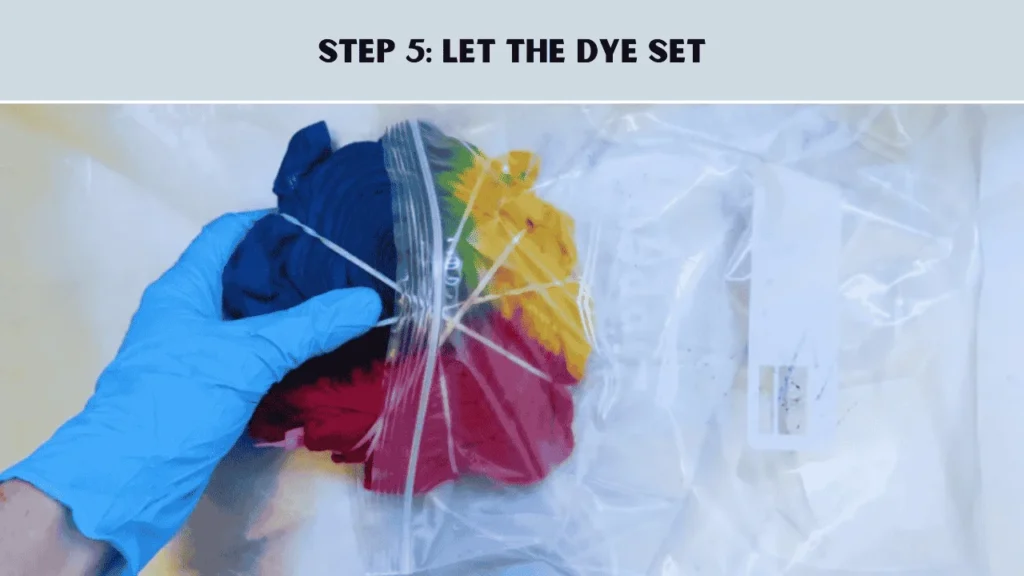
After you put the dye on the fabric, wrap it in a plastic bag or plastic wrap to keep it wet and warm. Put it in a sunny spot so the dye works on the fabric. Leave it there for at least 6-8 hours. If you want super bright colors, leave it for up to a whole day (24 hours). The sun helps the dye stick better.
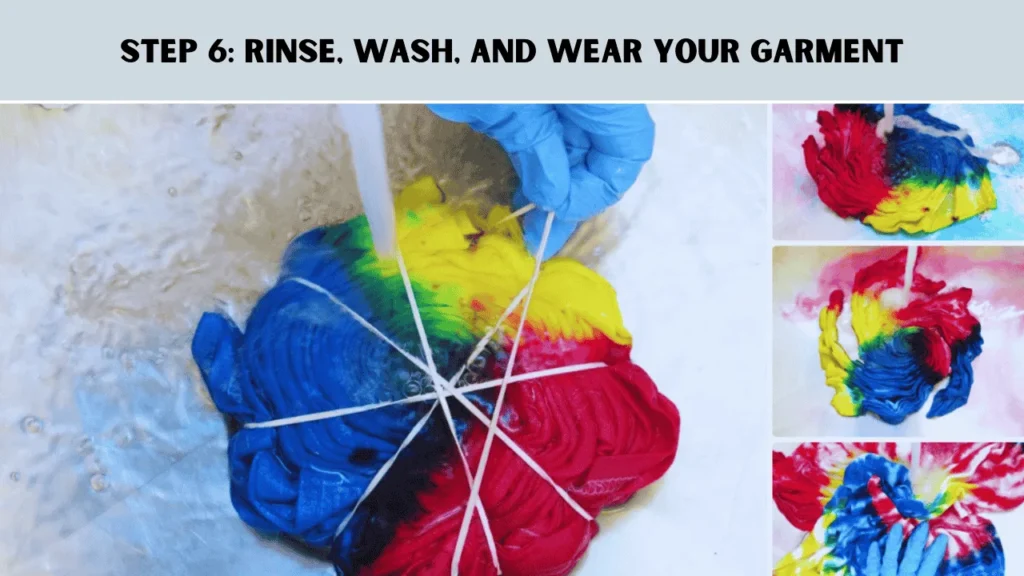
Step 6: Rinse, Wash, And Wear Your Garment
After you finish tie-dyeing, leave the rubber bands on and rinse your shirt under cold water first. Then switch to slightly warmer water. Take off the bands, and keep rinsing until the water isn’t colorful anymore.
Throw it in the washing machine with warm/hot water and a special soap called Synthrapol to lock in the colors. For the first wash, you can toss in other tie-dyed stuff if the colors are kinda similar just don’t mix too many or they might turn messy and dull.
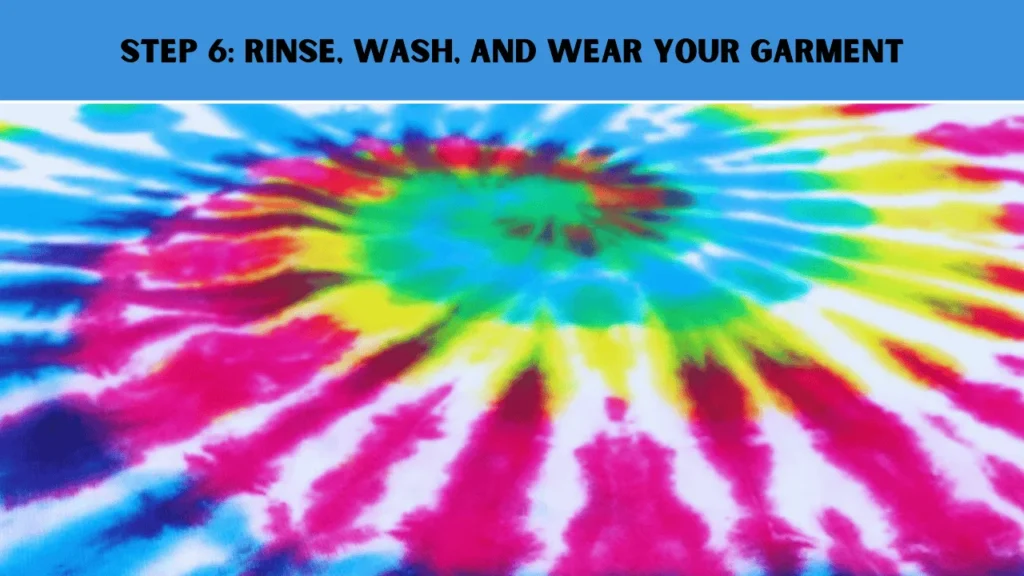
After that, wash your tie-dye stuff by itself a couple of times, and then you can finally toss it in with your regular laundry. Let your tie-dye shirt dye. Now, your tie-dye shirt is ready to wear.
Tie-Dye Patterns and Folding Techniques
Here are the top 35 tie dye shirt patterns with folding techniques. Including –
1
Spiral Or Swirl Tie Dye Shirt
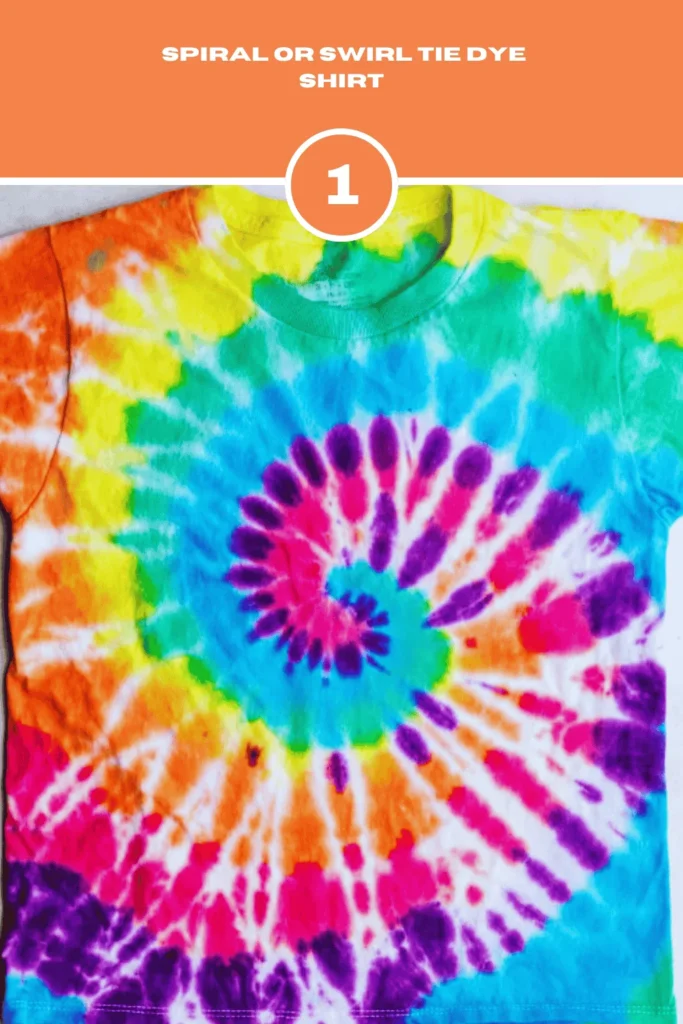
Spiral tie dye design is a cool pattern where you twist the fabric into a swirl, like a cinnamon roll! In this pattern, you will add bright dyes in rainbow colors. When you untie it, the colors burst outward in a spinning design. Each one is unique and looks like a colorful galaxy.
How to make a Spiral or Swirl tie dye shirt:
1. For making this pattern grab the very center of the shirt. Keep holding that part while turning the shirt to the right. Twist the shirt until it forms a spiral shape.
2. Then, wrap rubber bands around it like a star. Cross them over the middle. Hold them tight to keep some white areas.
3. Dye each section between the rubber bands with rainbow colors. After dying the shirt let the shirt sit overnight. Rinse it with cold water until the water runs clear. Then cut off the rubber bands.
2
Scrunch Or Crumple Tie Dye Shirt
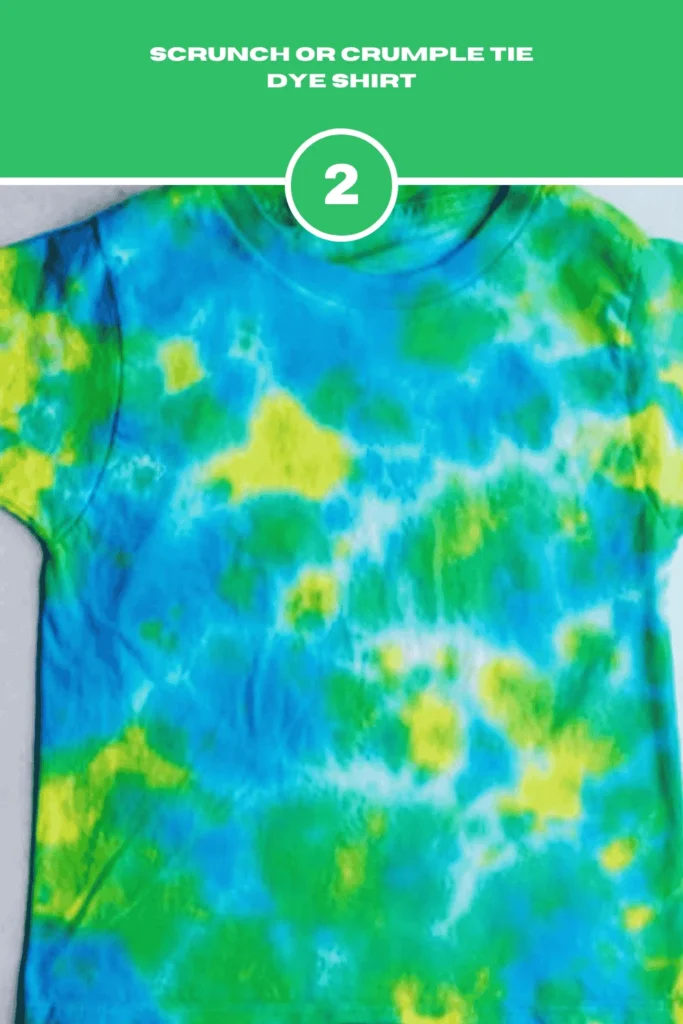
Scrunch tie dye shirt is made by crumpling fabric into a ball, and then dying it. Splash on dyes in random spots. Let it sit, rinse. The colors spread in wild, splattery shapes like a messy paint explosion or fireworks. Every scrunched design is one-of-a-kind! (Tie Dye Sweatshirts)
How to make a Scrunch or Crumple Tie Dye shirt pattern:
1. For making this dye pattern lay your shirt smoothly on a table. Then grab little parts of the shirt and scrunch them any way you want like crumpling paper. Keep squishing until it’s a flat, tight circle.
2. Wrap rubber bands around the squished shirt super tight like wrapping a present. The harder you squish, the more white spots you’ll see later in the tie-dye shirt.
3
Bullseye Tie Dye Shirt Pattern
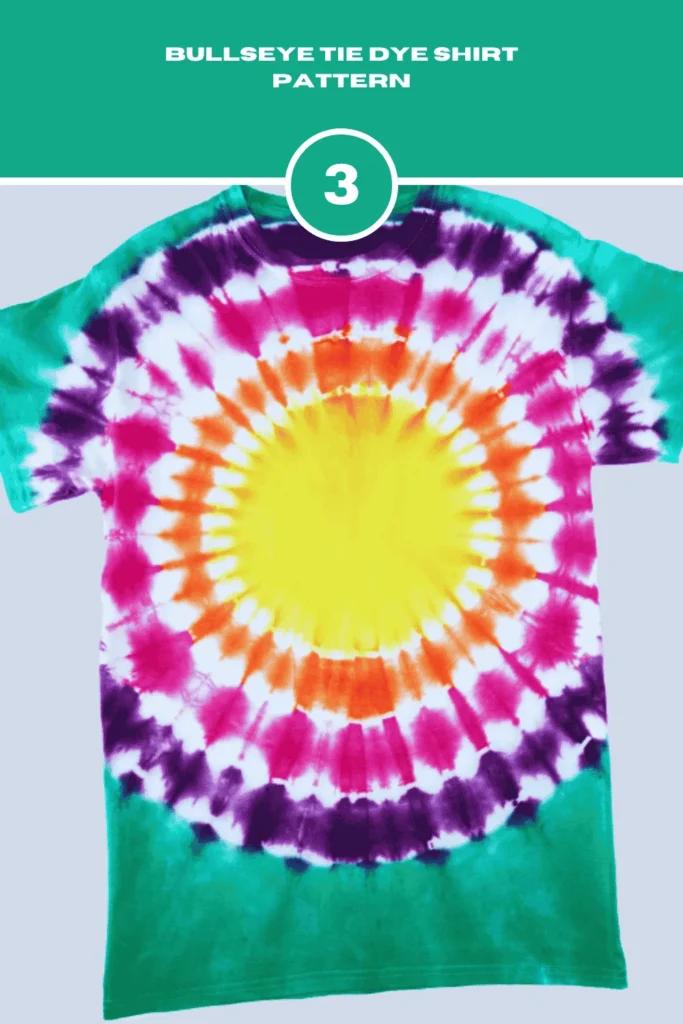
A Bullseye Tie Dye shirt has colorful circles that look like a target. Bright rings swirl out from the center, mixing colors like rainbow magic. Each layer blends into the next, creating a cool, eye-catching design.
How to make a Bullseye Tie Dye shirt Pattern:
1. Lay the shirt flat on a table.
2. Grab a tiny piece of fabric in the middle or pick a spot not in the middle if you want.
3. Pull that piece up to make a pointy shape, like an ice cream cone. Smooth the rest flat.
4. Wrap rubber bands around the cone, starting a little below the top. Add lots or a few.
5. To make stripes apply one color of dye. Then add another color. Keep switching to make stripes Let dry.
4
Sunburst Design
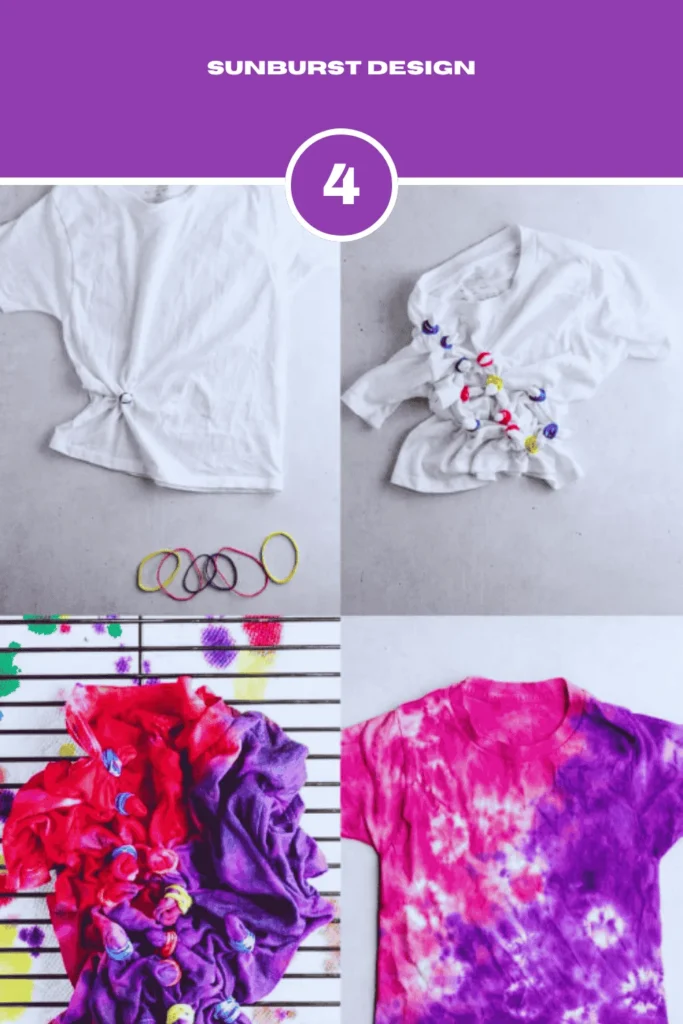
A Sunburst Design tie dye shirt looks like the sun’s rays bursting out from the center! Bright colors explode in all directions. The swirling lines make it seem like the shirt is glowing with energy. Each one is a bold, vibrant masterpiece that’s totally unique!
How to make a Sunburst Design Tie Dye Shirt Pattern
1. For making this dye pattern. First of all, put the shirt flat on a table.
2. Grab a tiny piece of fabric and pull it up to make a pointy cone shape.
3. Wrap a rubber band around the cone, a little below the tip.
4. Do this again. Grab another spot, and make a cone. Add a rubber band.
5. Make lots of cones all over the shirt!
6. Paint the shirt with one or two colors around the cones. Let dry and rinse.
5
Horizontal Stripes
A Horizontal Stripes tie dye shirt has colorful lines running left to right like a row of candy canes or a beach towel! Bold blues, sunny yellows, or bright pinks stack up neatly, creating a fun, tidy look. The stripes can be thick or thin, mixing shades for a cheerful style that pops!
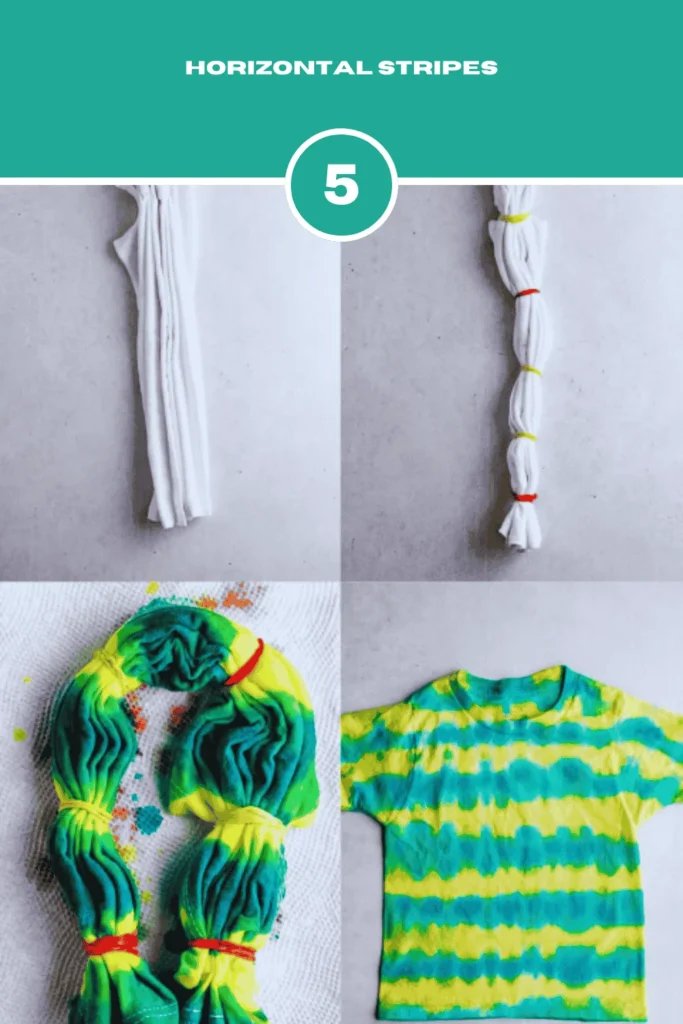
Here are the steps of making a Horizontal Stripes tie dye shirt pattern.
1. Lay the shirt flat on the table.
2. Fold the shirt like a paper fan. Fold 1 inch up, then 1 inch down. Do this over and over. Start from the sleeve.
3. Wrap rubber bands around the folded shirt every few inches.
4. Squirt different dye colors in each folded section to make stripes.
5. Let it dry, then rinse!
6
Diagonal Stripes
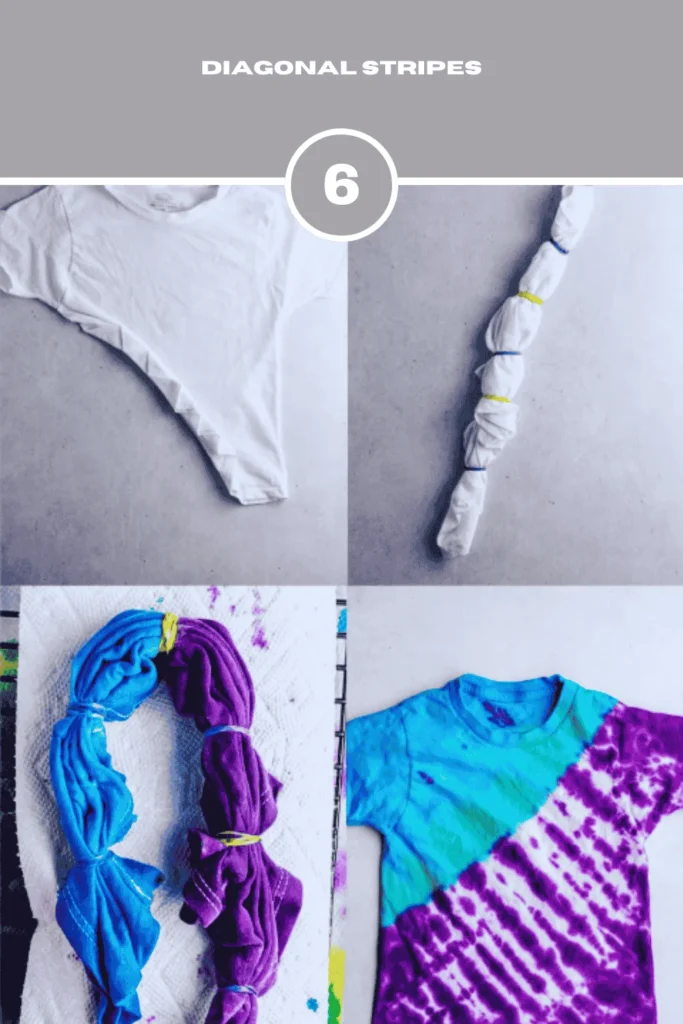
Here are the steps for making a Diagonal Stripes tie dye shirt pattern. Including –
1. Lay the shirt flat on the table.
2. Start at the bottom-left corner. Fold the shirt like a zig-zag fan: fold 1 inch up, then 1 inch down, all the way to the top.
3. Keep the sleeve folded neatly with the rest (it’s tricky, but just line it up!).
4. Wrap rubber bands around the folded shirt every few inches.
5. Squirt different dye colors in each folded section for stripes. Want blocks? Use one color per section!
6. Let dry and rinse. Your cool diagonal stripes tie dye shirt pattern is ready to wear.
7
Vertical Stripes

A vertical striped tie-dye shirt pattern has long, straight lines running from top to bottom. This tie dye shirt pattern makes the shirt look taller and stylish. It is a classic design found in casual and formal clothes. This gives a neat and cool look.
Here are the steps for making a Vertical Stripes tie dye shirt pattern. Including –
1. Lay the shirt flat on the table.
2. Start at the bottom edge. Fold the shirt like a paper fan. Fold 1 inch up, then 1 inch down. Repeat this over and over.
3. Wrap rubber bands around the folded shirt every few inches.
4. Squirt different dye colors in each folded section to make stripes.
5. Let it dry and rinse.
8
Square Box Folds
A square box fold tie dye shirt pattern has a design that looks like squares or small boxes. The folds create sharp lines, making the pattern neat and stylish. Different colors can fill the boxes, giving the shirt a bold look. This pattern is great for making eye-catching and unique designs.
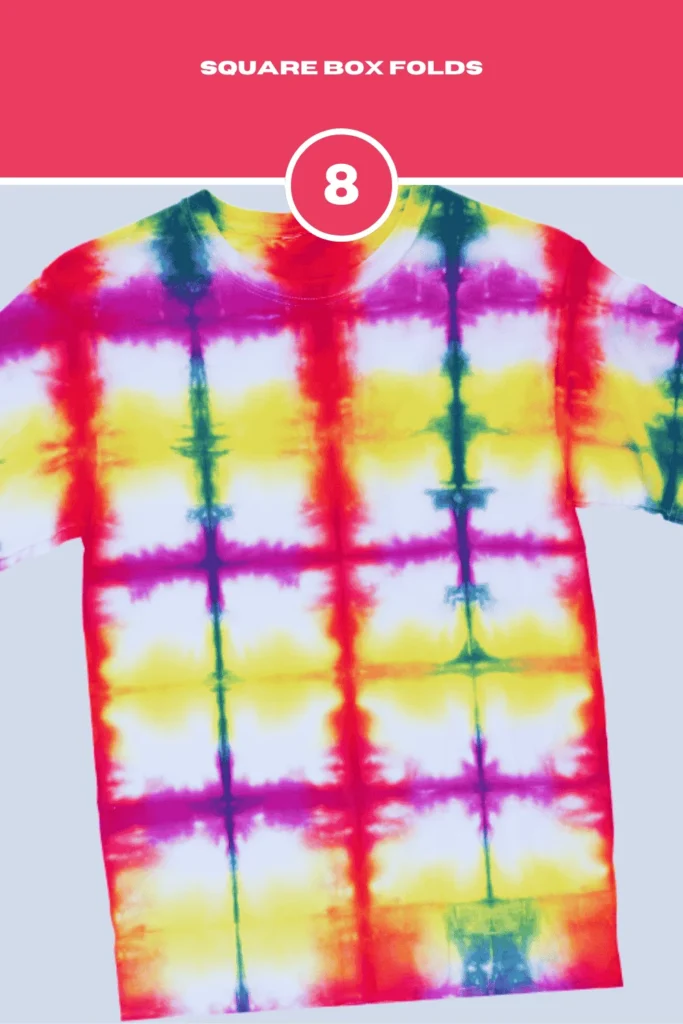
Here are the steps for making a Square Box Folds shirt pattern. Including –
- Lay the shirt flat on the table.
- Fold it like a paper fan sideways from left to right. This makes each fold as wide as your hand. Smooth the folds flat.
- Fold it up and down the same way as a smaller paper fan to make a square bundle.
- Squish the folded shirt between two small cardboard squares. Wrap rubber bands tight around them.
- Dip the whole bundle in dye, or squirt dye on the edges and push lots of color in so it soaks through.
- Let it dry, and rinse. Your cool criss-cross patterns are ready.
9
Triangle Folds
A triangle fold tie dye shirt pattern has shapes that look like triangles all over the fabric. The colors mix in cool ways. This makes sharp lines and bold designs. In this tie dye shirt pattern, some triangles may be big, while others are small. This pattern gives the shirt a creative, and eye-catching look.
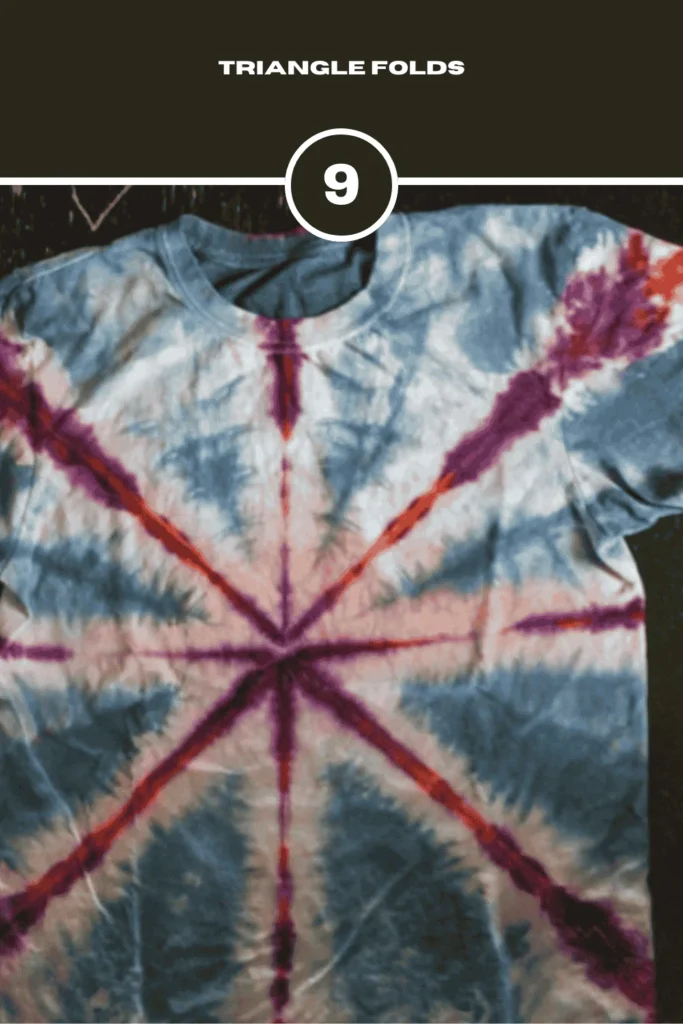
Here are the steps for making a Triangle Folds tie dye shirt pattern. Including –
- Lay the shirt flat on the table.
- Fold it sideways like a paper fan. Make each fold about as wide as your hand. Press hard to make sharp lines.
- Now fold it into triangles: Fold a corner up, then fold back at a slant like a paper airplane. Keep folding until it’s a triangle shape.
- Cut two cardboard triangles. Squish the folded shirt between them. Wrap rubber bands tight around everything.
- Dip the whole bundle in dye OR squirt dye on the edges use lots so it soaks in.
- Let dry and rinse.
10
Mandala Aka Kaleidoscope Tie Dye Shirt
A mandala also called a kaleidoscope tie dye shirt pattern, looks like a colorful, swirling design with many shapes. It has a center that spreads out in circles, like a flower or a spinning wheel. The colors blend in a cool way, making the shirt look bright, bold, and full of energy.
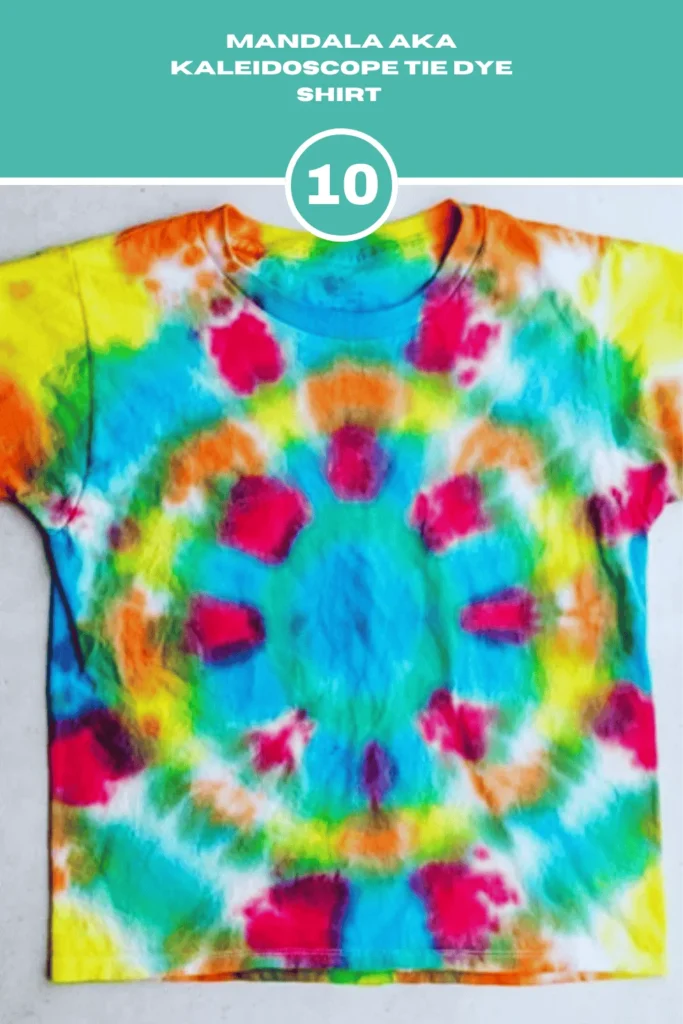
Here are the steps for making a Mandala aka Kaleidoscope Tie Dye shirt pattern. Including –
1. Put the shirt flat on a table.
2. Fold it in half longways like a hot dog bun. Then fold it in half short ways like a hamburger. Now it’s a small square.
3. Fold it corner-to-corner to make a triangle. Fold it corner-to-corner again to make a tiny triangle.
4. Wrap rubber bands around the folded triangle to hold it tight.
5. Squirt different dye colors all over the folded parts. The colors will mix in cool ways.
6. Let it dry and rinse.
Note: Don’t peek until it’s dry.
11
Heart Tie Dye Shirt
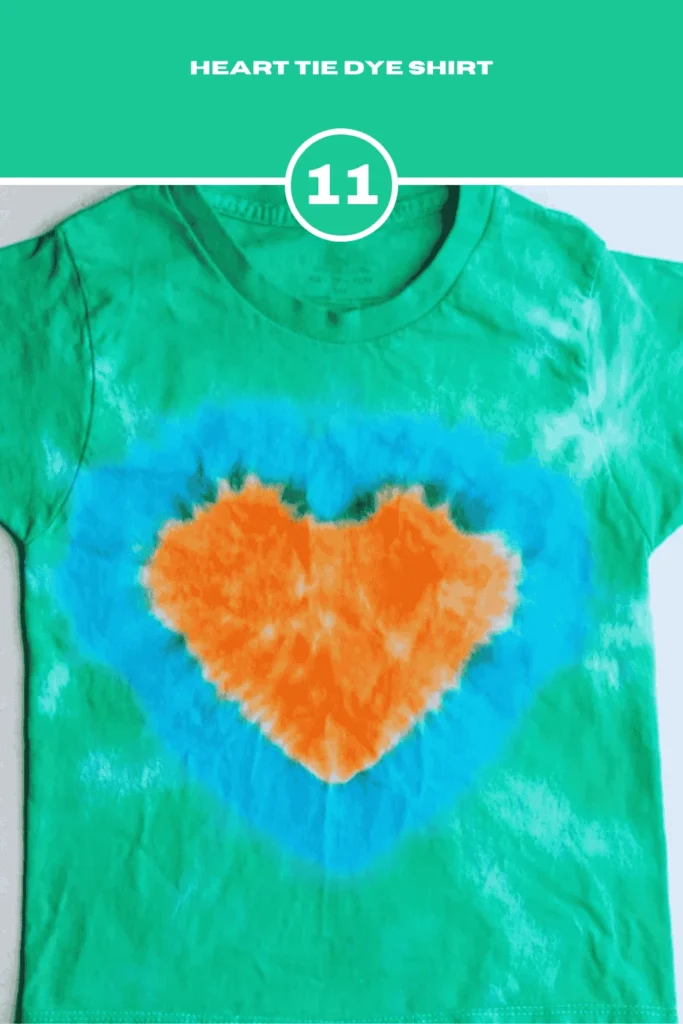
A heart tie dye shirt pattern has a big heart shape in the center of the shirt. The heart stands out with bright colors, while the rest of the shirt has cool swirls or lines. Different colors can make the heart pop, giving the shirt a fun, bold, and creative look.
Here are the steps for making a Heart tie dye shirt pattern. Including –
1. Lay the shirt flat on a table. Fold it in half longways like a hot dog bun.
2. Draw half a heart shape along the folded edge with a marker. It’ll wash off later.
3. Fold the shirt like a paper fan along the heart line. Outer folds are bigger, and inner folds are smaller to follow the curve.
4. Wrap a thick rubber band around the middle of the folded fan. Add more bands above or below if you want!
5. Squirt dye colors all over the folded parts. Use lots so the color soaks in!
6. Let it dry, and rinse. Don’t peek till it’s dry.
12
Rainbow Tie Dye Shirt
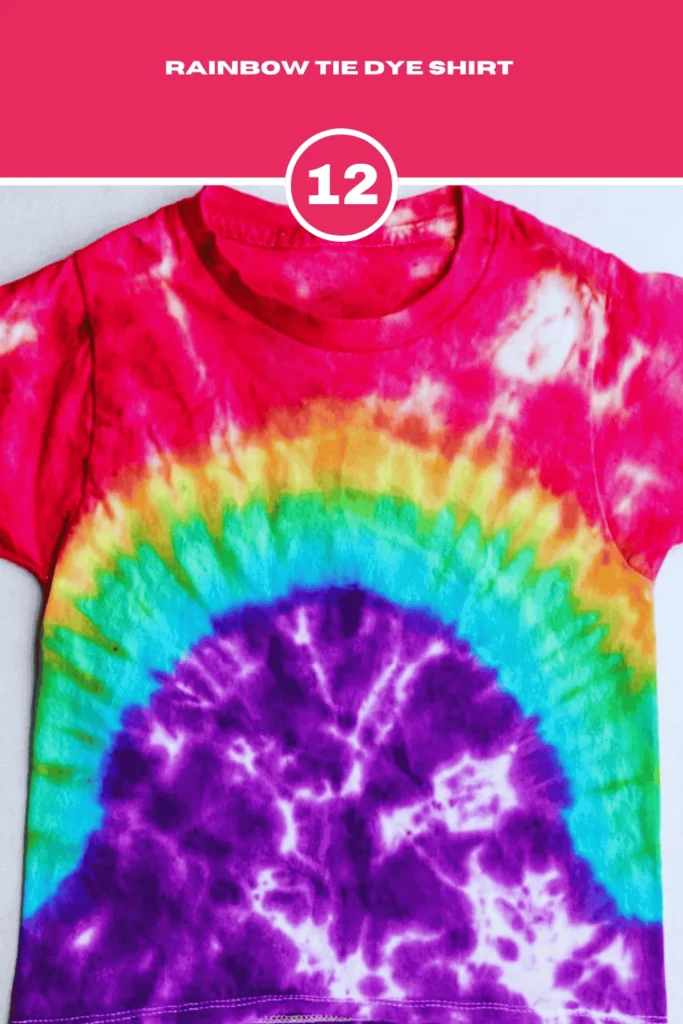
1. Fold the white shirt hot-dog style. Draw half a rainbow (like an arch) on the folded edge with a washable marker.
2. Starting at one end, fold the fabric back and forth along the rainbow line. Make deeper folds on the outside and smaller folds on the inside to keep the rainbow straight. Wrap a thick rubber band around the middle of the folded fan.
3. Squirt dye in ROYGBIV order and let it sit overnight in a plastic bag.
13
Chevron Tie Dye Shirt
1. To make the Chevron Tie Dye shirt pattern you need to fold the shirt in half lengthwise. Draw half a V-shape on the folded edge with a washable marker. Fold the fabric back and forth along the V-shape line. Keep the marker line straight on top. Tie them with rubber.
2. Squirt 1–2 colors all over and use different colors in small stripes. Let it sit overnight in a plastic bag. Rinse with cold water until the marker washes off. Let it dry.
14
Blue Lightning
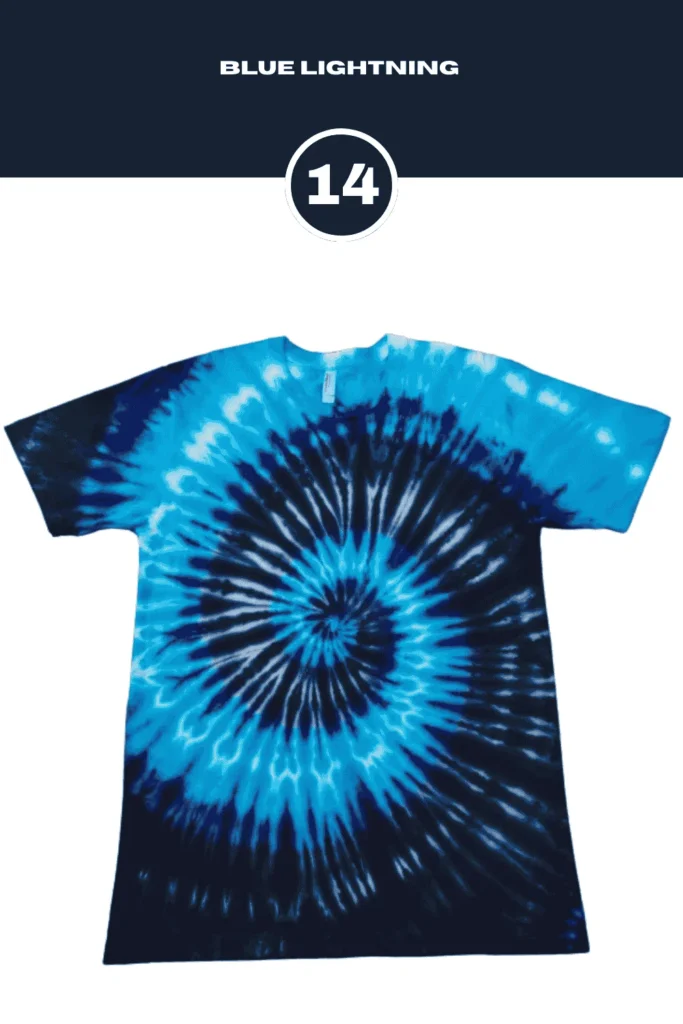
1. To make this pattern lay your white shirt flat. Fold it back and forth like a fan, then twist it into a zig-zag shape. Wrap rubber bands around the folded shirt to hold the zig-zag shape.
2. Squirt sky blue dye on one end and dark navy blue on the other. Squirt sky blue dye on one end and dark navy blue on the other.
15
Ice Dye
Ice-dye tie dye shirts have colorful, dreamy patterns made by melting ice and powdered dye on fabric. The colors blend beautifully, creating unique designs with soft, watercolor-like effects. Every shirt looks different!

1. To make an ice dye pattern scrunch a damp white shirt into a loose ball. Secure it with rubber bands. Place the shirt on a rack or tray. Pile ice cubes all over it until it’s covered.
2. Shake powdered dye onto the ice. Let it sit overnight. Rinse with cold water until the water runs clear.
Tips: Use a spray bottle with water to help the dye spread if the ice melts too fast.
16
Pokemon Ball Design
A Pokemon ball tie dye shirt pattern looks like a colorful Pokemon ball with red, white, and black colors. The design is fun and playful, perfect for Pokemon fans who love bold, bright shirts.
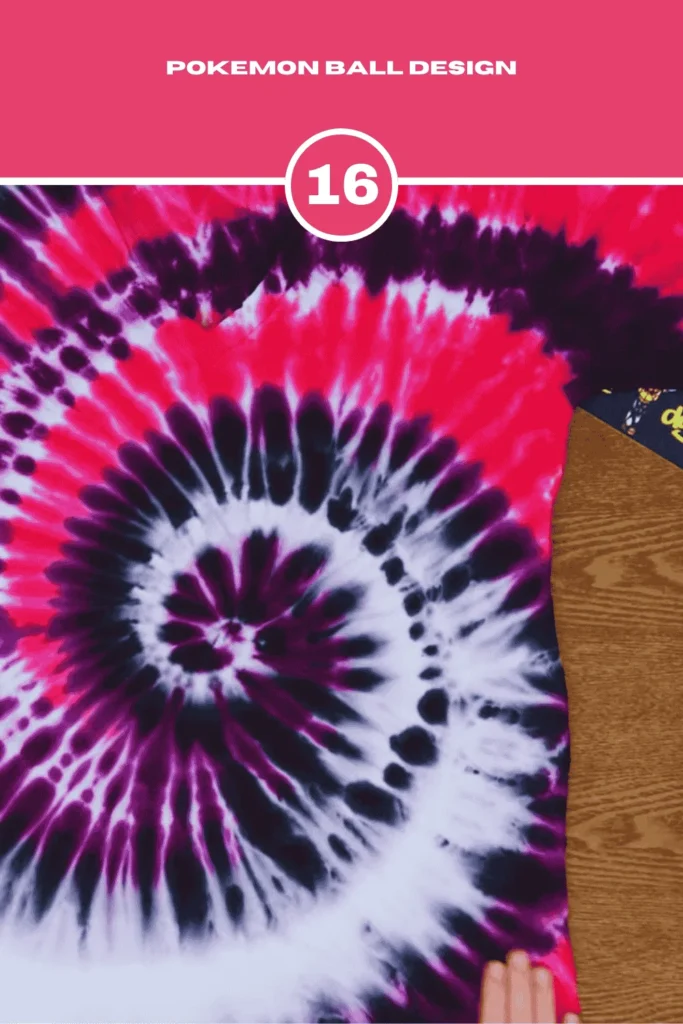
Here are the instructions for making this tie dye shirt pattern.
1. Fold the top half of the shirt down to the middle. This will create the red top part of the Poke Ball. Wrap a rubber band tightly around the middle of the shirt.
2. Squirt red dye on the top folded section and black dye on the rubber band in the middle. Leave the bottom half white.
3. Let it sit for 6–8 hours so the colors set. Rinse the shirt in cold water until the water runs clear.
17
Heart Tie Dye Shirt Pattern
A heart tie dye shirt pattern has a heart shape in the center, surrounded by colorful swirls. The bright colors make the heart stand out, creating a fun, bold, and loving design.
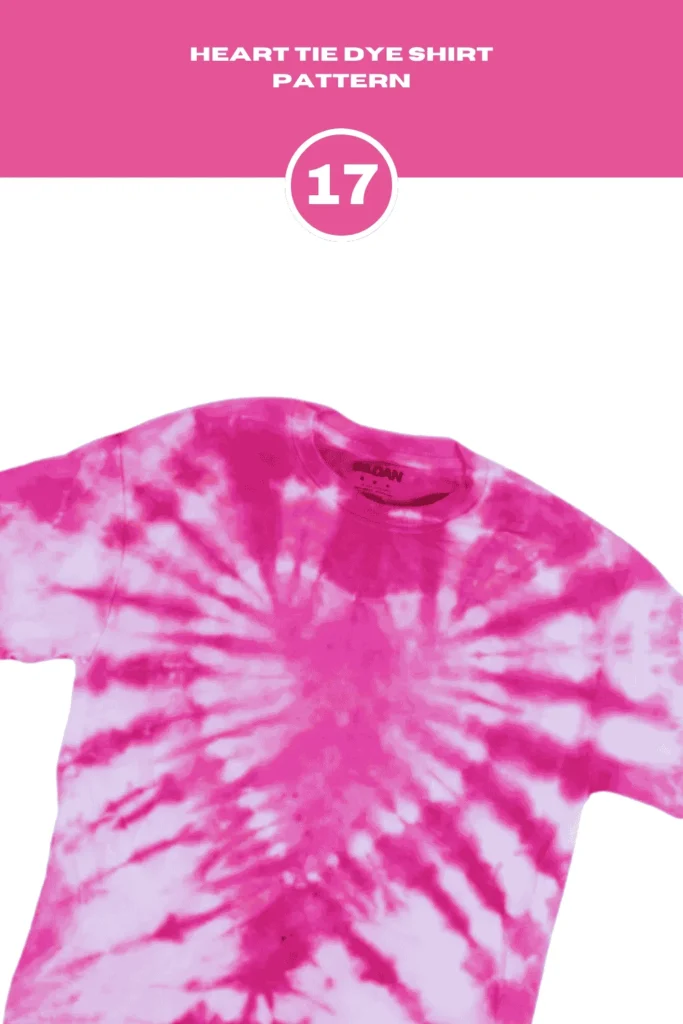
Here are the instructions for making this tie dye shirt pattern.
1. Lay the shirt flat on a table. Start at the bottom fold pinch the fabric about 2 inches up to make a V shape. Fold the top left and right sides toward the back to make the heart curves
2. Wrap rubber bands around the heart shape. Put one in the middle and a few near the top curves. Squirt red dye on the bottom half of the heart and pink dye on the top half. Let the colors mix a little at the edges.
3. Let it sit for 6–8 hours (or overnight). Rinse the shirt in cold water. Keep rinsing until the water runs clear.
18
Skull Tie Dye Shirt
A skull tie-dye shirt pattern features a skull design made with bold, dark colors. The pattern looks edgy and cool, with vibrant colors blending around the skull to create a striking, unique look.
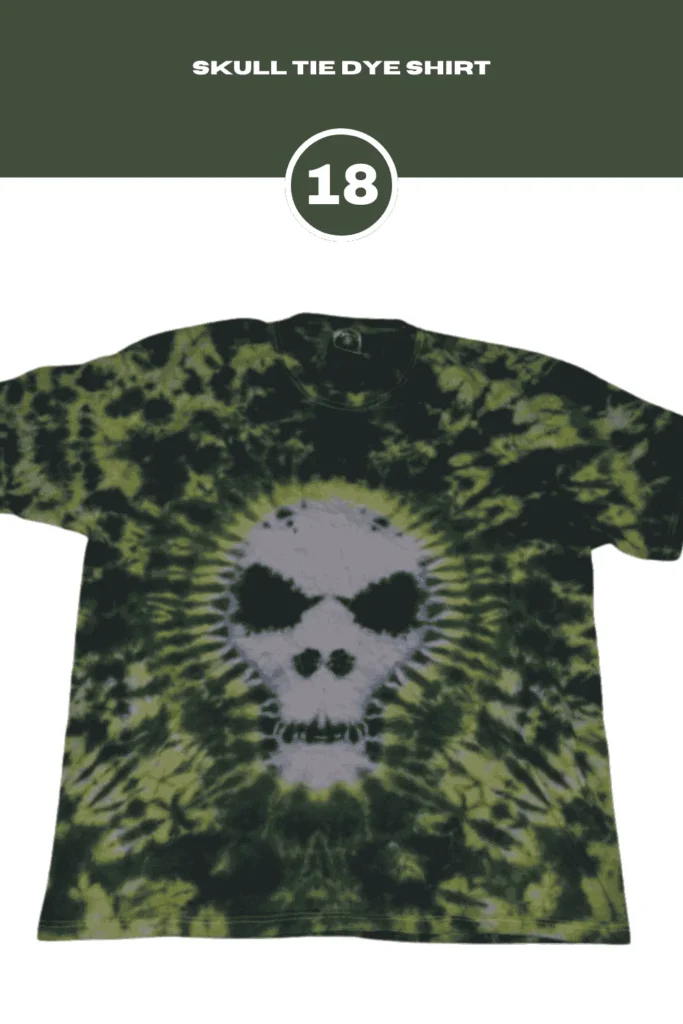
Here are the instructions for making this unique tie dye shirt pattern. Including
1. Spread a white shirt on a table. Use chalk to lightly draw a skull shape. Pinch the fabric inside the skull outline and twist it into a tight ball. Wrap rubber bands around it to keep it squished.
2. Dye the Background and let the dye soak for 6 hours. Rinse with cold water until it runs clear.
19
Yin Yang Design Tie Dye Shirt
A yin-yang tie dye shirt pattern has two colors that swirl together in a circular shape. The design represents balance, with one side dark and the other light, creating a cool, peaceful look.
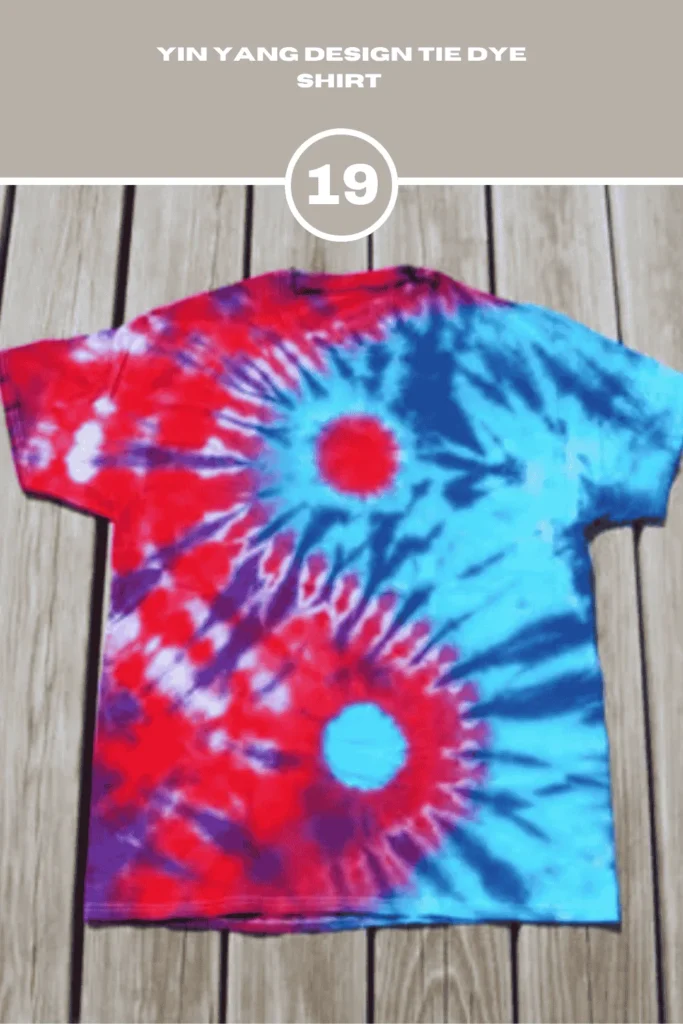
Here are the instructions for making this tie dye shirt pattern.
1. Lay the shirt flat. Pinch the center and twist slowly into a tight spiral. Bend the spiral into an S-shape. Pinch the middle to hold it and wrap 2 rubber bands around the S-shape.
2. Dye the halves and wrap the shirt in plastic or a bag. Let it sit overnight. Rinse under cold water until water runs clear.
20
Watermelon Tie Dye Pattern
A watermelon tie-dye shirt pattern looks like a juicy watermelon with red, green, and white colors. Black spots can look like seeds, making the design fun, bright, and perfect for a fresh, playful look.

Here are the instructions for making this tie dye shirt pattern.
1. Lay the shirt flat. Fold it diagonally into a triangle. Starting at the curved edge roll the shirt tightly toward the point. Stop halfway this makes the watermelon rind.
2. Wrap 2–3 rubber bands around the rolled part to hold the rind in place. Now, Squirt green dye on the rolled edge and pink/red dye on the flat part of the inside of the wedge. Use the black dye bottle tip to dot tiny seeds on the pink part.
3. Let it sit overnight and rinse.
21
Blooming Tie Dye
A blooming tie-dye shirt pattern looks like a flower opening up. The colors spread out in soft, flowing layers, creating a bright, beautiful, and eye-catching design that stands out.
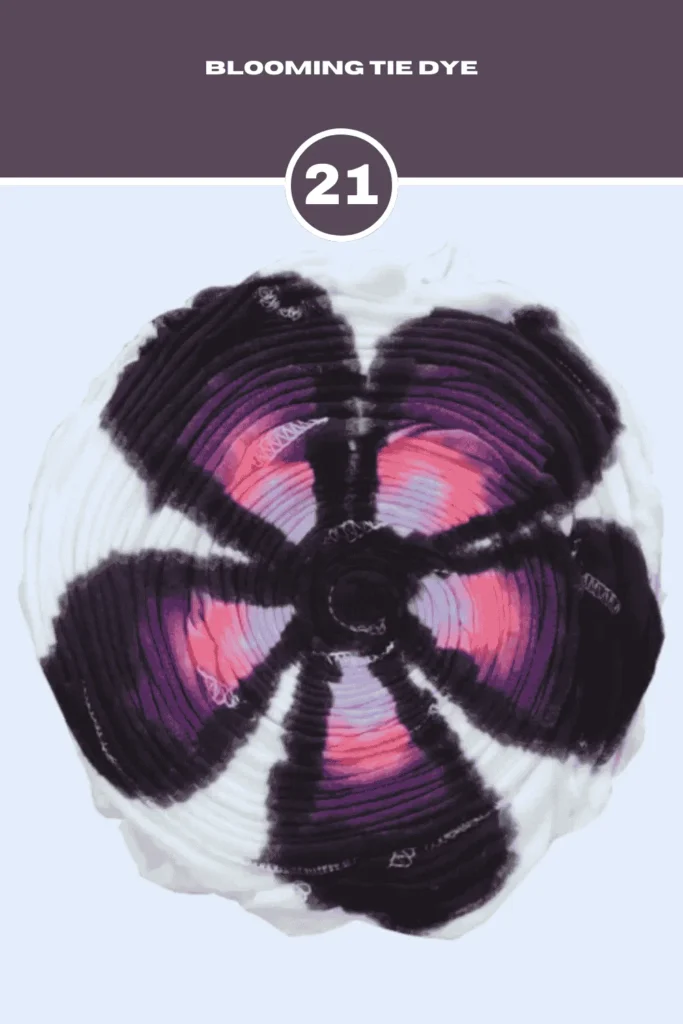
Here are the instructions for making this tie dye shirt pattern.
1. Lay the shirt flat. Pinch the center and twist it slowly into a tight spiral. Fold the spiral into 6–8 wedge slices. Rubber band the petals. Crisscross them like a star.
2. Dye the bloom. Use one color to make a line like a flower. Then use different colors to fill the petals of the flowers.
3. Let it sit overnight and rinse under cold water until water runs clear.
22
Chain Links
A chain links tie-dye shirt pattern has shapes that look like connected loops or rings. The colors blend through the links, creating a bold, unique, and eye-catching design on the fabric.
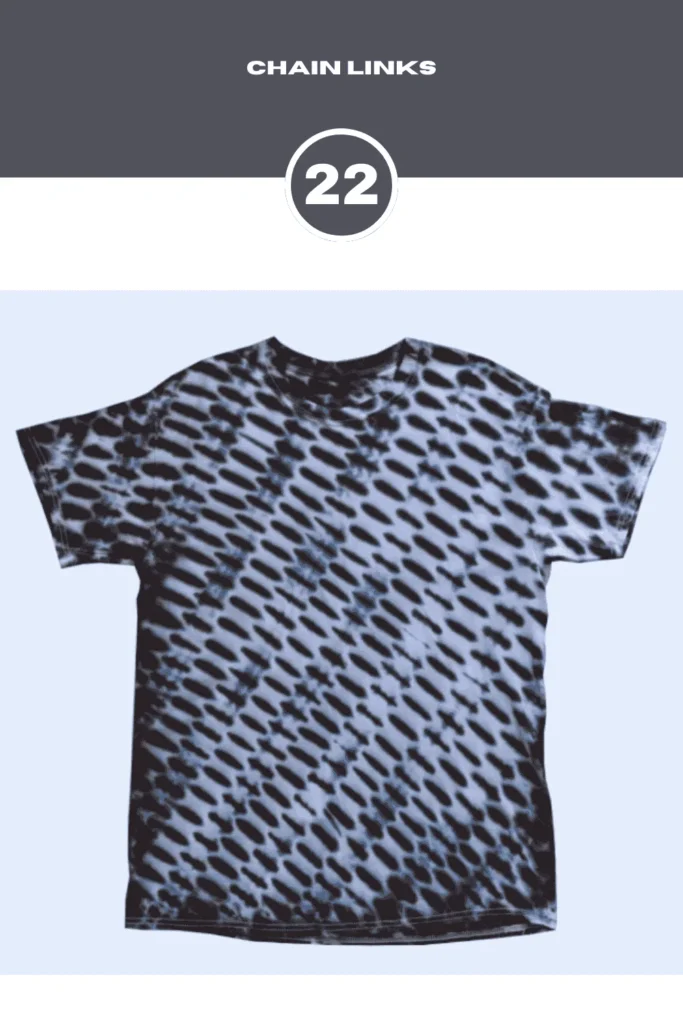
Here are the instructions for making this tie dye shirt pattern.
1. Lay the shirt flat. Fold it back and forth like a paper fan, starting at the bottom. Make folds about 2–3 inches wide. Roll the folded fan into a long tube. Bend the tube into 3–4 big loops. Secure each loop with rubber bands.
2. Squirt one color on the top half of each loop and se different color on the bottom half of each loop. Flip the loops over. Add dye to any white spots so both sides are colorful.
3. Let it sit overnight and rinse under cold water until water runs clear.
23
Spirograph Tie-Dye Pattern
A spirograph tie-dye shirt pattern has swirling, looping lines that look like a spinning wheel. The colors twist and overlap, creating a detailed, fun, and eye-catching design that stands out.
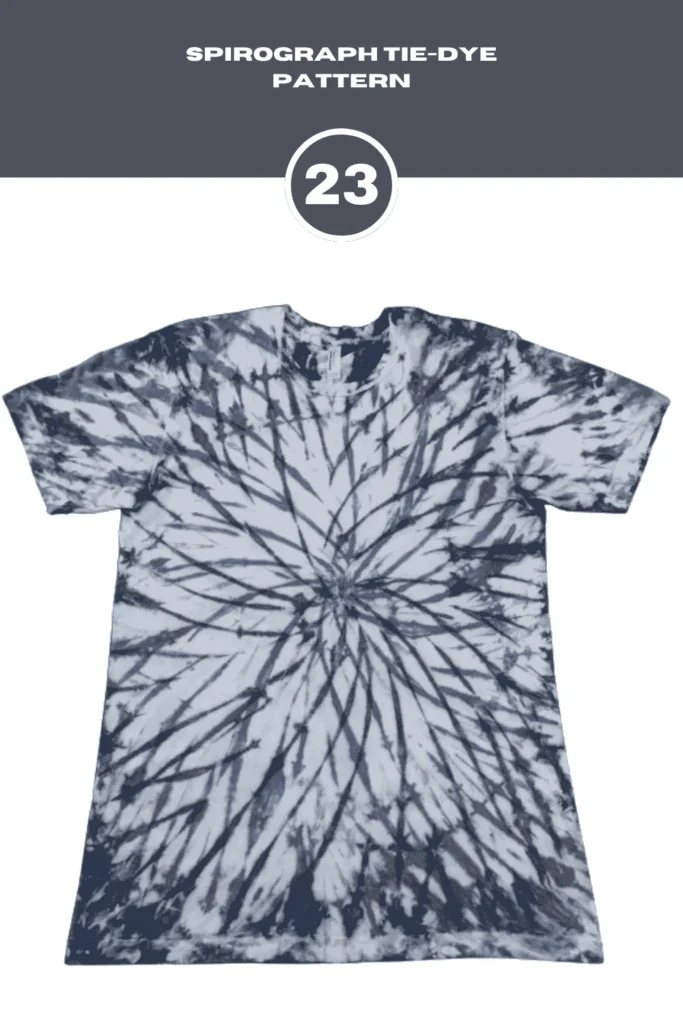
Here are the instructions for making this tie dye shirt pattern.
1. Lay the shirt flat. Pinch the center and twist it slowly into a tight spiral. Wrap rubber bands around the spiral to make 6–8 sections.
2. Squeeze one color into the middle of the spiral. Pick different colors for each slice. Squeeze dye in half-circles along the edges of each section. Overlap colors to make loopy shapes.
3. Wrap the shirt in plastic wrap or a bag and let it sit overnight. Rinse under cold water until the water runs clear.
24
Wedge Wig-Wag Tie-Dye Pattern
A wedge wig-wag tie-dye shirt pattern has zigzag lines that spread out in a wedge shape. The colors shift back and forth, creating a bold, fun, and eye-catching design on the fabric.

Here are the instructions for making this tie dye shirt pattern.
1. Lay the shirt flat. Pinch the center of the shirt and twist it into a circle. Fold the circle into 6–8 wedge slices. Press flat.
2. Rubber band the wedges. Tilt each wedge sideways to make a “V” shape. Squeeze one color on the left side of the V. Squeeze a different color on the right side. These colors will meet in the middle.
3. Let it sit overnight and rinse under cold water until water runs clear.
25
Ombre Tie-Dye Pattern
An ombre tie-dye shirt pattern has colors that slowly fade from light to dark or mix smoothly. The soft blending creates a cool, stylish look, making the shirt bright, bold, and eye-catching.
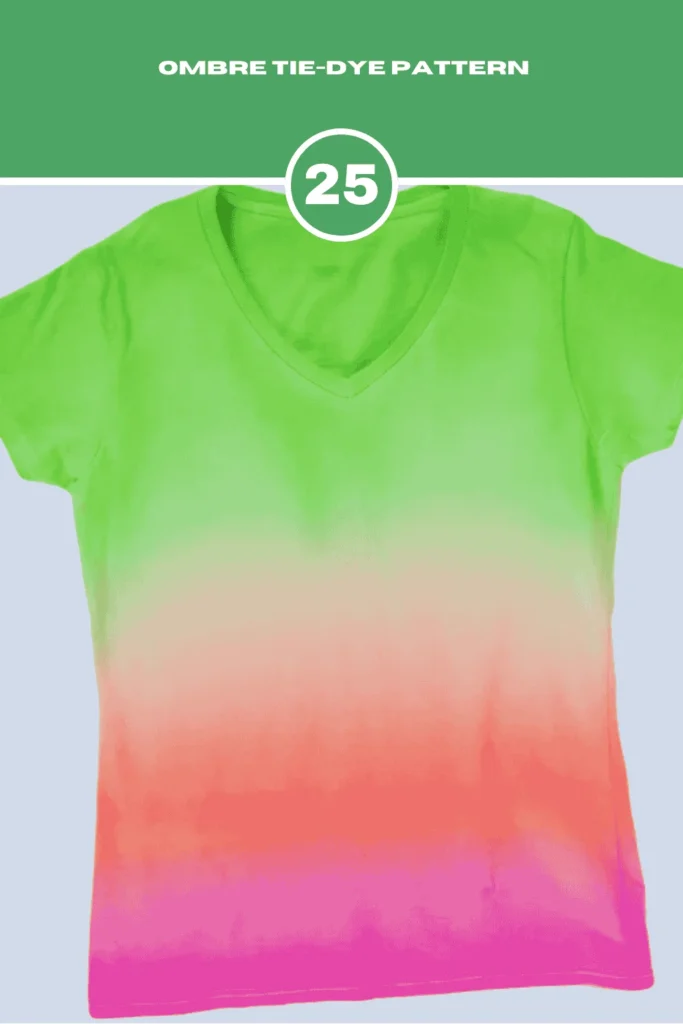
1. To create this Ombre tie-dye pattern, first mix the dyes in various shades, such as dark and medium shades. Another shade will be dark.
2. Lay the damp shirt flat. Starting at the bottom, roll it up tightly to the top. Wrap three rubber bands around the rolled shirt: one near the bottom, one in the middle, and one at the top.
3. Apply the dark shade dye all over the bottom part, the medium shade in the middle, and the light shade at the top.
4. Allow it to sit overnight to let the colors blend together. Rinse and unroll.
26
Cherry Blossoms
A cherry blossoms tie-dye shirt pattern has soft pink, white, and purple colors, like blooming flowers. The design looks gentle and beautiful, with colors spreading like petals, creating a peaceful and stylish effect.

Here are the instructions for making this tie dye shirt pattern.
1. Lay the shirt flat. Starting at the bottom, fold it back and forth like a paper fan to the top. Keep folds about 2 inches wide. Tie the branches with a rubber band.
2. Squeeze brown dye along the folded edges. Pinch small sections of the folded fan and twist them into tiny balls. Secure each ball with a rubber band. These are your cherry blossoms. Squirt pink dye onto each scrunched ball.
3. Let it sit overnight. Rinse under cold water until the water runs clear.
27
Complex Spiral
A complex spiral tie-dye shirt pattern has many swirling lines twisting in different directions. The colors blend in layers. This makes the design look detailed and bold. This pattern creates a fun and eye-catching effect.
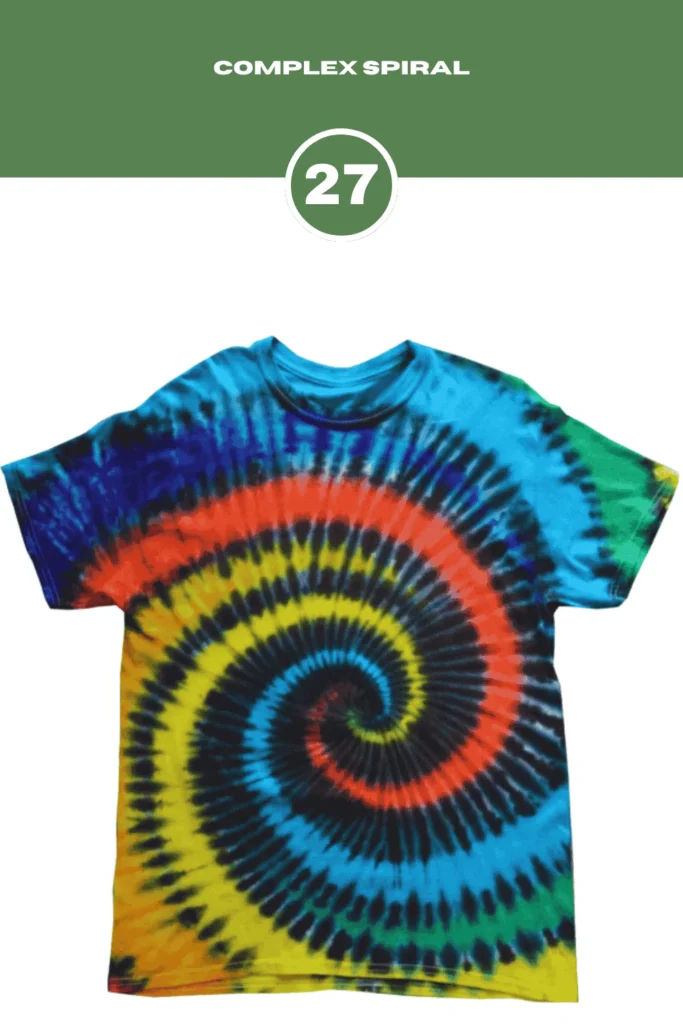
Here are the instructions for making this tie dye shirt pattern.
1. Lay the shirt flat. Pinch the center of the shirt with your fingers. Twist it slowly like you’re turning a doorknob. Keep twisting until the whole shirt becomes a tight spiral.
2. Secure with rubber bands. For dying start with the center. Squeeze one color onto the middle of the spiral. Squeeze the dye from the center outward. Flip the spiral over.
3. Let it sit overnight and rinse under cold water until the water runs clear.
28
Fan Fold Wig-Wag
A fan fold wig-wag tie-dye shirt pattern has wavy, zigzag lines that move back and forth. The colors blend in a fun way, creating a bold, flowing design that stands out.
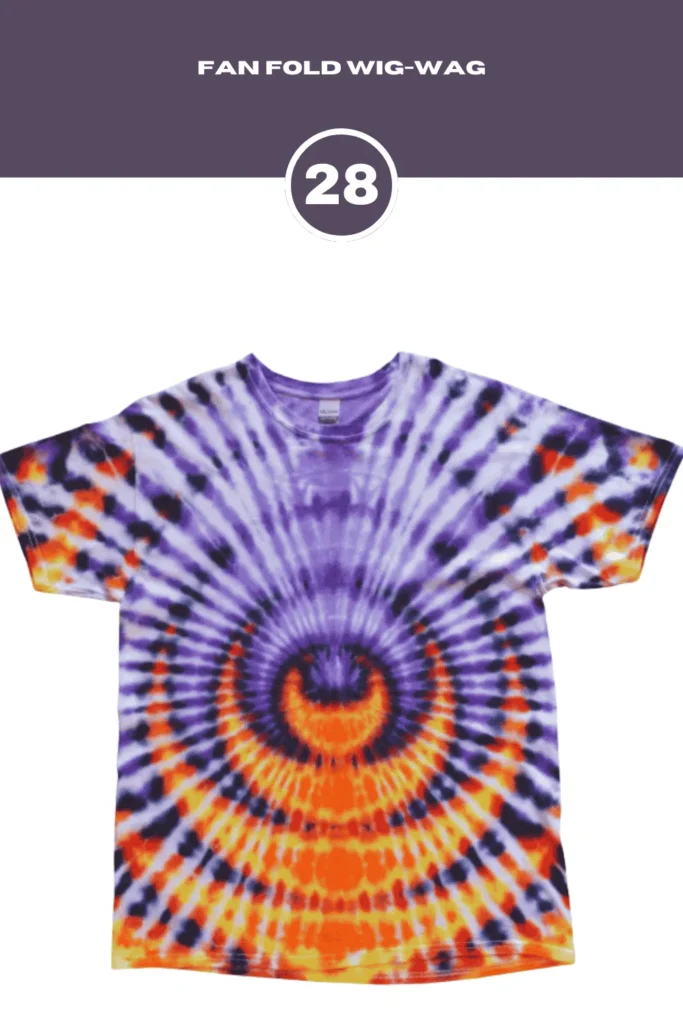
Here are the instructions for making this tie dye shirt pattern.
1. Lay the shirt flat. Start at the bottom and fold it back and forth, like making a paper fan. You need to fold until the whole shirt is a long, flat strip. Keep folds about 1–2 inches wide.
2. Wrap 3–4 rubber bands around the folded strip to hold it together.
3. Tilt the folded strip sideways like a “V”. Squeeze one color on the top left side of each section. Then again flip it and squeeze a different color on the top right side. The colors will meet in the middle.
4. Let it sit overnight and rinse the shirt under cold water until the water runs clear.
29
Ripple Peacock
A ripple peacock tie-dye shirt pattern has wavy rings of blue, green, and purple, like a peacock’s feathers. The colors spread out in ripples, making the design bold, colorful, and eye-catching.
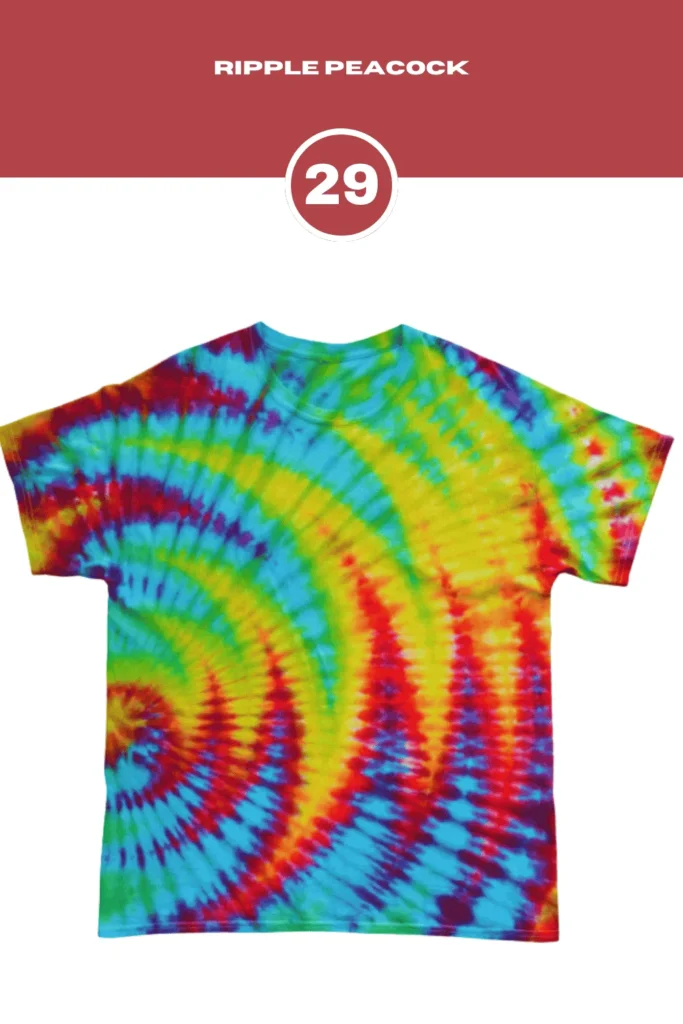
1. To make this first spread the shirt on a table.
2. Grab the center and twist tight. Tie bands around the spiral to make 6-8 pie slices.
3. Dye the ripples. Dab a little gold or yellow dye near the center of the eye.
4. Let it sit for 8+ hours and rinse in cold water until clear.
30
Peacock
A peacock tie-dye shirt pattern has bright colors like blue, green, and purple, just like a peacock’s feathers. The design spreads out in a fancy way. This pattern makes the shirt look bold and beautiful.

1. Lay the shirt on a table.
2. Grab the center and twist into a tight spiral. Tie bands around the spiral to make 6-8 slices.
3. Paint each slice with peacock colors. If you want you can add a dab of gold or yellow colors for sparkle. For more attractive squirt a little black dye in the very center for the peacock’s eye.
4. Let it sit for 8+ hours. Don’t peek during this time and rinse in cold water until clear.
31
Black Hole
A black-hole tie-dye shirt pattern has a dark center with colors swirling around it. The design looks like a deep space spiral. It creates a cool, and eye-catching effect.
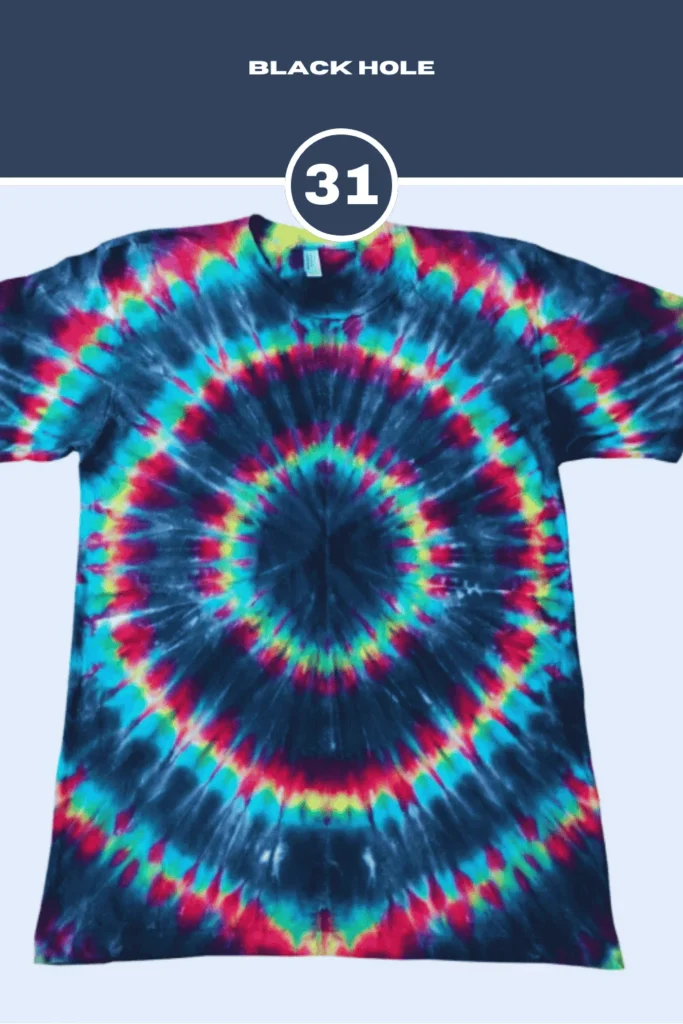
Here are the instructions for making this tie dye shirt pattern.
1. Spread the shirt on a table. Grab the middle and twist tight into a spiral.
2. Tie bands around the spiral to make slices. Squirt black dye in the very center.
3. Add space colors in the white shirts. Let it sit overnight and rinse in cold water until clear.
Tip: Wear gloves so your hands don’t turn galaxy mode.
32
Criss-Cross
A criss-cross tie-dye shirt pattern has lines that cross over each other. It makes an X-shaped design. With these patterns, you can create a bold and unique look on the fabric.
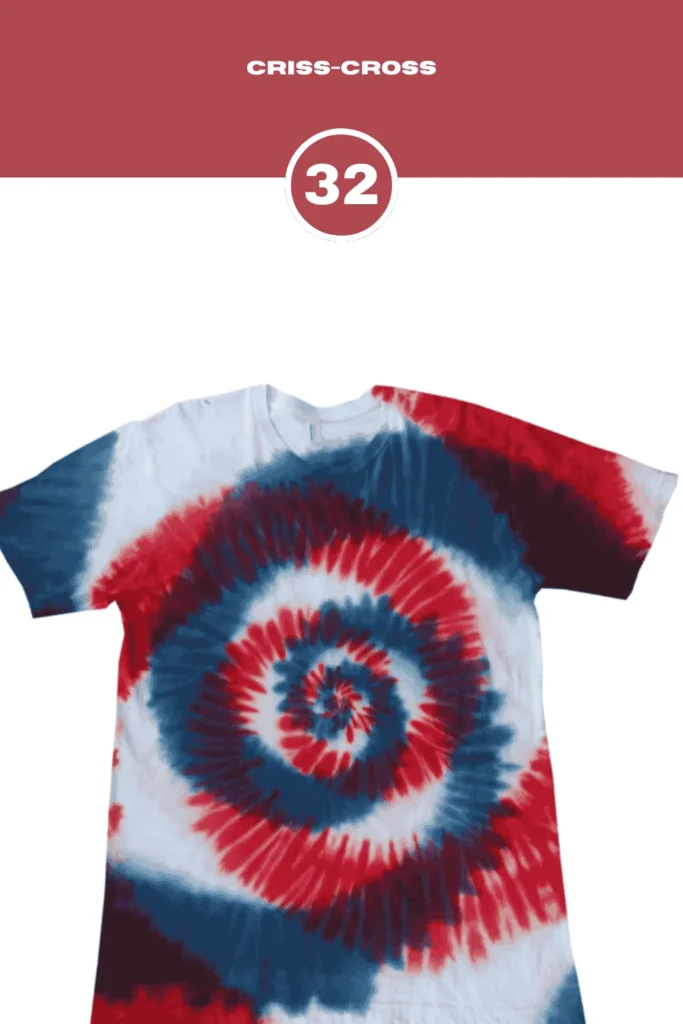
Here are the instructions for making this tie dye shirt pattern.
1. Spread the shirt on a table.
2. Fold it sideways from left to right in 1-inch zig-zags. Press folds flat. Again, fold it up and down the same way to make a tiny square bundle.
3. Squish the folded shirt between two small cardboard squares. Wrap rubber bands tight around them.
4. Then, squirt different colors on the edges of the bundle. Let it dry for 8+ hours and rinse in cold water until clear.
Tip: Use bright colors for maximum pop.
33
Shifting Spiral
A shifting spiral tie dye shirt pattern has a swirling design that moves in different directions. The colors twist and blend, making a cool, wavy effect. This pattern looks bold, fun, and eye-catching.
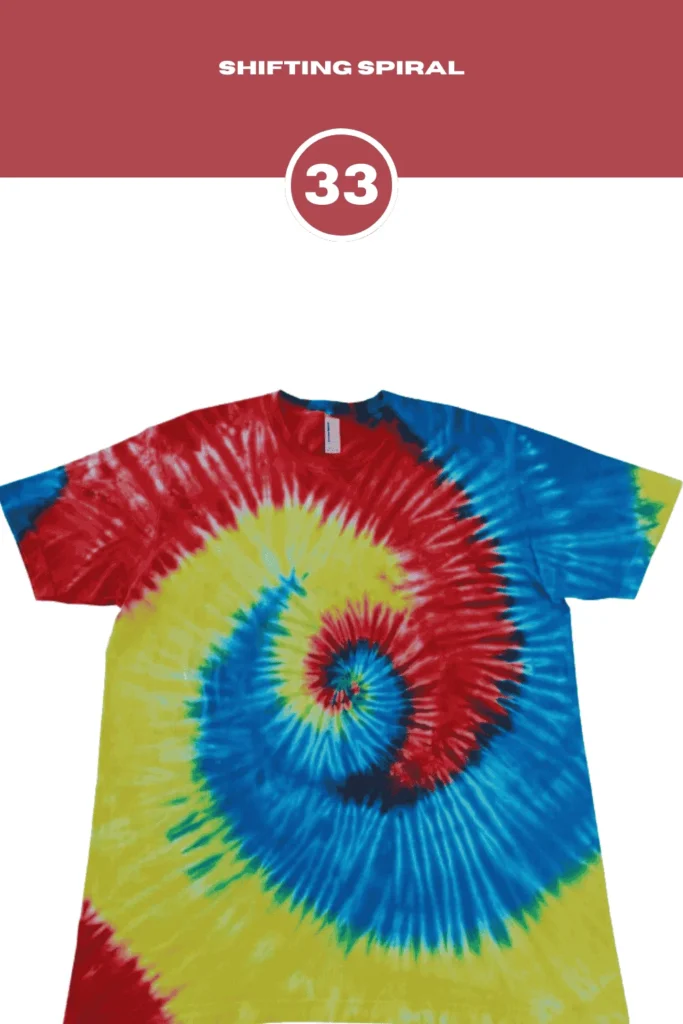
Here are the tie dye techniques for this pattern.
1. Lay the shirt in a flat place.
2. Grab the center of the shirt. Twist it clockwise until the whole shirt is a swirly circle.
3. Wrap bands around the spiral. Space them out unevenly for a shifted look. Squirt different colors on each slice. Let the colors touch a little to blend!
4. Turn the spiral over and add more dye on the back. Let it sit for 8+ hours and rinse in cold water until clear.
34
Diagonal Pleat Tie Dye Pattern
A diagonal pleat tie dye shirt pattern has lines running at an angle across the fabric. The colors blend along the folds, creating a cool, striped effect. This pattern looks bold, stylish, and unique.
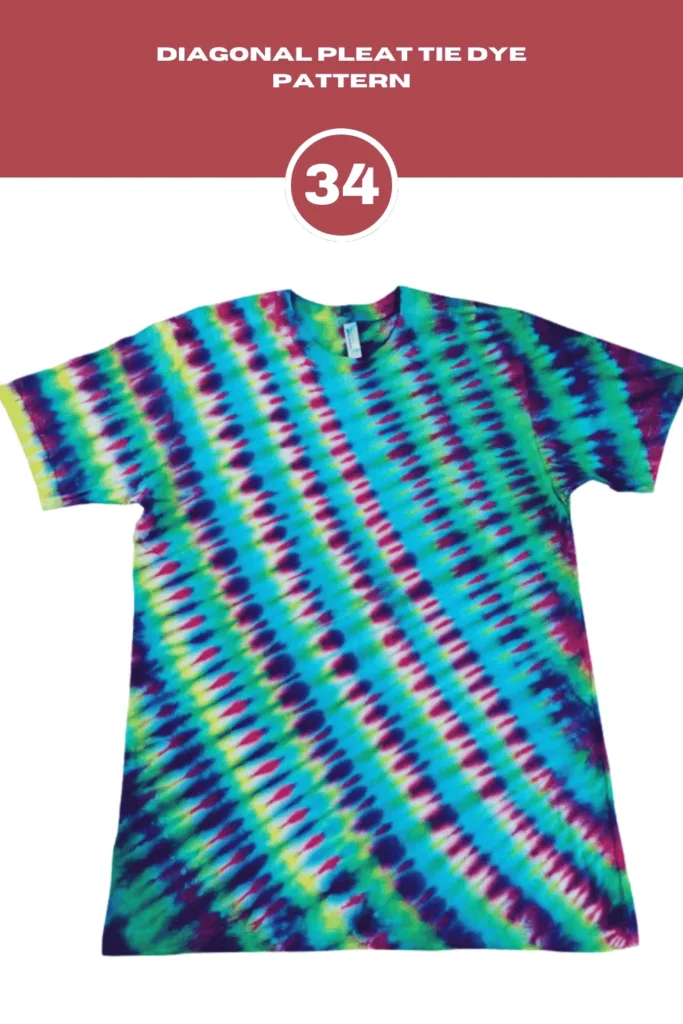
1. Lay the shirt flat or on a table.
2. Choose the bottom-left corner. Fold the shirt like a zig-zag fan all the way to the top. Tuck the sleeve into the folds.
3. Wrap rubber bands every 1-2 inches around the folded fan.
4. Squirt different colors on each folded section and let it sit overnight. Rinse in cold water until clear.
35
Fireworks Tie Dye Shirt Pattern
A fireworks tie dye shirt pattern looks like bright bursts of color exploding on the fabric. The colors spread out from the center, just like real fireworks in the sky. Different shades mix together to make a bold and exciting design. This pattern gives the shirt a fun and energetic look.
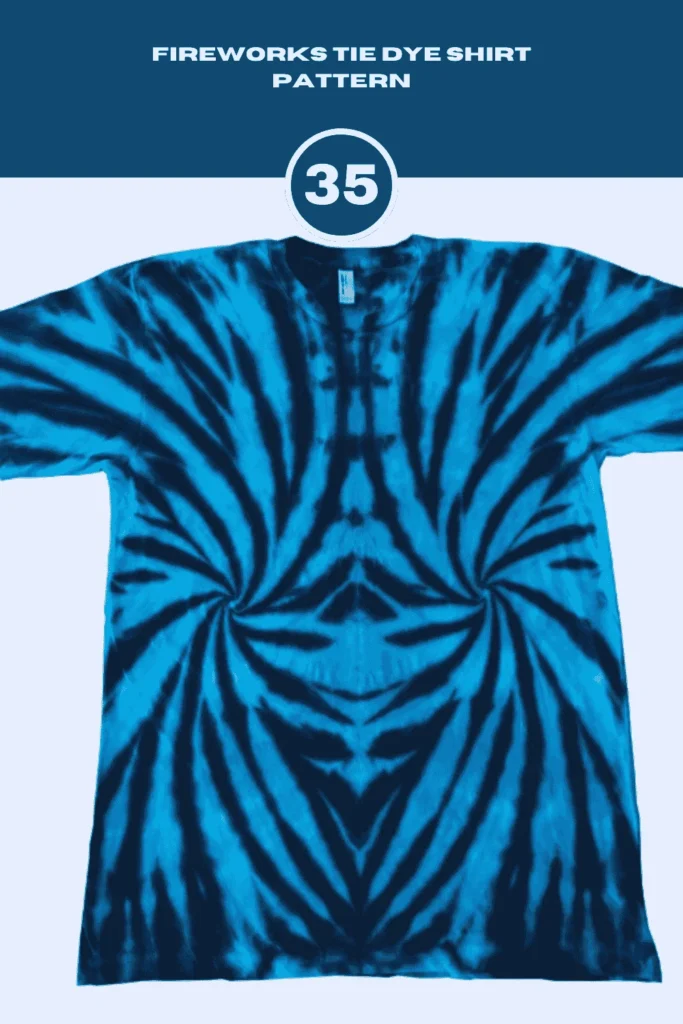
Here are the instructions for making this tie dye shirt pattern:
1. Lay the shirt flat on the table.
2. Grab a tiny spot in the middle or anywhere. Pull up, and twist into a tight ice cream cone shape.
3. Tie bands around the cone, spacing them out. Do this 3-5 times for mini firework bursts.
4. Squirt different colors on each wrapped cone. Soak the tips.
5. Let it sit overnight. Rinse in cold water until water runs clear.
How To Choose Color Combinations For Tie Dye
Colors make your tie-dye shirt shine! Like picking yarn for crochet, fun hues create bold tees. Plan your design. Sketch it out. Use 2-4 colors max. Avoid muddy mixes. Grab fiber-reactive dyes for bright, lasting results. Think summer vibes: neons for festivals, pastels for beaches. Test on scrap fabric. See how colors blend. Keep it simple, bold, and you. Here’s how to pick winning combos:
- Complementary Colors: Pick opposites like blue and orange. They pop hard. Create high-contrast designs. Your shirt grabs attention fast.
- Analogous Colors: Choose neighbors like red, orange, and yellow. They flow smoothly. Make gradient patterns. Look cohesive, warm, or cool.
- Monochromatic Shades: Stick to one color, like light to dark green. Looks sleek. Adds depth. Keeps it clean and unified.
- Avoid Overmixing: Don’t let colors bleed together. Brown’s no fun. Apply in sections. Leave white space. Keep patterns crisp.
Play with colors. Experiment. Make your shirt a summer stunner
In Closing
Tie-dye shirts are a fun way to make colorful designs. By twisting, tying, and adding dye, each shirt becomes attractive. This craft teaches creativity and how colors mix. Every design is a surprise, showing your personal style. Grab some dye, get messy, and let your creativity run wild. Who knows? You might design the coolest shirt ever!


![The Best 30+ Free Crochet Cat Patterns [Beginner-Friendly Guide]](https://crochetmind.com/wp-content/uploads/2025/04/1-The-Best-30-Free-Crochet-Cat-Patterns-Beginner-Friendly-Guide.webp)


