


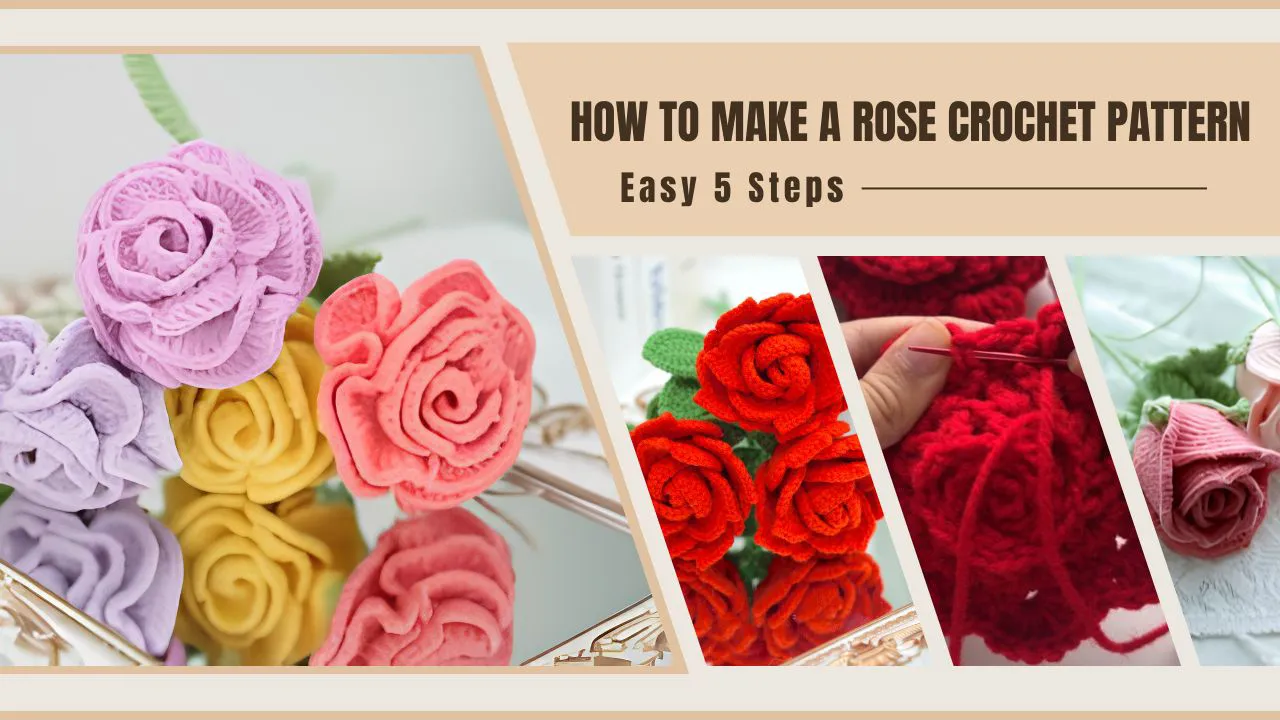


Trying thermal stitch crochet may be considered both practical and creative. This stitch is bulky and toasty. You can make items such as pot holders, dishcloths, scarves, or even blankets out of it. In this tutorial, we are going to demonstrate to you how to crochet the thermal stitch.
Thermal stitch crochet is a heavy, two-layered method that is ideal for making items that are heat-proof and warm, such as potholders, blankets, scarves, and dishcloths. It employs simple stitches ingeniously: it proceeds by some working up, by some working back; and it forms a fabric that is strong and insulating. This stitch is simple to understand. It is wonderful for learners. It hardens, softens, and warms things. some more info on facebook
In This Post
Key Takeaways
- Experience in working the thermal stitch creates bulk and warmth.
- Thermal stitch crochet requires the appropriate yarn and hook.
- By practising, you will end up creating robust dual-layered things.
- The stitch is effective on warm, wear-resistant winter wear.
- States of thermal stitch can be created in a wide variety of crochet crafts.
What is a Thermal Stitch Crochet?
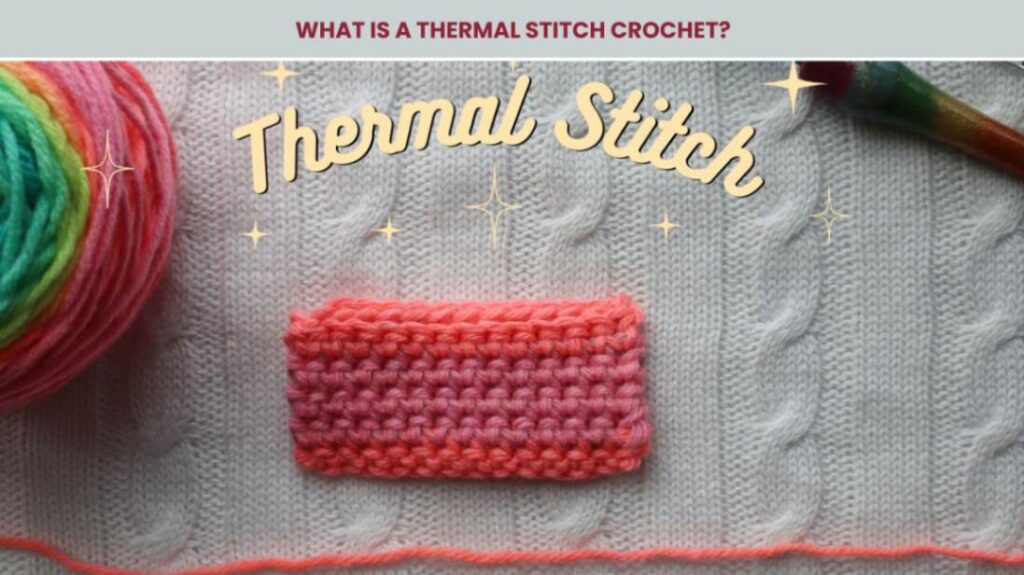
The thermal stitch begins with a basic stitch, termed a single crochet. It is thickened with a special method, however. It is so strong that people use it to make items such as potholders, dishcloths, blankets, and scarves, as it can withstand heat.
The stitch forms two layers, hence the fabric becomes thick and firm to the touch. It retains heat exceptionally well and is suitable for warm clothes and kitchenware. It is not flimsy, and appears to be identical on both sides.
Abbreviations
These are the standard crochet abbreviations in this guide. Both are necessary for knowing the steps and patterns in thermal stitch crochet.
- SC (Single Crochet): The foundation stitch that forms a firm, dense fabric.
- BLO (Back Loop Only): The stitch is made in the back loop.
- CH (Chain): A set of loops that is the basis of a project.
- THDC (Thermal Half Double Crochet): Half double crochet made to make it thicker.
- TDC (Thermal Double Crochet): Thermal variation of double crochet.
- SL ST (Slip Stitch): Flat stitch (used to join or to move).
- ST (Stitch): single crochet loop or hole.
Materials Needed to Crochet a Thermal Stitch
Prepare your materials before you start. To do this, you will need:
- Yarn Suggestions – To resist heat, select cotton. To stay warm and flexible, opt for acrylic or wool.
- Crochet hook (H-8) 5.0 mm – Offers the appropriate combination of definition and pliability of stitches.
- Stitch markers – Assist in maintaining track of the beginning of rows and eliminating errors.
- Scissors– To neatly trim yarn at the end or for colour changing.
- Tapestry needle -Excellent when weaving in ends or when joining pieces together.
- Measuring tape – Helps ensure that your work is the correct size or gauge.
- Notebook/tension journal -Useful to record stitch tension, pattern, or project progress.
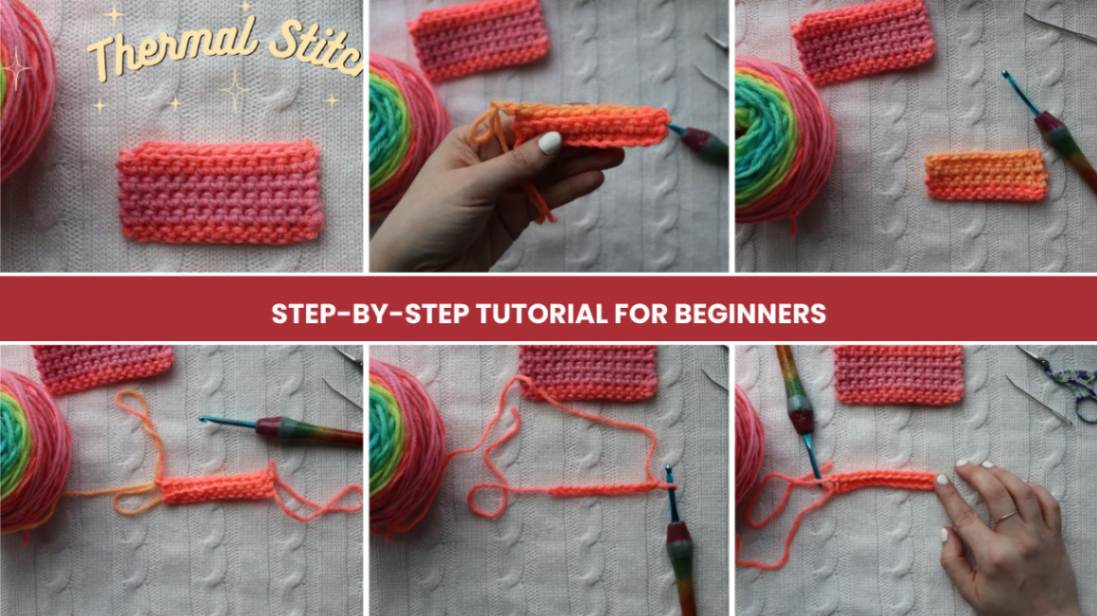
How to do Thermal Stitch Crochet [StepS-by-Step Tutorial]
Thermal stitch crochet is a double-layered, thick fabric crochet stitch that is ideal for creating items requiring extra warmth and durability, such as pot holders, scarves, and blankets. Although it is based on the simple single crochet, it has a clever twist, as it works in both the current and the previous rows. The steps of the tutorial thermal stitch crochet are as follows:
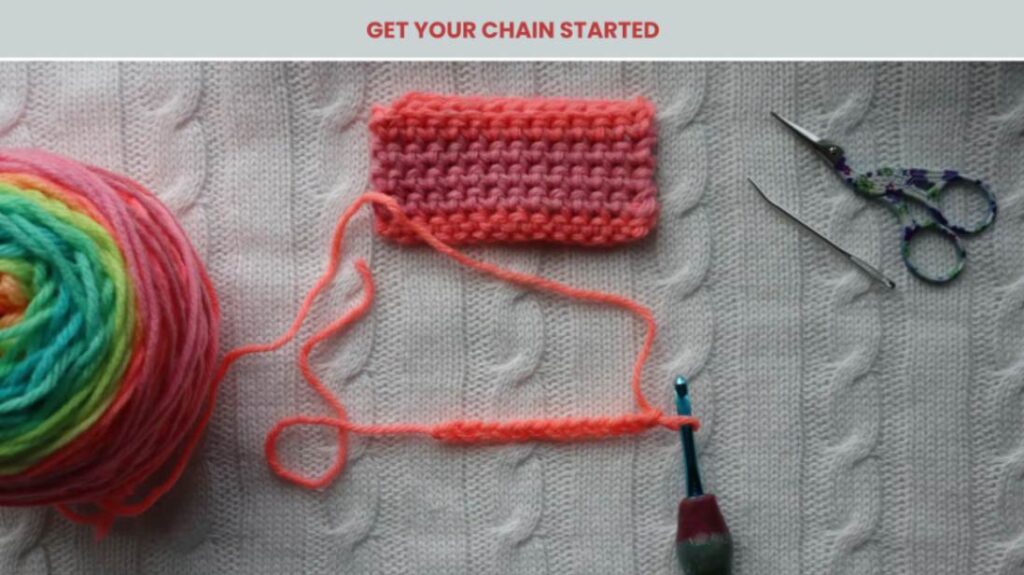
Step 1: Get Your Chain Started
To begin with, tie a slip knot. Next, go ahead and produce as many chains as you require in your project. Here we come up with 12 chains.
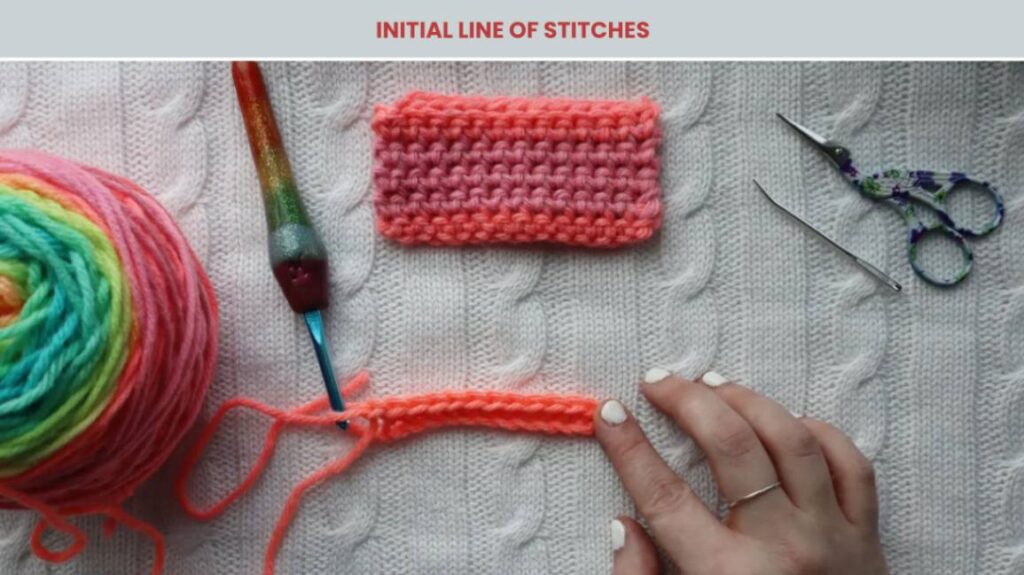
Step 2: Initial Line of Stitches
Make a single crochet in the second chain of your hook and a single crochet in each chain. Chain one to your work. This will give you 11 stitches.
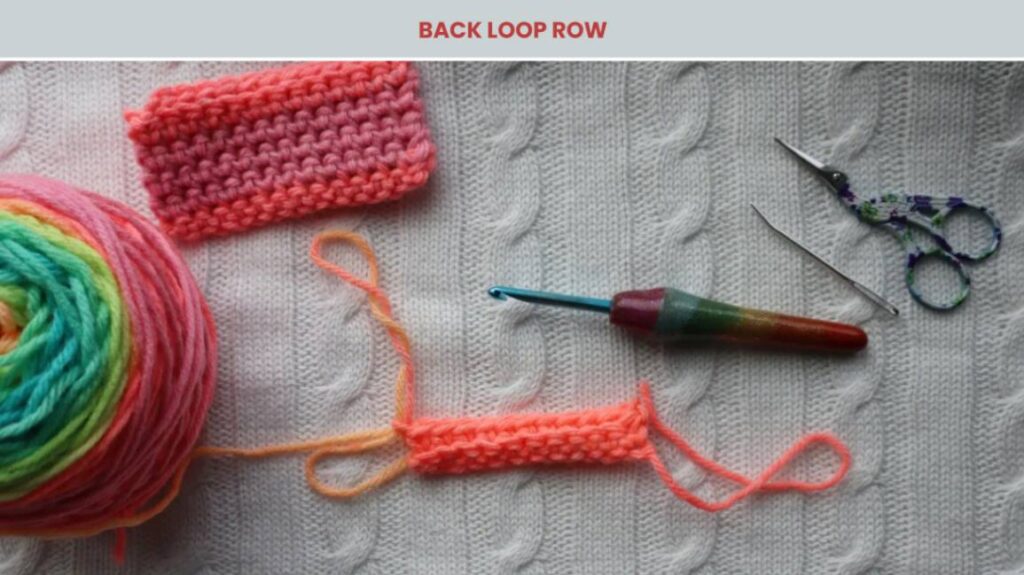
Step 3: Back Loop Row
This row works one single crochet into the back loop of every stitch. This begins to develop the basis of the thermal texture. Initial chain and turn.
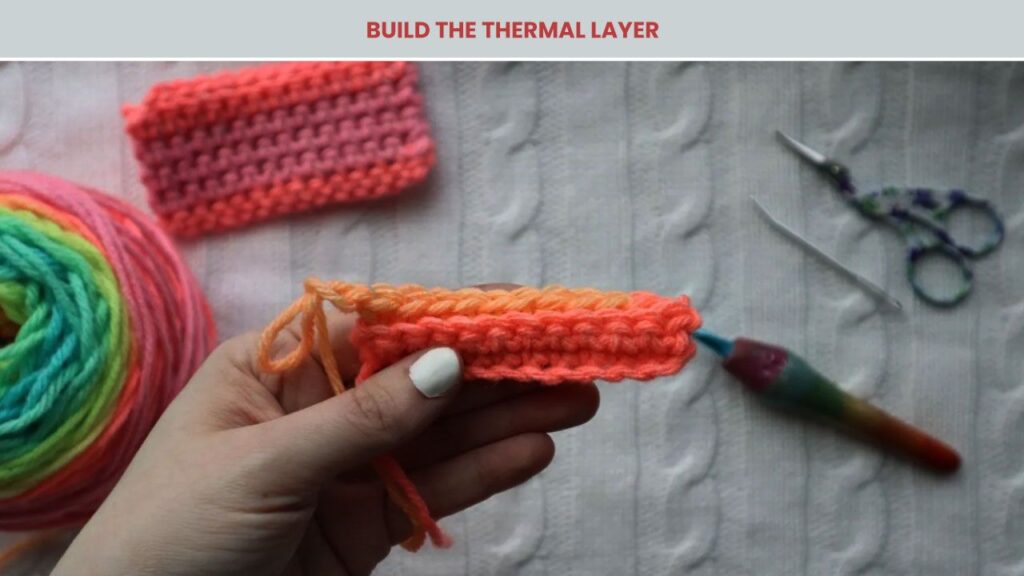
Step 4: Build the Thermal Layer
You are now crocheting into the back loop of the current row and the unworked back loop of the row below. Repeat along the row to achieve that thick layered effect. Chain 1 and turn to go on.
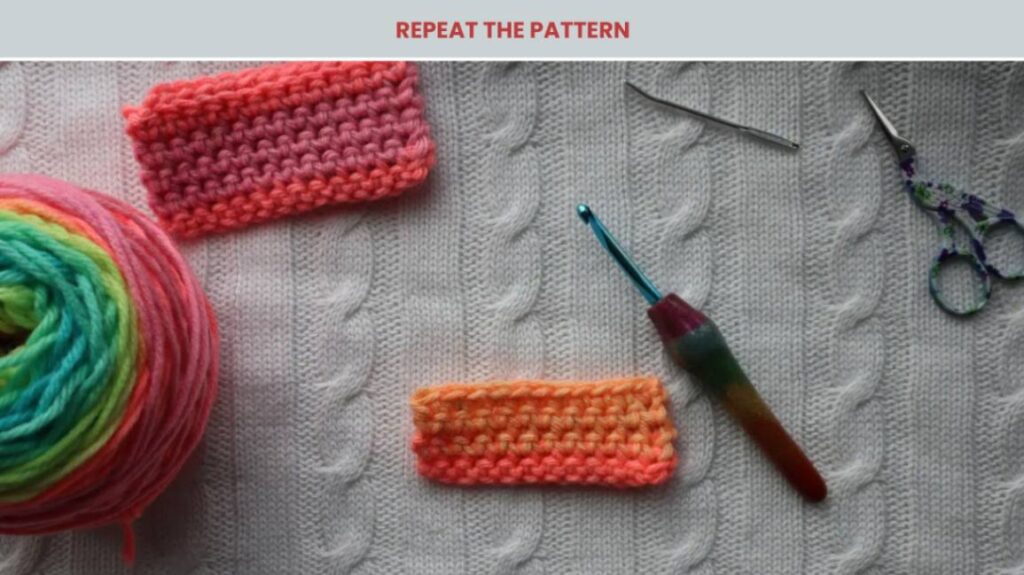
Step 5: Repeat the Pattern
Repeat row four until your work is as long as you wish. You may simply complete the last row and sew in an end, or you may add a nice edge by single crocheting around the top. To neaten the top, you can insert your hook into all three loops of the current stitch and the unutilised loop of the row below (three loops in total) to tidy up the top.
Thermal Stitch Crochet Pattern and Project Ideas
The thermal stitch works well on thick, tough, and warm objects. Its close and dual-layer fashion aids in preventing heat transfer, making it ideal for potholders and oven gloves. It is also suitable for use with mittens and warm winter wear, such as scarves, hats, and headbands, which can help keep you warm.
The thermal stitch may be done at home as well. Experiment with making dishcloths thick, creating soft bath mats, or making warm blankets. The stitches are well done and tidy, making your work appear good. This is only some of them to experiment with the next time you want to do something on Thermal stitch crochet.
Thermal Stitch Crochet Pot Holder Pattern Free
The thermal stitch crochet pot holder is one of those practical and beautiful methods for making a thick, heat-resistant square that can be used in the kitchen. It is made with a doubly thick texture constructed of single crochets, which makes it durable and too insulating, with the possibility of creating amusing colour schemes, such as a two-shade pattern.
- Chain Foundation: Chain 27. This establishes the width of the bottom of your pot holder ( approx. 7 inches).
- Row 1 & 2: Single crochet in the second chain from the hook to the end. Row 2: Work only in the back loops in preparation for the thermal layering.
- Thermal Rows: In row 3 and following, carry into the back loop of the current row, and the unworked front loop of the row beneath. This forms the thick signature texture of the thermal stitch.
- Colour Change: After the waypoint (about 3.5 inches), switch to a second colour to make a two-tone effect.
- Finishing & Loop: Square till seven inches, then chain 10 in the corner to form a hanging loop, slip stitch to close, then make fast on and off and weave in ends.
Thermal Stitch Crochet Mug Cosy
A straightforward stitch is the thermal stitch, which is used to create a crochet mug cosy. It will ensure that your drink is kept warm and protect your hands. The comfort is heavy-duty and fun-textured. It perfectly wraps your mug and retains the heat that is inside.
You can make it special by adding buttons, choosing your colours, or sewing a funny design onto them. This makes it homemade and original. It is an easy yet helpful project to experiment on when you are a novice in crochet.
- Chain Base: Chain to a height of your mug’s height and circumference, and chain (usually 10-12 chains).
- Rows 1 & 2: Make a single crochet in the initial row and then in the second row, work into the back loops only.
- Thermal Stitch Rows: Repeat thermal stitch rows (back loop and the front loop of the row before) until it goes all the way around your mug.
- Button Loop: Chaining 5-8 stitches on the final row creates a loop that can be fastened around a button.
- Finishing: Sew a button on the other end, tidy it up in the end, and try the bandage on your mug.
Thermal Stitch Crochet Double-Thick Dishcloths
These thermal stitch crochet double-thick dishcloths will be a valuable and long-lasting member of your kitchen items. Their thick texture enables them to be super absorbent, durable, and excellent scrubbers that do not scratch surfaces. Cotton yarn is robust, washable, and highly recommended.
- Chain Base: You will begin with a chain of 31 (or any desired width for the dishcloth).
- Initial Rows: In the initial row, single crochet; in the second row, back loop only.
- Thermal Stitch Body: Continue working thermal stitch (back loop + front loop of preceding row) for 25 -30 rows or until the dishcloth has become a square.
- Cleanup: Optional – single crochet around the edge to tidy up the edges.
- Finish: Cut off, sew in ends, and block lightly if necessary.
Thermal Stitch Crochet Beanie
The thermal stitch crochet beanie is an ideal cold-weather accessory, providing twice the warmth and fitting snugly and cosily. The thermal stitch that forms a thick, structured fabric is excellent for insulation, making it suitable on cold days. You could have it in one colour, or you could have it with stripes to add a chic touch.
- Measure and Chain: Chain a sufficient number of stitches as the height of the beanie (usually 25-30 chains in case of adults).
- Initial Rows: Perform one row of single crochet and one row of back loops only.
- Thermal Stitch Panel: Keep on with the thermal stitch rows until the panel goes around your head comfortably.
- Join and Shape: The short ends can be slipped stitched together to make a tube, and the top should be gathered and sewn shut.
- Add a pom-pom or ribbed brim (optional), and weave in the ends.
Thermal Stitch Crochet Blanket
The thermal stitch crochet blanket is the most comfortable project ever, making it ideal to work on during cold nights and to style your home. The luxurious two-ply texture makes it heavy and warm, making it a favourite as a baby blanket, lap throw, or even a full-size bed covering. It is a lime-consuming procedure, but the final result is a long, durable blanket, and so, it is worth the effort.
- Chain Base: Chain as broad as you wish your blanket to measure (e.g., 120 or more chains to make a throw).
- Initial Rows: Chain the initial row, then work the second row in single crochet, using only the back loops.
- Thermal Stitch Body: Then, simply continue in thermal stitch (back loop + front loop of the previous row) until the blanket is as long as you want it to be.
- Colour Changes (Optional): Add stripes or colour blocks to make your design unique.
- Finish and Border: Fasten off, and using a single crochet, make a border around the edges to make a clean finish.
Crochet Thermal Stitch Oven Mitt
The thermal stitch crochet oven mitt is one of the most valuable and protective tools in a kitchen set, as it covers your hands with its thick, two-layered texture, protecting them against heat. Its insulating features make it ideal for hot pots, pans, and trays, and most importantly, provide a chic, homemade look. This project is durable and heat-resistant, with a structured shape, making it a valuable addition to your kitchen.
- Chain Base: Internally, start with a chain that is approximately 30-35 links in length, depending on the desired width.
- First Rows: In the first row, crochet the row, and in the subsequent row, crochet in the back loops alone.
- Body: Refer to the chart to continue with thermal stitch rows (using the back loop and the not used loop of the row below) until the desired length of the mitt is achieved.
- Shaping and joining: Fold in half and then single crochet the sides or whipstitch along the sides and leave the top open.
- Section on Thumb (Optional): Prepare another piece of the same stitch, and sew it in place.
- Final Touches: Table hang loop, reinforce the ends with a weave and block as required.
Thermal Stitch Crochet Bag Strap
The thermal stitch crochet bag is a very pretty yet durable bag that can be used as an everyday bag, a grocery bag, or to carry your yarn projects. The thick stitch offers excellent durability and shape, yet appears clean and textured. You can size it, add handles, or even line it to make it extra powerful.
- Chain Base: You can start with a chain that is as wide as you desire your bag to be (as in 40 to 50 chains in a medium bag).
- First Rows: Perform one row of single crochet, and then another one by only working back loops.
- Thermal Stitch Panels: Continue to grow them out until the panels reach the desired height. You will be working on two panels.
- Join Panels: Sew the sides and bottom of the bag with a single crochet or with whipstitch.
- Add Handles: Use a strong crochet to create two long straps that you should equally tie to the top sides of the bag.
Advanced Tips & Techniques
When you feel comfortable with the base, IC thermal stitching allows you to lengthen your projects by finishing your work beautifully. Be it stitch tension or inventive variations, these tips will help you to improve the looks, touch, and functionality of your finished works.
It is better to avoid Common Mistakes.
A possibility of missing the previous-row loop is one of the most frequent errors, causing gaps and separation of the fabric. Another issue is when you pull your stitches too tight, causing the edges of your work to distort and the fabric to curl or shrink irregularly. Maintain even tension and ensure you grab both loops when working the thermal stitch.
Infinite Edging Techniques
To give your project a neat finish while maintaining its thermal appearance, consider using slip stitch edging or a single crochet border, worked evenly all the way around. These techniques help establish the structure and create a neat, solid edge without compromising the texture.
Variations of the Stitch
A little taller and with a little more thickness, but also a little more drape, is the thermal half double crochet (THDC). For a faster, looser stitch, there is the thermal double crochet (TDC), which is crocheted more quickly and is particularly suitable for lightweight, textured projects such as shawls or wraps.
Final Thoughts
The thermal stitch is not just a gimmick; it is a versatile procedure that is durable, warm, and has a pleasant texture. It also pushes the boundaries of thought in the minds of crocheters to consider the depth of stitches and texture, while providing gorgeous, practical outcomes. 候Whether you are making a potholder or a scarf that is ready to face the winter, learning this stitch will expand your crochet stitch kit. Happy Crocheting!
Frequently Asked Question [Thermal Stitch Crochet]
What is thermal stitch crochet?
The crochet thermal stitch is used to produce thick and warm items. It is excellent for dishcloths, potholders, blankets, and. The stitch is robust and is resistant to heat. It is two-layered and is long-lasting.
Is thermal stitch suitable for crochet blankets?
Thermal stitch would be ideal for crochet blankets, yes, because it creates a lovely, warm fabric suitable for colder areas and also makes snuggly throws.
How to make a thermal stitch crochet?
To create a thermal stitch, you need to insert your hook in the back loop of the row you are currently working on. Then also go in the front loop off the row below, which was not done. This creates a two-layer stitch that is both thick and strong.
Is it possible to use thermal stitch amigurumi?
Thermal stitch may be used on amigurumi, yes, snow, bellies, or any place that you want to affect thickness or definition.
What is the best yarn to use for thermal stitch crochet?
Cotton yarn can be used to make something such as potholders or dishcloths. Cotton is tough and heat-friendly. It should be made from soft acrylic yarn for blankets and scarves. It is comfortable and it becomes warm.


![The Best 30+ Free Crochet Cat Patterns [Beginner-Friendly Guide]](https://crochetmind.com/wp-content/uploads/2025/04/1-The-Best-30-Free-Crochet-Cat-Patterns-Beginner-Friendly-Guide.webp)


