


Crochet tulip bouquet: Even in cold weather, wouldn’t it be lovely to always have springtime flowers inside your home? Yes, you can! One of the most enjoyable ways to make lovely flowers that never droop or appear depressed is to make a bunch of tulips out of yarn. Even adults who crochet frequently will like it, and it’s simple enough for children who are just learning the craft.
A crochet hook, some thin, bendy wire (we call it floral wire) for the stems, some colorful yarn, and your imagination are all you need to get started! We’ll then walk through simple steps. You will discover how to create the petals, assemble all the flower components, and finally arrange them in a beautiful bouquet. You’ll have a lovely handmade gift or a lovely decoration for your own room before you realize it.
Want to learn how to make them? Keep reading our full guide on making these yarn tulips. We’ll share cool tips to make your flowers look super real!
In This Post
What Is A Crochet Tulip Bouquet?
A crochet tulip bouquet is a handmade craft of fake tulips made with yarn and a crochet hook. Crafters loop colorful threads, like cotton or acrylic. With that, they shape petals, stems, and leaves. After combining all the parts, they create flowers that look like real tulips but never fade.
These bouquets are perfect for home decor, gifts, or weddings, offering a lasting, vibrant touch. You should then wrap them with ribbon for a personal present. With endless color options, they suit any style or event.
What Materials Do You Need For Crocheting the Crochet Tulip Bouquet Pattern?
Here are the materials that a crocheter needs for crocheting a tulip bouquet. Including –
| Materials | Description |
|---|---|
| Crochet Yarn | You’ll need medium-weight yarn, category 4, for the tulip pattern. Choose any colors you love! You’ll need about 100-200 yards of petals for 3-5 tulips, less for others. |
| Crochet Hook | Use hooks that match your yarn, often 4.0 mm (G/6) to 5.0 mm (H/8). Check the pattern’s size for the right tension and look. |
| Stuffing | Polyester fiberfill gives bulbs a full shape. Scrap yarn or cheap pillow stuffing works fine, too. |
| Yarn Needle | A blunt yarn needle weaves ends and sews petals or stems for a tidy finish. |
| Scissors | Sharp scissors trim yarn after petals or stems. Keep them close for clean cuts. |
| Stitch Marker | Stitch markers track rounds or stitches in spiral patterns to avoid errors. |
Which Stitches Are Best For Crocheting a Crochet Tulip Bouquet?
Creating a crochet tulip bouquet is fun, and choosing the right stitches is key to shaping those delicate petals and sturdy stems. Based on common crochet techniques and patterns for floral projects, here are the best stitches to use, which are mostly used for crocheting a crochet flower tulip bouquet. Including –
- Chain Stitch (CH): The foundation of most crochet projects. Chain stitches are used to start the petals and stems. They create a flexible base for crocheting the tulip’s structure. It allows you to control the length and shape of your crochet tulip.
- Single Crochet (SC): This stitch is perfect for creating a dense. It also creates a smooth texture of tulip petals. This stitch has a tight and compact nature. This nature helps petals hold their shape, whether you want them soft or slightly firm.
- Double Crochet (DC): You can use the double crochet stitch if you want taller and looser stitches. These stitches add height and a slight curve to the petals. It’s ideal for creating the wider, open parts of the petals.
- Slip Stitch (SL ST): Slip stitches are essential for joining rounds or sections. This stitch is like connecting petals to the flower base or finishing stems. They create a seamless look without adding bulk.
- Half Double Crochet (HDC): With this stitch, you will get a bit of height and flexibility. It’s useful for adding subtle texture to petals or shaping the green part under the flower.
- Increase/Decrease Stitches: To shape the petals’ natural taper, use single crochet increases (two sc in one stitch) to widen the petals. For decreases (sc2tog) to narrow it toward the tip. This gives your tulips that iconic curved shape.
How To Make A Crochet Tulip Bouquet
Here is the step-by-step guide on how to craft a crochet tulip bouquet. Including –
Equipment
- Crochet hook 2/2.5mm
- Stitch marker
- Scissors
- Floral stem wire: 3mm * 20cm
Ingredients
- Crochet yarn: Lace or fingering yarn (choose your favorite color)
- Flower rod
- Iron wire
Here is a step-by-step guide on how you can crochet a tulip flower. Including –
Crochet the Petals for a small flower
First, we are gonna crochet small petals for the crochet tulips. Here are the steps on how you can crochet small petals for a crochet tulip. Including –
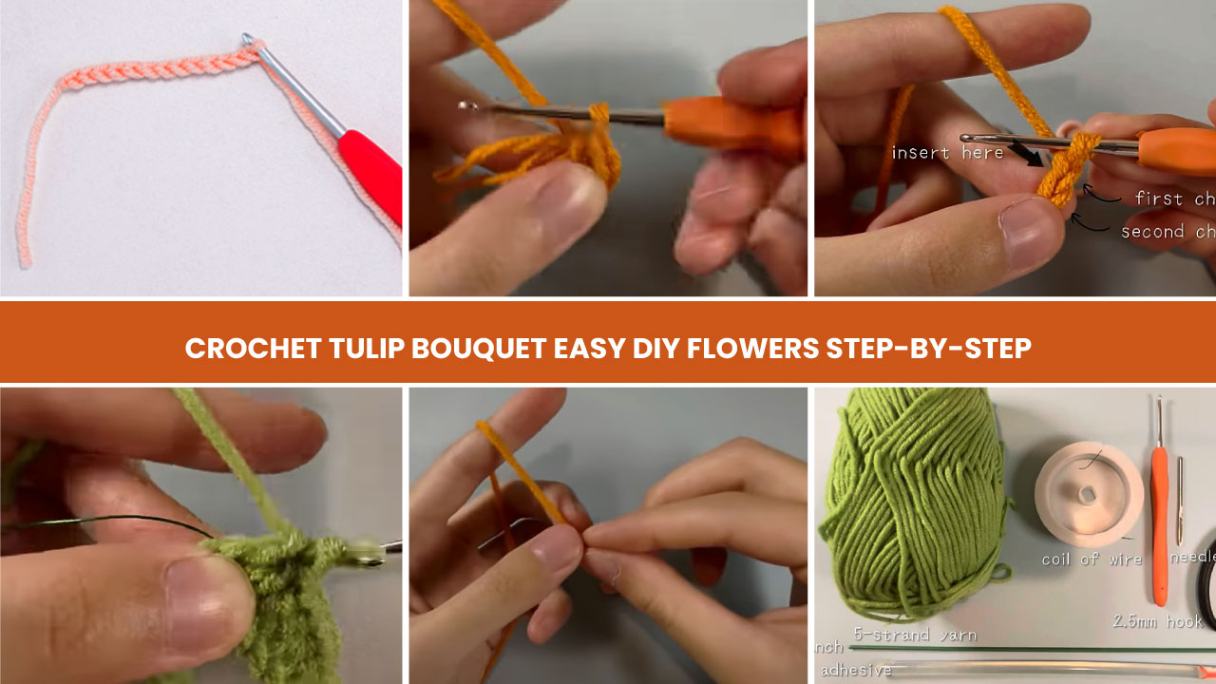
Step 1: Crochet The Small Petals.

For crocheting the small petals for the crochet tulip. First step, wrap the yarn around your hand like this. Now, let’s make a slip knot first. To make the slip knot, you need to hold the hook and twist it anticlockwise. Pinch the joint with your thumb and middle finger. Yarn over and pull through the loop. Pull the loop tight. This is a slip knot of your crochet small petal.
Step 2: Crochet The Foundation Chain

Next, we are going to create the foundation chain. Yarn over and bring the hook through the chain. This will count as the first chain. Then again, yarn over and pull through. This chain will count as two. Like that, we need to crochet 10 chains in total as a foundation chain. Then we are going to build the stitches on top of them.
Step 3: Crochet The Stitches Around The Foundation Chain

In this step, you need to work into the second chain from the hook. Make a slip stitch in the second chain. After making the slip knot, you will see there will be 2 loops on your hook. You just need to bring the first loop through the second loop. This will create a slip stitch. But in the meantime, we made a stitch on the side. By using a stitch marker, we are going to mark the stitch. This can help us to distinguish the key stitch in the following steps.
Now, go ahead and insert the hook into the next chain and make a single crochet. Next is the half-double crochet. During this time, you can find 3 loops on the hook. Yarn over and bring it through the three of them. Then make a double crochet stitch. Make 3 double crochets in total. Now make 2 slip stitches on the last chain that you have made. Insert the hook into the last chain again. This will complete your half of the first row of small petals.
Step 4: Crochet The Half Petal Of The Flower

Now you need to crochet the other half as same as you crochet this half side and mark the last stitch with the stitch marker. The insert the hook into the marked stitch and take the marker off. Make a slip stitch and a chain. Then insert the hook again and make a single crochet. At this time, you need to make 18 single crochet stitches in total around the stitches in the second row. Mark the last single crochet.
Next, we will pass 2 stitches and insert the hook into the third stitch. At this time, you need to crochet a slip stitch and a chain. Now pull up a loop. Leave a good amount of yarn and snip off the yarn. Pull the yarn out, and this creates a knot at the end of your work. Now, take a needle and thread up your yarn. Swing the ends. This is your crochet tulip, with small flower petals.
If you want, you can also add an iron wire to these small plates. For adding the iron wire, you need to crochet 12 single crochet stitches and 3 slip stitches in the last stitch. This will add the wire in the middle of the petals. Now, in the other half crochet 11 single stitches, and 2 single stitches in the slip stitch. Cut the yarn and leave a long tail. Make 3 small petals for 1 tulip. If you want, you can crochet more small petals.
Crochet Big Petals For A Crochet Tulip

Crocheting the big petals for the crochet tulip is quite similar to making the small petals. First, make a slip knot. Then, crochet 13 chains. You may count on it for sure. Now, make a slip stitch on the second chain. Mark this stitch with the stitch marker that you just made. Now make a single crochet stitch and a half double crochet stitch. After that, crochet 6 double crochet stitches and 1 half double crochet stitch. Now, make a single crochet stitch and 2 slip stitches on the last chain. This will complete the half side of the petals. You need to follow the same steps as the other side of the petals and mark the last stitch with the stitch marker.
Now you need to insert the hook into the marked stitch and take the marker off. Make a slip stitch and a chain. Insert the hook again and make a single crochet stitch. Now make 24 single crochets in total around the stitches as the second row. You need to make the last single crochet stitch in the marker stitch.
Next, you will cross 2 stitches and insert the hook into the third stitch. In there, make a slip stitch and a chain. Finish off and cut a long tail. This is your first big petal is complete. Make 2 Bingg petals for 1 tulip.
Crochet The Leaf For The Tulip Bouquet.

Materials:
- 5-strand yarn.
- Branch
- Coil of wire
- 2.5 mm hook
- Needle
- Scissor
- Lighter.
- Hotmelt adhesive
Here are the steps for crocheting a leaf of a tulip bouquet. Including –
Step 1: Crocheting The Leaf Of The Flower

First of all, let’s cut some wire that is around 1.5 times the length of the branch. Keep it on one side, and you will need to use it later. Now, wrap the yarn around your hand and make a slip knot. Now make a 29 foundation chain and 3 single crochet stitches. During crocheting the single crochet stitch, you need to put the yarn on the hook and complete the 2 single stitches with the yarn. With the wire, make 3 half double crochet stitches and 16 double crochet stitches in the foundation chain. After that, make 3 half-doubles and 2 single crochets. At this time, you need to crochet 1 single crochet stitch, 1 chain, and another 1 single crochet in order on the last chain. This will complete your half of the leaf.
Step 2: Crochet Half Of The Leaf

Let’s crochet the other half. It is the same as the previous steps. Continue working starting from the second stitch. Make 2 single crochet and 3 half double crochet stitches. After that, make 16 double crochets. There should be 6 stitches left after finishing 16 double crochet stitches. In these 6 stitches, you need to crochet 3 half-double crochet stitches and make 3 single crochet stitches. Make a slip stitch and chain for connecting both sides. Finish off and cut the yarn. This will complete your 1 leaf. One tulip only needs one leaf.
Assemble All The Parts Of The Tulip.

First, let’s start assembling the flower. For assembling the flower, first, let’s get some amount of yarn. Take a needle and thread up the yarn. Thread the small 3 petals and the 3 big petals together. Through the round side of the pedal. Then make a fast knot. Cut off the excess thread. To give the tulip a look, you need to use glue to stick the petals together. Now, take the Holmelt adhesive out and prepare a lighter for yourself. You need to apply the melted glue to the wrong side of a small petal. Stick the other part right side. Keep doing these steps to stick all the small petals together.
Then let’s take out the branch and insert it through the middle of the flower. Take out the green yarn and thread it up. Make it go through the middle of the flower, too. Take the needle off. Tie the yarn on the top of the branch and fix it with glue. Pull the bench down and hide the threads in the petal. Take the leaf out and fix it to the branch. Wrap the yarn around the branch. This way, you have completed a proper crochet flower tulip.
Assemble The Flowers In A Bouquet Style.

For warping a bouquet, first, you need to tie all the tulips together with the adhesive tape. You need to band the branches appropriately so the bouquet looks more natural, and move the lower leaves to the back.
Cut The Bouquet’s Paper.

Next, you need to cut paper for wrapping the bouquet. You need to have 2sizese of sheets of tissue paper. One of the sheets does not need to be cut. Set the paper aside. For the other paper, we cut it into quarters. No, we take 3 sheets of thick wrapping paper. Cut all three 3 sheets of paper in half. Take out 2 halves of the paper and cut them into quarters.
Wrapping The Crochet Tulip Bouquet

Let’s start wrapping. To wrap a crochet tulip bouquet, lay a full tissue paper sheet flat and place the tied tulips diagonally, with flower heads toward one corner. Add a tissue paper quarter under the stems and another loosely wrapped around them, securing with tape. Fan three wrapping paper halves under the bouquet, add a wrapping paper quarter for support, and wrap the tissue and wrapping papers in a conical shape. Secure with tape, adjust layers, and tie a ribbon for a polished look.
In Closing
A crochet tulip bouquet is a lovely handmade gem that adds a splash of spring to any space. Each stitch, crafted with care, mirrors the gentle shape of tulips. It’s a heartfelt gift or keepsake, bursting with color and charm. Made with patience and skill, this vibrant bouquet lasts forever, bringing joy and a touch of nature indoors. Perfect for anyone who loves a bit of cozy, creative beauty in their life.
Frequently Asked Questions About The Crochet Tulip Bouquet
How Long Does It Take To Crochet A Tulip Bouquet?
A single tulip takes 1-2 hours; a bouquet of 6-8 tulips may take 10-15 hours, depending on skill level. Beginners might need more time, while experienced crocheters can finish faster.
Can I Wash A Crochet Tulip Bouquet?
Gently hand-wash with mild soap and lukewarm water. Avoid soaking the wire stems. Pat dry with a towel and reshape. Air dry completely to prevent yarn damage and maintain the bouquet’s vibrant look.
Are Crochet Tulip Bouquets Good Gifts?
Absolutely! They’re thoughtful, handmade, and everlasting, perfect for birthdays, weddings, or housewarming. You can customize colors to suit the recipient’s taste, making it a personal, heartfelt gift that never wilts.
How Do I Make My Crochet Tulips Look Realistic?
Use soft, natural yarn colors and vary petal sizes slightly. Add wire to stems for posing, and shape petals with light starch. Small details like leaf texture enhance realism in your bouquet.


![The Best 30+ Free Crochet Cat Patterns [Beginner-Friendly Guide]](https://crochetmind.com/wp-content/uploads/2025/04/1-The-Best-30-Free-Crochet-Cat-Patterns-Beginner-Friendly-Guide.webp)


