


![Select Crochet Clothing Ideas: [Best Crochet Fashion] Crochet Clothing Ideas](https://crochetmind.com/wp-content/uploads/2025/07/Crochet-Clothing-Ideas-Best-Crochet-Fashion-in-2025-1-1.jpg)
Are you having trouble making your knitting projects look neat and even? If you’ve ever struggled with keeping stitches consistent or getting a smooth texture, you’re not alone. Many beginners find it tricky to create a polished-looking fabric, and that’s where the seed stitch comes in.
Seed stitch helps you add a beautiful, bumpy texture that lies flat and looks the same on both sides. Don’t worry if you’ve never tried it before! With our simple, step-by-step guide, you can learn this stitch and create scarves, blankets, or edges that look professional. Keep reading to get all the details.
In This Post
What Is Seed Stitch in Knitting?
The Seed Stitch is an entirely reversible pattern. The correct side and the incorrect side are the same. Every row of knitting features alternating Knit and Purl Stitches, producing small bumps that resemble seeds. A preferred reason is that it doesn’t curl at the edges and ends of a knitted item.
It is not only attractive but also highly efficient for creating clean edges. Consequently, it is frequently utilized for the edges of blankets and scarves –where you desire the work to remain flat. The textured seed stitch is effective not only for borders but also in dishcloths, blankets, scarves, and hats.
What materials do you need for knitting a seed stitch
Here are the materials that you need for knitting a seed stitch. Including –
1. Crochet Yarn:
To knit a seed stitch, good yarn is very important. Worsted-weight yarn is the easiest for beginners because it is thick enough to see your stitches clearly. Wool or cotton yarn works well because it is soft, strong, and makes the seed stitch look neat.
You can also try lighter or thicker yarn if the project needs it, but make sure it matches your needle size. Choosing the right yarn helps the stitches stay even and makes the finished piece look smooth and nice.
2. Knitting Needles:
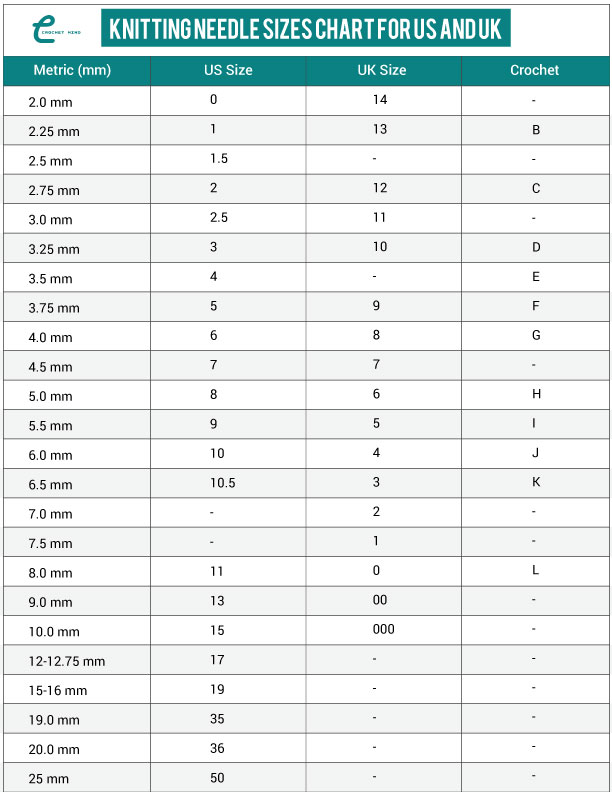
Knitting needles are needed to create the seed stitch. You can use straight needles if knitting flat pieces or circular needles if knitting in a round. Medium-size needles, like US 7–9, are easy to handle for beginners.
Using the right needles with your yarn ensures your stitches are even and the pattern shows clearly. Needles that are too small or too big can make knitting harder and may change the size of your project.
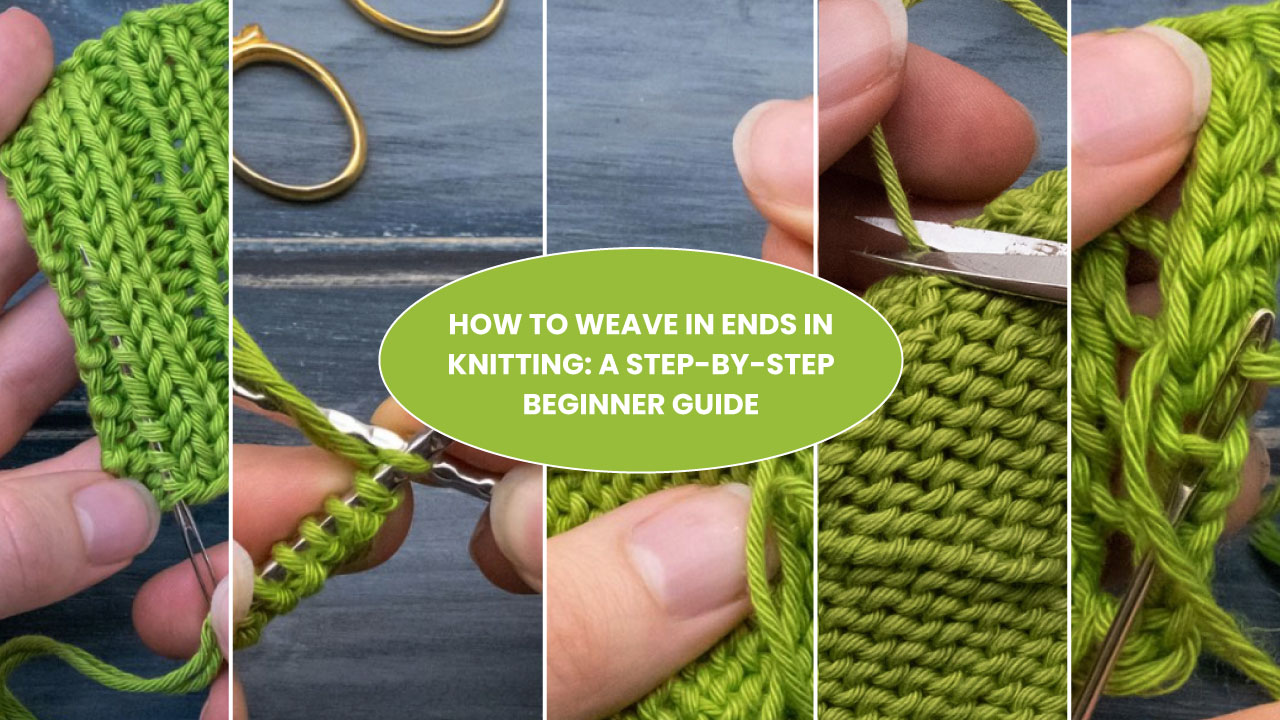
3. Tapestry Needle:
A tapestry needle is used at the end of your project to weave in yarn tails. This makes your work neat and stops it from unraveling. The needle is big enough to fit your yarn and has a blunt tip, so it won’t split the stitches. Using a tapestry needle carefully makes your project look finished and professional.
4. Scissors:
Scissors are needed to cut the yarn at the end of each section. Sharp scissors make clean cuts and prevent the yarn from fraying. Always keep your scissors nearby while knitting so you can trim ends safely.
5. Measuring Tape:
A measuring tape is helpful to check the length and width of your project. It ensures your scarf, blanket, or tie comes out the right size. Measuring often keeps your work accurate and helps you know when to stop knitting.
6. Stitch Markers (Optional):
Stitch markers help keep track of pattern repeats or rows. They are useful for large or complicated projects. You can move them as you go to make sure you don’t lose your place. Using markers makes knitting easier and more organized.
How to Knit Seed Stitch
Here are the 2 different ways on how to knit a seed stitch. Including –
1. Flat Knitting (Even Number of Stitches)
Step 1: Cast On An Even Number Of Stitches In Your Knitting Project

For knitting the seed stitch, first you need to use the cast-on technique. In seed stitch, you can use any type of cast-on technique. But it’s better if you use a standard longtail cast-on. This cast-on is not too stretchy nor too solid for this pattern.
Step 2: In The First Row, *Knit 1, Purl 1* Across All Stitches

When you finish your cast on, then turn your work around. Bring the yarn to your needle and start knitting your first stitch. You need to bring your yarn in front of your needle and knit a purl stitch in the next stitch.
From here, you need to repeat this technique. First, knit the stitch, then knit the purl stitch. You need to repeat this until the end of the row.
Note: Remember to move the yarn to the front for purl stitches. Move it to the back for knit stitches.
Step 3: In The Second Row, Knit *Purl 1, Knit 1* Across All Stitches

In this step, you need to turn the work to the other side. Now, repeat step 2 in the opposite direction. Means you need to start with a purl stitch, then work a knit stitch. Keep alternating between purl and knit stitches throughout the row.
Step 4: Repeat Those Two Rows Until You Reach

Seed stitch can be done in just 2 steps. To complete the seed stitch, simply follow steps 2 and 3 repeatedly.
2. Seed Stitch In the Round

If the cast-on has an odd number of stitches, the seed stitch in the round will be worked this way.
Here are the instructions for how to knit the seed stitch in a round. Including –
| Round | Instructions For Knitting Of Seed Stitch In Knitting In The Round |
| Round 1 | Knit 1, purl 1; keep repeating from * until the last stitch, then finish with a knit 1. |
| Round 2 | Purl 1, knit 1; keep repeating from * until the last stitch. Then finish the row with a purl 1. |
| Repeat | Keep repeating Rounds 1 and 2. Continue until the project reaches the size you want. |
Best Projects for Seed Stitch In Knitting
1. Seed Stitch Infinity Scarf Knitting Pattern

Materials:
- Knitting needles, size 8
- Worsted weight yarn (any kind or color)
- Scissors
- Tapestry needle
Here is the step-by-step guide on how to knit an infinity scarf with seed stitches. Including –
- Step 1: We’ll cast on using the long-tail method. Start by making a slip knot about 18″ from the end of the yarn.
- Step 2: After that, you need to cast on at least 3 stitches.
- Step 3: Row 1 (Right side): Knit 1, purl 1, then keep repeating knit 1, purl 1 across the row, and finish with a knit 1.
- Step 4: Row 2 (Wrong side): Purl 1, knit 1, keep repeating across the row, and finish with a purl 1.
- Step 5: You need to keep repeating these two rows until the scarf reaches the length you want. Usually, a knitted scarf will be about 5′ 6″.
- Step 6: Cast on: K1, P1, then while the yarn remains at the front from the purl stitch, pick up the stitch that’s further back with the working needle, bring it over the second stitch, and let it go. Only one stitch should remain on the needle. Move your yarn to the back, K1, then with the yarn in the back, take the stitch that is further back and lift it up and over the nearer stitch. Continue to repeat this sequence while adhering to the K1, P1 format until only one stitch remains. Draw the leftover yarn through that loop and secure it.
2. Knitted Tie Pattern in Seed Stitch

Materials:
- Straight Knitting Needles Size 8 US
- Scissors
- Tapestry Needle
- Measuring Tape
- Worsted weighted yarn
Here is a step-by-step guide on how to knit a tie in seed stitches. Including –
Step 1: First, you need to cast on 13 Stitches using the Long-Tail Technique.
Step 2: Then, knit the seed stitch on every row. Keep going until the piece is 21 inches long.
Step 3: Disease section of the knitted seed stitch tie
| Rows | Instructions On How To Decrease The Seed Stitch For A Knitted Tie | Stitches |
|---|---|---|
| Round 1 | Knit 2 together, then knit 1, purl 1 across, and finish with a knit 1 | 12 stitches |
| Round 1 | Knit 2 together, then knit 1, purl 1 across. | 11 stitches |
| Round 3–10: | Purl 1, knit 1 across each row, ending with a purl 1. | |
| Round 11 | Knit 2 together, then purl 1, knit 1 across, ending with a purl 1. | 10 stitches |
| Round 12 | Knit 2 together, then purl 1, knit 1 across. | 9 stitches |
Step 4: Now, you need to knit the seed stitch pattern on every row. Continue until the tie measures 57–59 inches long.
Step 5: Bind off your stitches, block the piece to shape it. Then, weave in all loose ends.
Facebook : Twitter : Pinterest : Instagram
Frequently Asked Questions About Seed Stitch
Is seed stitch knitting hard for beginners?
Seed stitch knitting is super beginner-friendly! Alternating knit and purl stitches creates that bumpy texture. Just cast on an even number, follow the pattern, and practice. You’ll get the hang of it quickly and love the cozy results.
What yarn works best for seed stitch?
Worsted-weight yarn is ideal for seed stitch knitting. Go for wool or wool-acrylic blends for softness and clear texture. Light colors help you see stitches better, and 100–200 yards is plenty for a small project like a scarf.
Can I fix mistakes in the seed stitch?
Absolutely, mistakes in seed stitch knitting are fixable! If you mix up a knit or purl, carefully unravel to the error, then reknit. Take it slow, check your work often, and you’ll keep that textured pattern looking perfect.
How do I keep track of seed stitch rows?
Keeping track in seed stitch knitting is easy with a row counter or tally marks. Always knit over purls and purl over knits. A sticky note or app can help you stay on top of your pattern without stress.
What projects suit the seed stitch best?
Seed stitch shines in scarves, blankets, and dishcloths. Its textured look adds charm to simple beginner knitting projects. Try a scarf first. It’s straightforward, and the bumpy pattern makes it a cozy, stylish piece you’ll love showing off.
In Closing
Seed stitch knitting offers a perfect blend of simplicity and elegance, creating a textured pattern ideal for scarves, blankets, and more. Accessible to beginners, this versatile technique enhances any project with its charming, tactile design.
With just yarn and needles, you can master the seed stitch and elevate your knitting skills. Embrace this timeless method, start your next project, and enjoy crafting beautiful, handmade pieces with confidence.


![The Best 30+ Free Crochet Cat Patterns [Beginner-Friendly Guide]](https://crochetmind.com/wp-content/uploads/2025/04/1-The-Best-30-Free-Crochet-Cat-Patterns-Beginner-Friendly-Guide.webp)


