


![Select Crochet Clothing Ideas: [Best Crochet Fashion] Crochet Clothing Ideas](https://crochetmind.com/wp-content/uploads/2025/07/Crochet-Clothing-Ideas-Best-Crochet-Fashion-in-2025-1-1.jpg)
Stretchy beaded bracelets are one of the most fun crafts to make at all. Using some simple materials such as elastic cords and different colored beads, you can create attractive beaded bracelets. They are stretchy beaded bracelets, ideal for kids, novices, or those who enjoy working with DIY beaded bracelets. These bracelets can be a fashionable addition to outfits with multi-colored beads and an elastic strip.
It is very simple to make stretchy beaded bracelets. First, cut and tension your elastic cord. Then, insert beads into the cord. Next, employ a bead stopper in the end. After that, make a knot and remove the ends. Your cute DIY bracelet is ready.
It is possible to create custom beaded bracelets with names, patterns, and colors of the favorite. In this article, you will learn how to make stretchy beaded bracelets in a set of steps. We show you the materials and methods on how to tie knots, especially the best way to make your bracelets not only durable but also good-looking and addictive to wear or as gifts.
Key Takeaways:
- Beaded stretchy bracelets are simple to make, joyful, and will not take that many items. Elastic cord is significant in making them stretchy and strong.
- You might utilize a lot of kinds of beads, such as seed beads or colorful plastic beads.
- Make sure that your bracelet is very secure so that it will not come apart. It is more or less an excellent hobby for children and grown-ups.
In This Post
- What Are Stretchy Beaded Bracelets?
- Supplies You’ll Need to Make Stretchy Beaded Bracelets DIY
- How to Make Stretchy Beaded Bracelets
- Types of Stretchy Beaded Bracelets
- Best Stretch Cord for Bracelets
- How to Make Stretchy Bracelets that Won’t Break
- FAQ’s
- 1. Do children have the ability to create stretchable beaded jewelry?
- 2. Which knot shall I tie?
- 3. What is the reason my bracelet breaks?
- 4. How long should the cord be?
- 5. Is it possible to create personalized beaded bracelets?
- 6. What is the type of bead suitable for a novice?
- 7. What can I do to prevent my beads from falling off?
- 8. Can I fashion two-strand bracelets?
- 9. How can I make a bracelet colorful?
- 10. How much does glue dry?
- Final Thoughts
What Are Stretchy Beaded Bracelets?

The stretchy bead bracelets are enjoyable items of jewelry, given the production of beads strung together on flexible cord. When compared to metal or clasped bracelets, stretchy beaded bracelets can fit around your hand and go through your wrists easily, as they are elastic.
It is a beaded bracelet that is an exceptionally popular beaded bracelet among beginners since it is extremely simple to construct. Many people like them and have them as friendship bracelets or individual gifts. You may make original beaded bracelets with names or favorite colors!
Related Post: How to Make Friendship Bracelets?
Supplies You’ll Need to Make Stretchy Beaded Bracelets DIY
You will start with some easy materials. First, grab some stretchy cord. Then, pick your favorite beads. Also, keep scissors nearby. After that, you should glue a bead stopper. After all, the tools are ready, and you are now free to start on your stretchy bracelets DIY project.
| Item | Why You Need It |
|---|---|
| Beads | For decoration and color |
| Stretch cord | The base that makes it stretchy |
| Scissors | To cut the cord |
| Bead stopper (optional) | Keeps beads from falling off |
| Glue (clear) | To seal the knot |
| Needle (optional) | Helps if the beads have small holes |
These tools enable you to create stretchy beaded bracelets that are simple, quick, and sturdy!
How to Make Stretchy Beaded Bracelets
It is easy and enjoyable to create your stretch beaded bracelets. Just perform these simple steps. First, cut and tension the cord. Then, insert beads and employ a bead stopper. After that, make a knot and remove the ends. Your bracelet is ready.

Step 1: Measurement of Fit

At this point, wrap the bracelet gently around your wrist to see how it fits. It has to fit, but not be tight. If it is too loose, add a few more beads. The move will help your bracelet fit well.
Step 2: Cut the Elastic Cord

To start with, take a length of stretch cord about 12 inches. This length will have provided you with sufficient cord so that you can add beads and a bit more so that you can tie a knot that will be safe. Just keep in mind that a bit more cord than too little is better. The ends will always be trimmed subsequently.
Step 3: Tension the Cord

After that, you pull and stretch the cord a few times without any beads being added next. This simple trick helps the cord relax and does not allow your already-made bracelet to be loose or saggy after wearing it.
Step 4: Insert Beads

After that, begin to attach your preferred beads to the cord one at a time. You may have a pattern, using alternating colors, or mix and match them to create a fun, bejeweled colored bracelet. Also, make sure to gently push every bead down near the stopper or tape so that they do not come off.
Step 5: Employ a Bead Stopper

As soon as a few beads are added, tie up one end of the cord with a bead stopper or a piece of tape. It prevents the beads from falling off during work. It facilitates the procedure and ensures that your beads cannot fall onto the table.
Step 6: Make a Knot
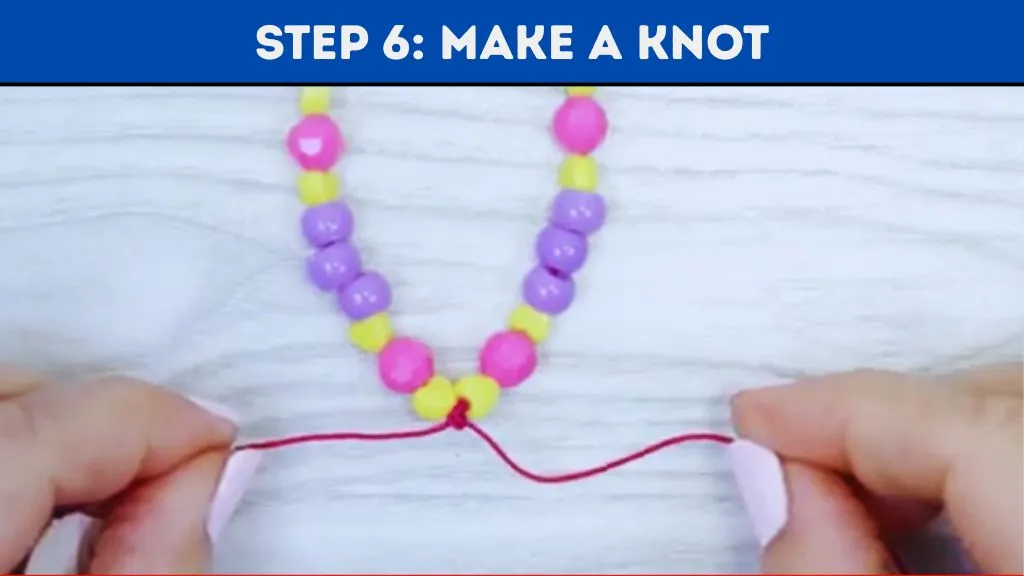
When completing the knot of the bracelet, one should use a double knot or a triple knot in order to knot the bracelet. Ensure that the knot is firmly knotted. It is a very crucial step, given that a good knot prevents your bracelet from slipping out.
Step 7: Remove the Ends

Last, but not least, you cut off any excess cord with scissors. Leave a little portion of the cord near the knot so as not to lose the knot when it is cut. It is the final decoration that gives your bracelet a nice and polished appearance.
Your finished DIY bead bracelet should look perfect! Wear it proudly or give it away to a friend as a personal handmade present.
Types of Stretchy Beaded Bracelets
In the production of stretchy beaded bracelets, the selection of the beads used is of great importance. The two types provide varied looks and feels. You can make cute beaded bracelets. The common types of beads that you can use are given below.
1. Seed Beads

First, seed beads are very tiny. They are perfect for small beaded bracelets. These beads are also of a variety of colors. They are small, which means that you can create detailed patterns. They are also lightweight, and thus your bracelet will feel nice.
2. Plastic Beads

Plastic beads are jaunty and rainbow-colored. They work well with children. Moreover, they are light and therefore manageable. They are available in most shapes and sizes. Besides, plastic beads tend to be less expensive; hence, creating numerous bracelets won’t cost you that much.
3. Glass Beads

Glass beads add a shiny, fancy look. They sparkle nicely in the light. Also, they come in bright or soft colors. However, these beads are made of plastic; thus, they are lightweight when compared to glass beads. Therefore, wear them in case you want to make your bracelet a bit more beautiful.
4. Letter Beads

Another fun option is letter beads. These let you spell names or messages. They are suitable for making personalized beaded bracelets. E.g., you can make friendship bracelets. You can also have letter beads to give a personal touch to your piece. [Youtube]
5. Wooden Beads

Wooden beads are natural in appearance. They are easy to grasp and are soft. They are light and eco-friendly as well. Wood beads also would help you when you require a simple and earthy appearance to be added to your bracelet. Youtube
Different kinds of beads give dissimilar styles and emotions. Therefore, take the beads that are according to your style. That way, your colorful beaded bracelets are going to look just as you want. The kind of bead you select will alter the way your diy beaded bracelets appear.
Best Stretch Cord for Bracelets
Choosing the right stretch cord is very important. First, a good cord makes your bracelet both strong and flexible. Next, the cord should fit your beads well. Also, the thickness matters. Below are some of the best cords you can use.
1. Stretch Magic

Stretch Magic is very popular. It is simple to use, and the duration is high. Many people love it for its stretchy beaded bracelets. Plus, it stretches well without breaking.
2. Elastic Floss

Elastic floss is soft and strong. It feels nice on your wrist. Also, it holds up well when you wear your bracelet every day. It is a great choice for many types of beads. [2]
3. Clear Elastic Cord

Clear elastic cord gives an invisible look. It implies that you have beads that appear to be floating on your wrist. As well, it is compatible with any colors and bead sizes. This cord is ideal in case you wish to make your beads look prominent.
Related Post: Handmade Crochet Designs: 55+ Unique & Stylish Creations
Choosing the Right Thickness
When using holiday and triangular cords, choose one between 0.5 mm and 1 mm.
- A thicker cord works better with big beads.
- The thinner one is recommended on seed beads or small beaded bracelets.
- Always ensure that the cord fits in your bead holes easily.
Your DIY beaded bracelets will be strong and comfortable if you use the appropriate stretch cord. Choose, hence, the finest cord to weave beautiful and permanent bracelets!
How to Make Stretchy Bracelets that Won’t Break
These five simple steps will ensure that your stretchy beaded bracelets will be strong and durable. These tricks will ensure that your bracelet is safe and can last a long time, looking beautiful!
- Select a power stretch cord: First, select a good stretch cord, such as Stretch Magic or the elastic floss. These strings have large elastics and cannot break easily. Make sure to use a sturdy cord, as thin or cheap cords tend to fail quickly.
- Beading Cord Stretch: Then, you can twist and stretch the cord, after which you can insert beads. It aids in getting the cord to relax, thus making your bracelet not sag after completion.
- Tighten the Double Knot: Once you have put on all the beads, tie a decent knot. The knot should be pulled up so that it cannot loosen. Additional security can be done using a knot by a surgeon.
- Drop Glue Somewhere: Next, apply some clear glue to the knot. It holds the knot to make it slip. Mind using excessive glue.
- Wait until the Glue is Dry and trim the Ends: Lastly, allow 10 minutes for drying the glue. Then you carefully cut an additional cord, leaving some space so that the knot remains secure.
With these few easy steps, your stretchy beaded bracelets will be durable, bendable, and ready to wear daily.
Related Post: 50+ Easy Mother’s Day Crafts Ideas in 2025
FAQ’s
1. Do children have the ability to create stretchable beaded jewelry?
Yes! Stretchy beaded bracelets are easy do-it-yourself projects that kids can make. They should, however, be assisted in using scissors and knots by tying them safely.
2. Which knot shall I tie?
Try a surgeon’s knot or a double knot. These knots are more durable and make the bracelet well fastened.
3. What is the reason my bracelet breaks?
It could be due to a weak cord. You should always use powerful elastic such as Stretch Magic. Also, do not fasten the knot too much, and do not fasten the knot too loosely.
4. How long should the cord be?
Take 12 inches of casual cord. It provides sufficient space to insert some beads, and so it knots well.
5. Is it possible to create personalized beaded bracelets?
Yes! You may use letter beads to spell names or silly words. It makes your bracelet individual and unique.
6. What is the type of bead suitable for a novice?
Beads made of plastic are perfect to start with. They are light, colorful, and simple to handle.
7. What can I do to prevent my beads from falling off?
Stuff a bead stopper into one end of the cord, or tape one end. It keeps the beads held at work.
8. Can I fashion two-strand bracelets?
Yes! This bracelet will be stronger with two cords. Just feed the beads on the 2 cords and tie a knot in the UFC cord.
9. How can I make a bracelet colorful?
Blend colors and shapes of beads. A beaded bracelet can be made in a fun pattern or any random design (to be colorful).
10. How much does glue dry?
The drying time for glue is approximately 10 minutes. Wait to put on your bracelet to ensure it does not get lost.
Final Thoughts
Stretchy beaded bracelets are a way to be self-inspirational. The bead color, size, and form may be whatever is preferred. In no time at all, you will be quite skilled in making stretchy bead bracelets that do not snap. You can also sell your handmade beaded bracelets or use them as a present.
Then go and get your beads, go and get your cord, and begin your journey into DIY beaded bracelets, and what a journey it would be. The colorful beaded bracelets are as easy as anything you could make yourself.


![The Best 30+ Free Crochet Cat Patterns [Beginner-Friendly Guide]](https://crochetmind.com/wp-content/uploads/2025/04/1-The-Best-30-Free-Crochet-Cat-Patterns-Beginner-Friendly-Guide.webp)


