


![Select Crochet Clothing Ideas: [Best Crochet Fashion] Crochet Clothing Ideas](https://crochetmind.com/wp-content/uploads/2025/07/Crochet-Clothing-Ideas-Best-Crochet-Fashion-in-2025-1-1.jpg)
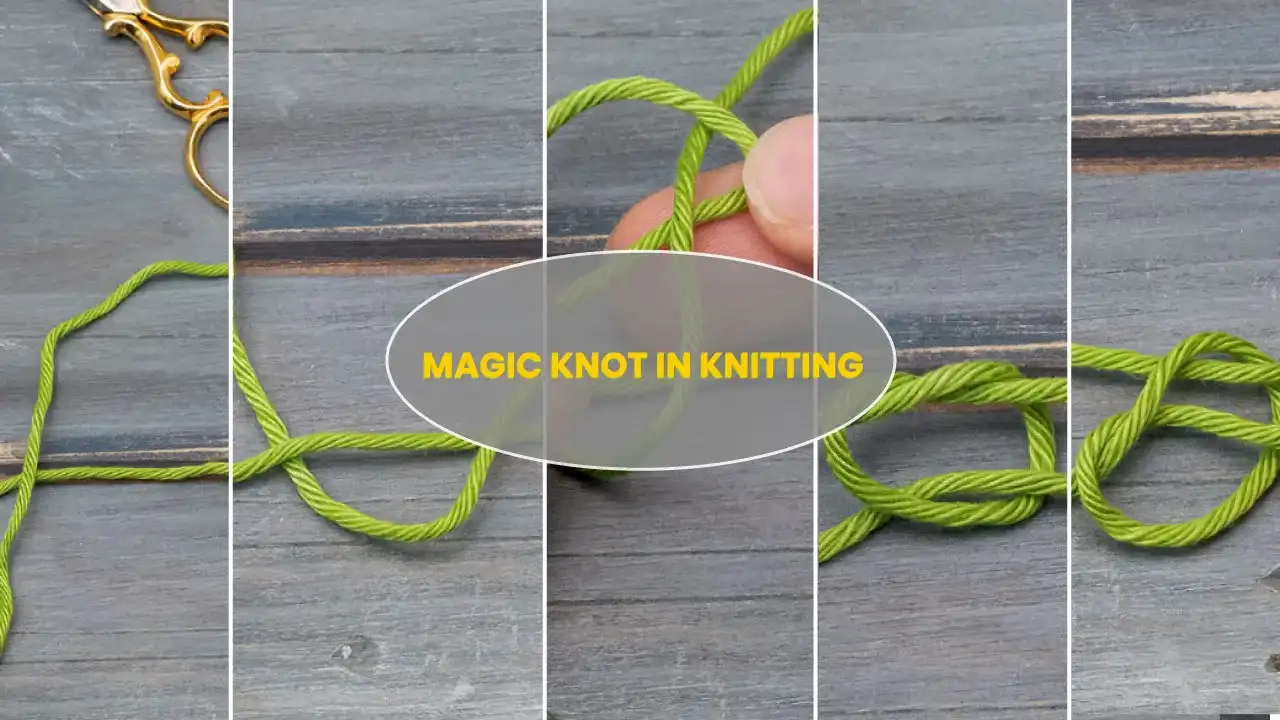
Ever run out of yarn mid-row and dread weaving in endless ends? In this moment, try out the magic knot. This technique lets you attach new yarn anywhere in your project—no cutting, no fuss. It creates a secure and nearly invisible knot that sits flat against your fabric.
Take those two yarn ends and cross ’em like a little X. Then wrap one around the other and give a gentle tug to lock them together. Seriously—that’s the whole trick! This tiny knot sits flat against your fabric (no weird bumps!), holds tight even with slippery yarns, and leaves zero ends to weave later. It’s perfect for cozy blankets, soft sweaters, or anything you want super smooth.
In this guide, we’ll walk you through every move with photos and pro tips—no guesswork! Ready to see how?
In This Post
What Is a Magic Knot?
The magic knot is a clever little knitting trick to join two yarn ends together. It creates a tiny, super-secure knot that sits flat against your fabric. Best of all? It leaves almost no ends to weave in later! This makes it feel like magic – especially with slippery yarns that usually unravel. It’s your secret weapon for invisible, sturdy joins in any project.
When to Use the Magic Knot In Knitting
So, you’ve heard whispers about this “magic knot” thing in knitting circles. But when is it actually useful? Consider it your hidden tool for particular yarn-joining scenarios. Here’s when to utilize this useful technique:
1. When You Need to Join Yarn Mid-Project:
Running low on yarn while working on a row? Rather than panicking or leaving untidy ends, the magic knot allows you to effortlessly connect a new ball exactly where you are. It’s ideal for large endeavors such as blankets, scarves, or sweaters that will probably require multiple skeins.
2. When You HATE Weaving in Ends:
Let’s be real, tucking in numerous small yarn ends is the most tedious. The magic knot forms an incredibly strong, nearly undetectable connection that results in minimal ends to manage afterward. It’s a massive time-saver and keeps your work looking clean on the inside, too.
3. When Working with Slippery Yarns:
Yarns like silk, bamboo, or very smooth merino simply won’t remain knotted. Standard knots can easily slip out! The magic knot is specifically crafted to tightly bind slippery yarns together. No more untangling messes.
4. When You Want a Neat, Flat Join:
You know how some knots in knitting feel like little rocks hiding under your fabric? Super annoying, right? Especially when you’re making something soft like a sweater or a delicate scarf. That’s where the magic knot shines! It sits so flat against your work that you’ll barely know it’s there. No weird bumps rubbing against your skin or messing up your pretty lace pattern. It’s perfect for anything you want to feel smooth and cozy – think baby clothes, comfy shawls, or anything you wear close to your body.

Materials Needed For Knitting A Magic Knot
Worried you need special gear? Relax! The magic knot is wonderfully low-tech. Honestly, you probably have everything you need right now tucked into your knitting bag.
Here are the materials that you need while knitting a magic knot. Including –
1. Your Yarn Ends: This is the main material you need while knitting a magic knot. You need the tail end of the yarn you’re finishing with, and the starting end of the new yarn ball you want to join. That’s it. No special yarn required – the magic knot works with most types, from cozy wool to slippery silk. Just make sure you have at least a few inches (about 6-10 cm) of each end to work with comfortably.
2. Sharp Scissors (or Snips): Once your knot is magically in place, you’ll want to snip those ends close. Sharp scissors are your best friend here – they give a clean cut right up near the knot, keeping things tidy and secure. Dull blades? Not so much – they can leave fuzz or make trimming a pain.
3. (Optional but Handy) A Tapestry Needle: Okay, you don’t need this to make the knot itself. But some knitters like to use one to very gently tuck in the teeny-tiny trimmed ends after the knot is tightened down.
That’s it! No special gadgets, no expensive gizmos. Just your yarn, and something to snip with. It’s one of the reasons knitters love this technique – it’s simple, accessible, and uses what you already have. Ready to see how it’s done?
How to Tie the Magic Knot (Step-by-Step)
Here is a step-by-step guide on how you can tie the magic knot in knitting. Including –
Step 1: First, take the two yarns you need to connect. Set them down in front of you with the tails pointing in opposite directions.

Now, in Step 2, take the tail on your left and gently drape it right over the other yarn.

Step 3: Next, take that tail and carefully tuck it underneath the other yarn.

Step 4: Next, take that tail and drape it across the other yarn (the one still connected to your project). Just like that—you’ve made a loop.

Step 5: Next, carefully guide that tail through the loop from below.

Step 6: Next, pull the tail gently but firmly until the knot feels cozy and secure. And just like that—you’ve made your very first starter knot.

Step 7: Now, grab the other tail (the one you haven’t used yet) and gently cross it over the main yarn. Just like you did before.

Step 8: Now, take that same tail and gently thread it underneath the other yarn again.

Step 9: Now, take that tail and fold it over the main yarn (the part still attached to your ball). Just like before—you’re making another little loop.

Step 10: Next, carefully slide the tail up from underneath the loop. Gently pull until it’s cozy and tight.

Step 11: Now, gently hold the knot between your thumb and finger. Then, pull the two long yarns (the ones still attached to your yarn balls—not the little tails!). Keep pulling softly until your two knots slide together and meet in the middle.

Step 12: Next, pull the yarns snug (not too hard!) to secure the knot. Then, carefully trim the tails with your scissors right up against the knot. And… you’re done! Your new yarn is ready to go. Just pick up your needles and knit on like nothing happened.


Pros and Cons of the Magic Knot
The magic knot is a super handy technique for knitters. This knot helps those knitters who want to join yarn without a ton of fuss. It’s like a little trick up your sleeve that can make your knitting projects smoother, but it’s not perfect for every situation.
Let’s break down the pros and cons of using the magic knot, so you can decide if it’s right for your next project.
| Pros Of The Magic Knot | Cons Of The Magic Knot |
|---|---|
| Quick and Easy to Learn | Not Ideal for Delicate Yarns or open texture |
| Secure and Reliable | Can Feel Stiff |
| No Bulky Ends | Not Reversible |
| Great for Yarn Changes | Not Always Invisible |
| No Weaving Required | Takes Practice for Tension |
Frequently Asked Questions About Magic Knot in Knitting
Will the magic knot come undone?
No. When pulled tight, it locks securely. It works well with most yarns, including slippery ones. Just tug the main yarns firmly after joining. The knot holds strong during regular use and washing.
Is the knot visible in my knitting?
It sits flat against the fabric. In most projects, it’s nearly invisible. Ideal for garments, scarves, or items where a smooth finish matters. No lumps or bumps show on the right side.
What yarns work best with this knot?
It suits most smooth yarns like wool, cotton, or acrylic. Use extra care with very slippery fibers (silk, bamboo). Avoid very thick or fuzzy yarns, as the knot may not hold neatly.
Do I need to weave in the ends?
No. After tightening the knot, trim the tails close with scissors. The knot grips the yarn securely, so the ends won’t unravel. This saves time compared to traditional weaving.
Is this method easy for beginners?
Yes. It involves two simple knots pulled together. Follow the steps slowly, and you’ll learn it quickly. No special skills are needed, just basic hand coordination. Practice with scrap yarn first.
Final Thoughts
The magic knot offers a simple, reliable way to join yarn mid-project. It creates a secure, flat join that resists unraveling, even with slippery fibers. By eliminating the need to weave in ends, it saves significant time.
Ideal for garments, blankets, and accessories where a smooth finish matters. With minimal tools and practice, knitters of all levels can master this technique for cleaner, faster results.


![The Best 30+ Free Crochet Cat Patterns [Beginner-Friendly Guide]](https://crochetmind.com/wp-content/uploads/2025/04/1-The-Best-30-Free-Crochet-Cat-Patterns-Beginner-Friendly-Guide.webp)


