


![Select Crochet Clothing Ideas: [Best Crochet Fashion] Crochet Clothing Ideas](https://crochetmind.com/wp-content/uploads/2025/07/Crochet-Clothing-Ideas-Best-Crochet-Fashion-in-2025-1-1.jpg)
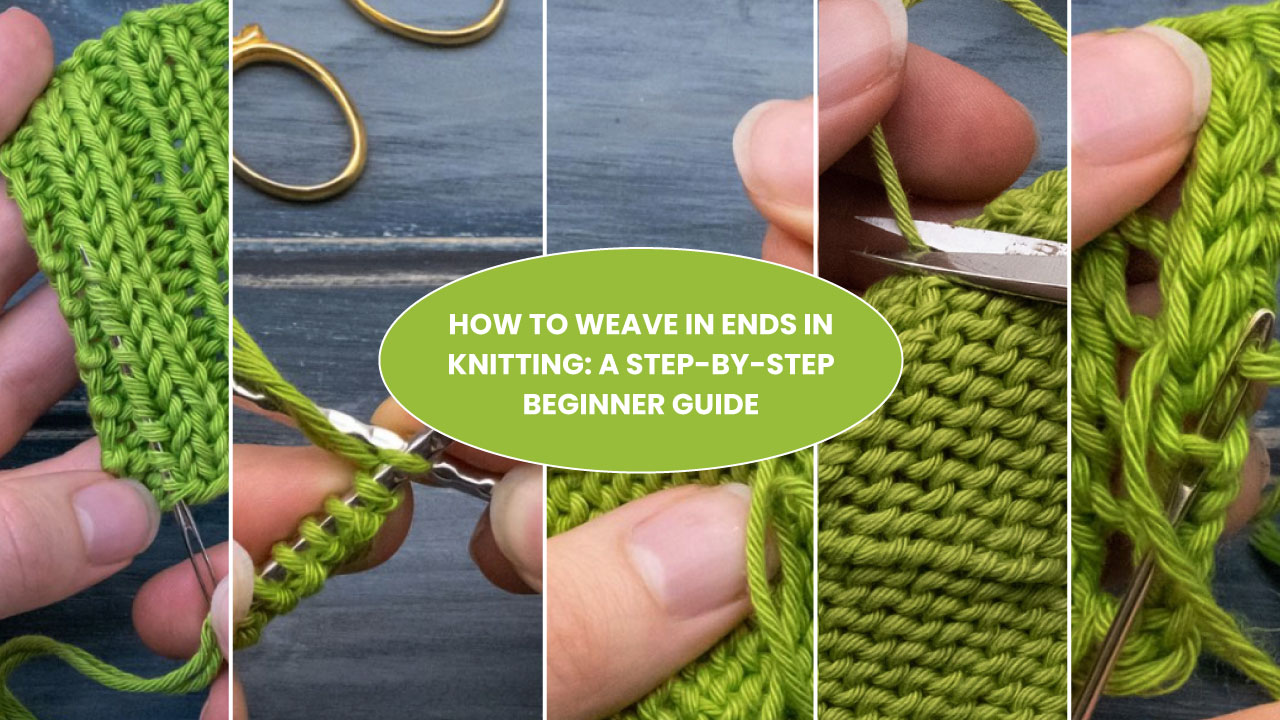
Weaving in ends in knitting is a straightforward yet essential step that gives your project a neat and polished appearance. It hides the loose yarn tails and helps your work stay strong and last longer. Want to learn how to Weave in Ends in Knitting? You’re in the perfect place.
Weaving in ends is a beginner-friendly technique that works with all types of yarn projects, such as cozy hats, soft scarves, or warm sweaters. It blends well with different stitch styles and keeps everything tidy. Whether finishing a big blanket or a small swatch, this technique brings a clean finish.
In this article, we will discuss 8 easy methods of weaving in ends in knitting. Let’s walk through this easy guide and learn how to weave in ends like a pro!
In This Post
- Why Is Weaving In Ends Important?
- How To Weave In Tails The Easy Way
- How to Weave in Ends in Knitting [8 Ways ]
- Method 1: Ribbing
- Method 2: Garter Stitch
- Method 3: Knit in the cast-on tail
- Method 4: Weave in ends as you knit
- Method 5: Hide tails in the seams
- Method 6: How to Weave in Ends in knitting in Stripes and colorwork
- Method 7: Weaving in ends on lace using duplicate stitch
- Method 8: How to Weave in Ends in knitting Cotton Ends
- Frequently Asked Questions about how to weave in ends
- In Closing
Why Is Weaving In Ends Important?
Weaving in ends is important because it keeps your knitting secure and neat. Loose yarn tails can come undone over time, which might ruin your hard work. By carefully tucking them into your stitches, you make sure everything stays in place. It also gives your project a clean, finished look with no messy strands hanging out. Whether you’re making a scarf, sweater, or blanket, weaving in ends helps your piece last longer and look more polished from start to finish.
How To Weave In Tails The Easy Way
Here are the steps that you can use to weave in the tails of your knitting. Including –
Step 1: First, thread your yarn tail onto a tapestry needle. Then, weave it diagonally through the purl bumps on the back of your knitting to secure it. Now, insert the needle straight through the purl bumps, not around them. Do this through 5 or 6 stitches to lock the yarn tail in place.

Step 2: Pull the yarn tail through the stitches. Then, weave it through 5 or 6 more stitches in a different direction to secure it. If you want, you can go in the same direction or can go another angle.

Step 3: Now, you need to pull the yarn tail through the stitches. But remember to leave a small loop at the end without pulling it completely through.

Step 4: Gently stretch your fabric to smooth it out. Let the yarn tail settle into place within the stitches.

Step 5: Make sure your fabric is smooth and not puckered. When you’re satisfied, trim the yarn tail close to the stitches.

How to Weave in Ends in Knitting [8 Ways ]
Method 1: Ribbing
Weaving in ends for 2×2 ribbing keeps your knitting secure and neat, even with stretchy patterns. This method follows the knit stitch columns, ensuring an almost invisible, durable finish. Perfect for reversible projects like cuffs, it’s easy and reliable for any ribbed or stacked knit stitch patterns.
Here’s when to apply it:
- Ribbed Cuffs and Hems
- Reversible Projects
- Any Ribbing Pattern
- Stacked Knit Stitch Patterns
- Stretchy Fabrics
Step 1: Put the yarn end through a tapestry needle and weave it side to side along one rib, going through the left or right part of the knit stitches. If your project isn’t meant to show both sides, like a sock cuff, do this on the hidden side to keep it tidy.

Step 2: Pull the yarn end through the stitches. Then, weave the rest of the tail in the opposite direction along the same rib. It will pass through the other leg of the same knit stitches.

Step 3: Pull the yarn end all the way through the stitches, but don’t tug too hard. Rub the yarn gently to help it sit nicely, then stretch the ribbed part a lot to let the yarn settle. After that, cut off any extra yarn.

Method 2: Garter Stitch
Weaving in ends for garter stitch can be tricky, but this method keeps tails secure and discreet while respecting the fabric’s unique texture. By following the knit stitch legs, it minimizes visibility and ensures durability, even in stretchy or reversible projects like scarves or blankets.
Here’s when to apply it:
- Garter Stitch Projects
- Reversible Items
- Stretchy Fabrics
Step 1: Thread your yarn end onto a tapestry needle and gently nudge one rib apart. Then, zip it through the legs of the knit stitches for about 6 to 8 stitches with a fun, weaving motion!

Step 2: Depending on the yarn you’re using, you might want to weave the tail back the other way one more time.

Method 3: Knit in the cast-on tail
Avoid weaving in ends by knitting the cast-on tail directly into your project. This method creates slightly thicker stitches but is nearly invisible, perfect for non-stretchy edges like scarves or blankets. Be cautious with hems or cuffs, as it reduces elasticity.
Here’s when to apply it:
- Non-stretchy edges
- Projects where a slight thickness in the first row isn’t noticeable
- Avoid stretchy hems
Step 1: If you use the long-tail cast-on, the yarn end will hang right below your first stitch. This helps you know exactly where to start your first row or round.
Instead of weaving in the yarn tail later. You can hold the tail and the working yarn together. Then, knit the first row with both strands. You only need to do this for about 6 to 8 stitches.

Step 2: Once you have knitted this for 6 to 8 stitches, you can easily cut the yarn. Because using two strands makes the stitches a little fatter, it’s a good idea to knit the whole first row like that. This way, it all looks the same and doesn’t stand out.

Method 4: Weave in ends as you knit
This simple technique weaves in ends while knitting, ideal for stripes or colorwork. By wrapping the tail around the working yarn, you secure it without a tapestry needle. Best for fuzzy yarns like wool, but less effective for reversible projects or slippery fibers.
Here’s when to apply it:
- Stripes or Fair Isle with fuzzy yarns
- Non-reversible projects
- Avoid for slippery yarns
Step 1: When adding a new color or yarn, knit one stitch first. Then, wrap the yarn tail around the working yarn once. This makes a little twist in the back, kind of like what happens in Fair Isle knitting.

Step 2: Keep doing this for each stitch for about 6 to 8 stitches. This helps lock the yarn tail in place as you knit.

Method 5: Hide tails in the seams
Seams are perfect for hiding yarn tails in projects like sweaters or gloves. By weaving ends into the seam’s ridge, you ensure a neat, secure finish. Position tails at row edges for easy concealment, but avoid over-tightening to maintain seam flexibility.
Here’s when to apply it:
- Seamed projects
- Projects with sturdy seams
- Avoid for stretchy seams
Step 1: First, make sure all your yarn ends are at the edges of your knitting. If your yarn is almost finished, start the new ball at the beginning of a row. This keeps things neat and easier to fix later.

Step 2: After you finish your seam, use a tapestry needle to tuck in the small yarn ends by weaving them through a few stitches. You can also tie a small knot if you want extra hold.

Method 6: How to Weave in Ends in knitting in Stripes and colorwork
For stripes and colorwork, weave ends within the same color block for a clean look. Use strategic joins to avoid loose stitches or eyelets, especially in intarsia or flat knitting. This ensures secure, invisible tails without distorting your vibrant patterns.
Here’s when to apply it:
- Stripes, Fair Isle, or intarsia projects.
- Same-color blocks to hide tails discreetly.
- Avoid crossing colors when weaving to prevent show-through.
Step 1: Right before you start a new color, place the new yarn between your needle and the yarn you’re using. Then knit the stitch like normal. This makes a little strand, or float, on the back of your work.

Step 2: Before starting the new color, twist the two yarns around each other once or twice. This helps hold the first stitch in place and makes it easier to knit on the next row. It also keeps the fabric from getting pulled out of shape later.

Method 7: Weaving in ends on lace using duplicate stitch
Lace’s loose gauge and eyelets make weaving ends tricky. Use stockinette/garter sections or duplicate stitch for secure tails. Splitting yarn adds grip, but fuzzy yarns work best. Weave after blocking to ensure tails stay put in delicate lace projects.
Here’s when to apply it:
- Lace with stockinette/garter sections or fuzzy yarns.
- Post-blocking for secure tails.
- Avoid in open lace with slick yarns unless using knots
Step 1: Slide the needle under the rib, which is the space between two knit stitches.

Step 2: Put the needle under both parts of the knit stitch just above.

Step 3: Take one of the yarn pieces and slide it under the next stitch.

Method 8: How to Weave in Ends in knitting Cotton Ends
Cotton’s slick nature makes weaving ends challenging, as tails slip after washing. Combine weaving with knots and split yarn for extra security. This method ensures durable, invisible ends, even in loose-gauge projects, perfect for cotton dishcloths or garments.
Here’s when to apply it:
- Cotton or slippery yarns (e.g., silk, bamboo).
- Loose-gauge projects need extra security.
- Combine with other methods for versatile applications.
Step 1: Put the yarn end on a tapestry needle and weave it through 3 to 4 stitches. Go through the little bumps on the back (called purl bumps) as you do it.

Step 2: Divide the yarn tail into two smaller strands. Each part will have half the yarn threads.

Step 3: Take one of the two yarn parts and gently pull it under the next stitch on your knitting.

Step 4: Tie a knot around that stitch using the yarn piece. Make sure to gently stretch the knitting first so the fabric doesn’t bunch up.

Step 5: Take one of the yarn ends and put it through a needle. Then weave it through 3 or 4 stitches to keep it in place.

Step 6: Now, take the other yarn end and thread it through the needle. Weave it through some stitches in a different direction to help it stay secure.

Frequently Asked Questions about how to weave in ends
When should I weave in my ends?
It’s best to weave in your ends after you’ve finished knitting and blocked your project, if needed. This helps the stitches settle and gives you a better idea of where to hide the yarn tails without changing the shape or stretch of your fabric.
What tools do I need to weave in ends?
You’ll need a tapestry needle or yarn needle with a large eye, and sometimes scissors. These tools help you thread and guide the yarn tails neatly through the back of your knitting, hiding them in the stitches without pulling or damaging the fabric.
How long should my yarn tail be for weaving in?
A good length is about 6 to 8 inches. This gives you enough yarn to thread through several stitches securely without running short. If the tail is too short, it can be tricky to weave in and might not hold well over time.
Can I weave in ends with my knitting needle?
It’s possible but not ideal. Using your knitting needle doesn’t let you hide the tail as neatly, and it’s harder to control. A tapestry needle works much better for weaving ends securely and invisibly into the wrong side of the work.
In Closing
Weaving in ends may seem like a small step, but it plays a big role in finishing any knitting project. It keeps your work strong, tidy, and long-lasting. Whether you’re a beginner or experienced knitter, taking a little time to do this properly makes all the difference. With the right methods, your projects will not only look better but also stay together for years to come. It’s the perfect final touch.


![The Best 30+ Free Crochet Cat Patterns [Beginner-Friendly Guide]](https://crochetmind.com/wp-content/uploads/2025/04/1-The-Best-30-Free-Crochet-Cat-Patterns-Beginner-Friendly-Guide.webp)


