


![Select Crochet Clothing Ideas: [Best Crochet Fashion] Crochet Clothing Ideas](https://crochetmind.com/wp-content/uploads/2025/07/Crochet-Clothing-Ideas-Best-Crochet-Fashion-in-2025-1-1.jpg)

The alpine stitch crochet is one of the best techniques to add additional texture and warmth to your elements. It leaves behind a rugged, attractive appearance that not only feels but also looks good. Wish to know how to do it yourself at home? You have reached the right place.
Alpine stitch crochet is easy, introductory, and ideal for creating any type of item. Individuals wear it with thick blankets, fancy scarves, and warm sweaters. It goes well with baby accessories and lovely home furnishings as well. There are a few simple steps that will help you add this cute stitch to your favourite projects.
Alpine stitch is compatible with a lot of yarns. It does a proper, professional finishing to your work, but is not too stiff. This stitch can be used to make a complete-sized blanket or a textured border – whichever way, this stitch will love your crochet. So, we shall begin with this small guide for beginners!
In This Post
- What Is Alpine Crochet Stitch
- Supplies Needed for Alpine Crochet Stitch
- Alpine Crochet Stitch Free Pattern [Step-by-Step Guide]
- Alpine Stitch in Action: Project Ideas & Patterns
- Alpine Crochet Stitch Video Tutorials
- Tips for Crocheting Alpine Stitch
- Frquently Asked Questions (FAQs)
- How do I follow the Alpine crochet stitch written instructions?
- Can I find a free alpine crochet stitch pattern for blankets?
- What’s the best yarn to use for an alpine crochet stitch blanket?
- What is the dreamy alpine crochet stitch?
- Is there an alpine crochet stitch video for left-handed crocheters?
- Can I use the alpine crochet stitch pattern in clothing?
- Final Thoughts
Key Takeaway:
- The alpine stitch is easy enough to learn, even if you are a beginner in crochet.
- What you need to do is learn the single and the double crochet, and you are halfway to your goal.
- This textured stitch is ideal when one is trying to make something close to the body, such as a scarf or a heavy blanket.
- It may seem complicated at first sight, yet it is easy and fun after several rows.
- You may apply the alpine stitch to any type of work, including circular patterns, granny squares, and warm wear.
What Is Alpine Crochet Stitch
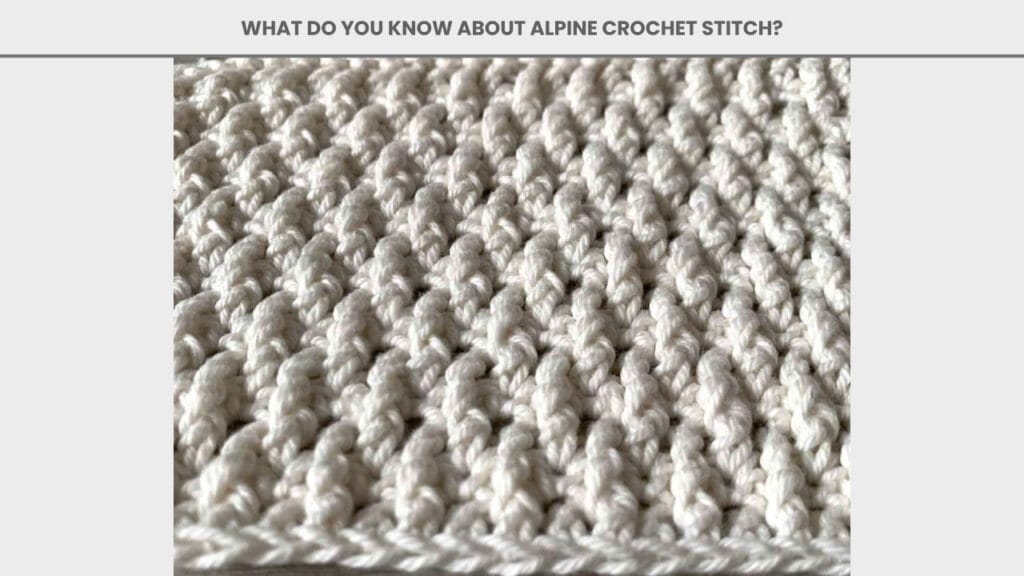
Alpine stitch is a crochet technique of producing patterns that appear raised and textured. It has simple stitches but ends up fancy. This stitch gives you a warm and thick feeling, which is like a soft winter sweater. You work it by alternating front post stitches with regular stitches. It is what makes it have the bumpy design.
The projects in which the alpine stitch may be applied are numerous. You may create a hot scarf, a large blanket, and even smaller ones, such as hats. Some people use it in square patterns, such as granny squares. It can be inserted into clothes, e.g., sleeves or edges of a sweater. The stitch is easy to master, especially with the beginner in mind, as it does not involve hard skills. It is only about learning how to do several simple steps.
You may use just about any yarn you prefer. A thicker yarn is better in alpine stitch as it brings out the texture better. It is adorable to use it in gifts, and people are more than willing to use them. It is also applied when it comes to making something you plan to sell to another person, or it could be a personal project.
Supplies Needed for Alpine Crochet Stitch
To get started with Alpine Stitch crochet, gather these basic tools. They’re easy to find and simple to use.
| Tool | Why It’s Needed |
|---|---|
| Medium Yarn | Thick enough to show the stitch texture well. Any color will work. |
| Crochet Hook | A 5 mm hook works best. You can also follow the size of your yarn. |
| Small Scissors | Used to trim your yarn after finishing your work. |
| Tapestry Needle | Helps tuck in loose ends to keep your project neat. |
| Stitch Markers | Optional tool. Handy for marking rows or keeping track of stitches. |
Once you have these, you’re all set to begin your alpine stitch project!
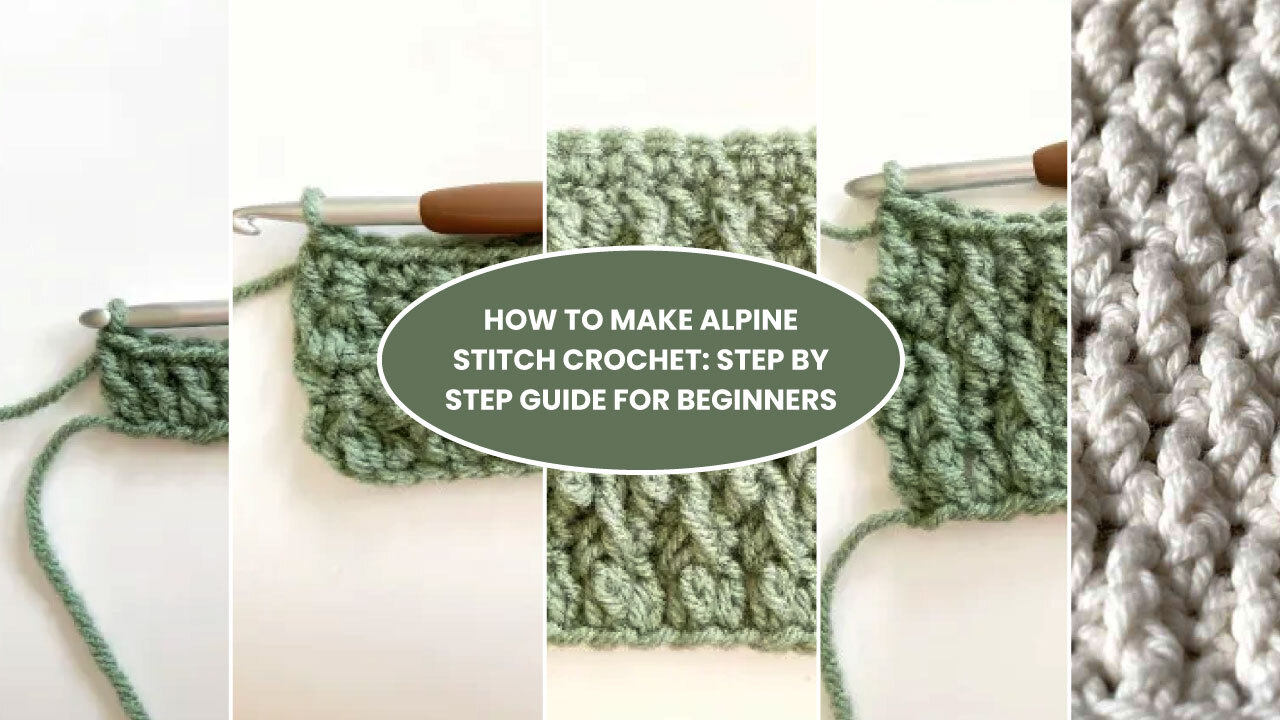
Alpine Crochet Stitch Free Pattern [Step-by-Step Guide]
Alpine stitch is a simple pattern of imposing texture on crochet work. It is quite flashy yet consists of simple moves. These basic steps are out of those famous single and double crochet stitches, and you can make them if you know how to do them.
- Step 1: Start by making a chain. The use of an even number is followed by an extra stitch at the end.
- Step 2: Working in the first row, make one single crochet across every chain.
- Step 3: On the second row, stitch one double crochet on each of the stitches.
- Step 4: You will now use only single crochet stitches to form another row.
- Step 5: In the following row, make one front post double crochet followed by a regular double crochet. Keep alternating between the two.
- Step 6: Repeat a row of single crochet all the way to make the pattern look flat.
- Step 7: Do the previous 2 steps repeatedly until your project is as long as you desire it to be.
Alpine stitch crochet can produce a thick raised effect, which can make lovely projects of many kinds. It may appear difficult, however, in case it is your first time, you need not worry. The following is an elaborated description of each step.
Step 1: Start with a Chain
A foundation chain may be started. The way to do this will require several stitches, which are a multiple of 2 and an additional chain at the end. You might, for instance, chain 21 or 41 or 61, according to the extent of the project you have in hand. There is your alpine stitch pattern with this starting chain as a foundation.
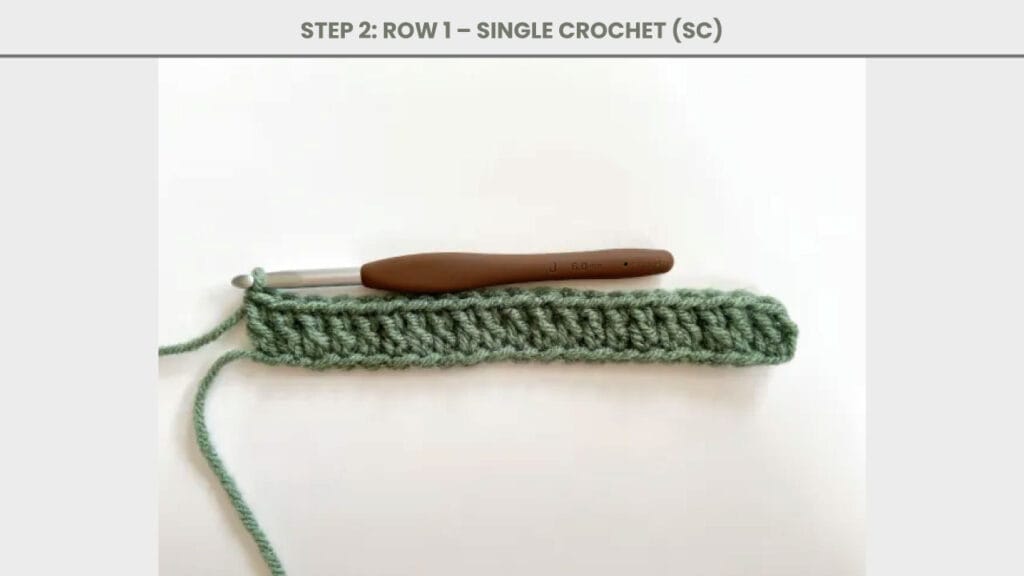
Step 2: Row 1 – Single Crochet (SC)
In this row, you will be forming a strong background with the help of single crochet stitches. To the end, put one single crochet in each stitch starting in the second chain of your hook. After completing chain 2, turn around to begin the next row.
Step 3: Row 2 – Double Crochet (DC)
Here, you make a row of full double crochet. In each stitch of the row work one double crochet. This adds the height in the piece and sets it up to receive the textured rows to come next. Complete chain 1, then turn your work at the end.

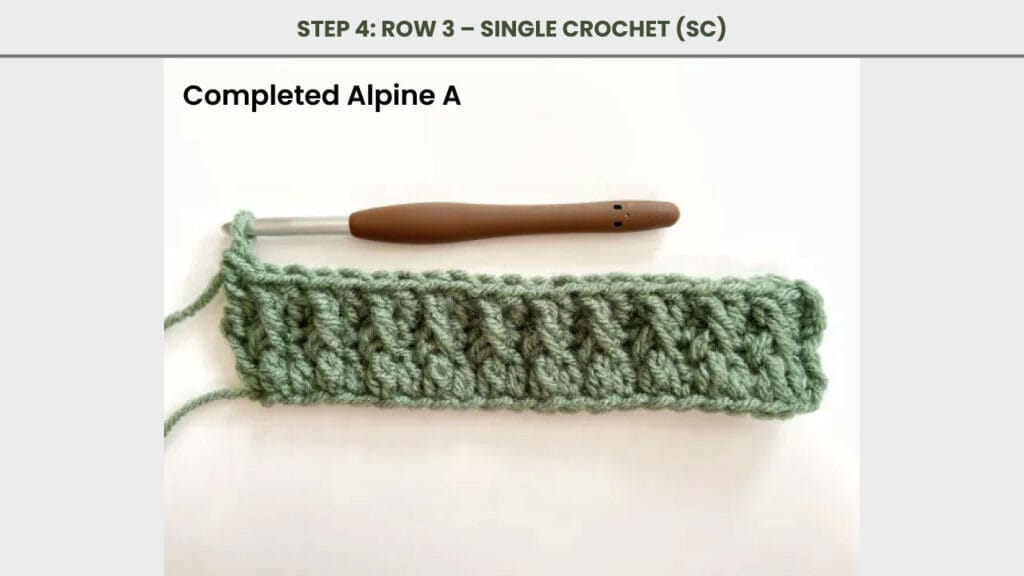
Step 4: Row 3 – Single Crochet (SC)
This row assists in smoothing the texture slightly, as well as preparing the alpine pattern. In the row, repeat in every stitch one single crochet as in Row 1. As the row is rolled, chain 2 and turn once again.
Step 5: Row 4 – FPDC and DC (Alpine Texture Begins)
Here, the alpine stitch texture begins to come in. You start with a front post double crochet (FPDC) around the two rows beneath the double crochet. And continue with regular double crochet in the stitch next. Keep repeating FPDC and DC in the whole row. Chain 1 and turn at the end.

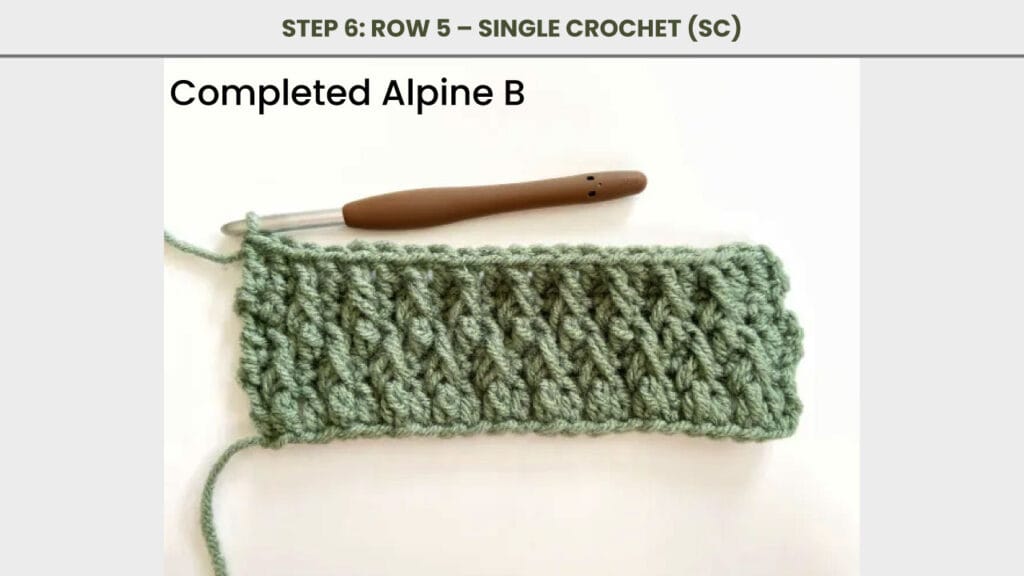
Step 6: Row 5 – Single Crochet (SC)
Here in this row, you will do one single crochet in every stitch to maintain the evenness of the fabric. This evens out the lumpy surface of the last row and assists the stitch pattern to lie flat. Finishing Chain 2, turn your work.
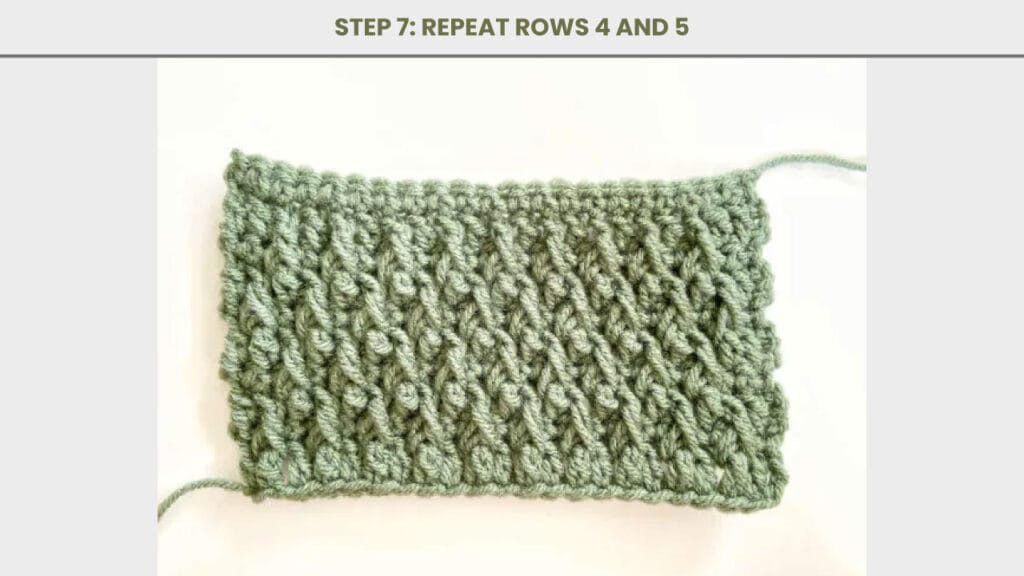
Step 7: Repeat Rows 4 and 5
You can now keep on repeating Row 4 and Row 5. Row after row, the alpine stitch texture will accumulate as you go further. Go on until your project has grown to the size or the length you desire, and then complete it in your usual way.
Alpine Stitch in Action: Project Ideas & Patterns
The alpine stitch is not only good-looking but also useful. Because of its thick and raised texture, it is ideal for items that would require warmth and structure. You can crochet warm blankets, comfy scarves, fashionable sweaters, or even baby clothes. It fully serves borders and square-based works such as granny squares.
Alpine Crochet Stitch Blanket Pattern
Alpine stitch is suitable for forming warm or thick blankets. Its high surface provides a comfortable material that fits perfectly. You may play with the colors or the weight of the yarns, use what you like, or whatever goes with your fashion or decor. They make marvellous winter-night wrappers, or presents in wintertime. This is the pattern;
- Step 1: Select a warm, textured, soft, chunky yarn.
- Step 2: Create an initial chain which is as wide as you desire (multiples of 2 + 1).
- Step 3: Crochet Row 1 with single crochet.
- Step 4: Install Row 2 in double crochet across.
- Step 5: Switching between doing the front post double crochet (FPDC) and doing normal double crochet (DC) alternately produces the alpine texture.
- Step 6: At each row of texture, do one row of single crochet to keep that row level.
- Step 7: Repeat textured row and single crochet row until your blanket achieves the size you desire.
- Step 8: Shape up the appearance by putting a plain bordering, moss, or shell stitch.
Crochet Sweaters Pattern
Alpine stitch is the best option in the creation of sweaters since it gives both warmth and texture. It is also effective on areas such as sleeves, cuffs, or panels, making the shirt look trendy and warm. It also turns the fabric into a thicker fabric, ideally suited to the cooler weather.
- Step 1: The size will include the front, back, and sleeves.
- Step 2: Make a chain of all the panels depending on your measurements.
- Step 3: Use alpine stitch rows as constructions of the body panels.
- Step 4: work sleeves in the same stitch or mix with ribbing.
- Step 5: Assemble the pieces with whip stitch or slip stitch.
- Step 6: Ribbing or more alpine rows to add neckline, cuffs, and hem.
- Step 7: Knit in all the yarn ends, then block the sweater to shape.
Crochet Scarves Pattern
Alpine-made scarves are thick, trendy, and warm, which makes them perfect during winter. This stitch makes a scarf look luxurious and is prominent in texture, and it teams up with tassels or fringe to get an added twist in style. It is also a very good starting project to get acquainted with the alpine stitch.
- Step 1: You would determine the length and width of the scarf.
- Step 2: Create an initial chain which corresponds to your width (multiple of 2 + 1).
- Step 3: Crochet a foundation row of single crochet.
- Step 4: Then do a complete row of double crochet.
- Step 5: Now, start to alternate FPDC and DC on the alpine pattern.
- Step 6: Include a feature of single crochet between every textured row.
- Step 7: Repeat it until the scarf is as long as you would like it to be.
- Step 8: Tassels may also be added to both ends, should you like.
Alpine Stitch Crochet Pattern in the Round
Working in the round using the alpine stitch will enable you to make items such as hats, baskets, or rugs. It is a bit contrasting to flat rows; however, it is easy and enjoyable as you get used to it. Working in the round does assist in creating smooth projects without having to join squares or panels.
- Step 1: Magic Start, in a magic ring or chain loop, and connect to make a circle.
- Step 2: Crochet a few foundation rounds to create your base, either in double or single crochet.
- Step 3: Start your rounds of alpine stitches with FPDC around stitches of two rounds down.
- Step 4: Otherwise, alternate FPDC and DC in turn around the circle.
- Step 5: Flatten the texture of each row of alpines with one row of single crochet.
- Step 6: Increase stitches evenly in each round, and continue to do so on the rugs or use a flat item.
- Step 7: In cases of hats or baskets, there will be no more adding to the increase, but rather just working straight up to create the height.
- Step 8: End it with a nice edge or border.
Granny Squares with Alpine Texture Pattern
Granny squares can also be modernized by adding an alpine stitch texture to them. They retain the elegant look of old squares, yet they have greater depth and gentleness. They are beautiful-looking patches, squares with interesting texture, used in patchwork or interior decoration.
- Step 1: Make a foundation of a conventional granny square (through clusters and chain holes).
- Step 2: Pull a couple of rounds of normal granny stitch to create the center.
- Step 3: Use the outer rounds to switch to alpine stitch.
- Step 4: Make a texture by way of FPDC around previous round stitches.
- Step 5: Alternate FPDC and DC without changing the square shape, leaving corner increases.
- Step 6: Create as many squares as desired, varying the color of the yarn.
- Step 7: Sew all the squares with slip stitch or whip stitch.
- Step 8: Put in another border around your entire project to finish the design.
Alpine Crochet Stitch Video Tutorials
One of the simplest methods, along with learning the alpine crochet stitch, is watching the video tutorials. Social sites such as YouTube have a lot of introductory clips that demonstrate every step. You get to follow how the yarn is taken, how the hook is manipulated, and how to position your stitches. It is best when studying the front post double crochet (FPDC) piece, which can be a tiresome process when going by the written instructions crammed in a book. This is a video lesson on how to crochet the alpine stitch.
Slow down, if you are new to the stitch: pause the video, rewind, and practice one step at a time more slowly. One can search for terms such as dreamy alpine crochet stitch to get patterns that have a soft, textured finish. The close-up images, as well as useful tips from many makers, are also shared, allowing you to practice along easily, even if you have never practiced this stitch.
Tips for Crocheting Alpine Stitch
The alpine stitch is not only beautiful but usable as well, which is why it is a common choice among crocheters. In the proper mood and with several useful suggestions, it will take you a minute to learn it by heart.
- Begin with the right number of stitches: Start off with a chain multiple of 2, and 1 additional.
- Choose chunkier or medium thread: The thicker yarn displays the texture better, and it is easier to work with.
- Unknot your Tension: Tight knots will complicate the procedure of hooking the hook around the post.
- Where to put the stitches: The FPDC does not go directly under your hook, though, but under the post two rows below it.
- Alternate row types accordingly: You should have a balance of rows of any kind of textures followed by the single crochet row regularly.
- Label your rows where necessary: If your pattern uses FPDC stitches, then use a stitch marker to remind you where they belong.
- Learn by watching instructions: Tutorial videos will make the learning process much quicker.
- Practice on a swatch: before making a full project, practice the stitch on a small piece.
- Stitch evenly: The alpine stitch has a single look with even markers.
- No hurry: Apply the FPDC to the skin slowly to be in the right position and get a good texture.
Frquently Asked Questions (FAQs)
How do I follow the Alpine crochet stitch written instructions?
The written instructions contain a series of single crochets, double crochets, and front post double crochets. In case you are lost, you can correlate the steps to an alpine crochet video or chart work in order to give a visual representation.
Can I find a free alpine crochet stitch pattern for blankets?
There are loads of free alpine crochet patterns that are designed for blankets. Some use chunky yarn to keep it warm, or have stripe patterns or intricate edgings.
What’s the best yarn to use for an alpine crochet stitch blanket?
Crochet stitch alpine blanket is best done using medium or bulky yarn. It aids in flaunting the texture and makes the fabric warm and comfortable. Use yarn that is not too slippery but must be soft to give even stitches.
What is the dreamy alpine crochet stitch?
The dreamy alpine crochet stitch is an informal name given by some crocheting practitioners to the softer or pastel variability of the stitch. It applies the same technique, but with lighter yarn or colors in order to obtain a light effect.
Is there an alpine crochet stitch video for left-handed crocheters?
Indeed, there are alpine crochet stitches tutorial videos, specially designed to work with any left-handed learner. The videos overturn the direction and describe how to make the alpine crochet stitch from a left-hand perspective.
Can I use the alpine crochet stitch pattern in clothing?
Absolutely! The Alpine crochet stitch pattern can be used on sweaters, cardigans, and even hats. The structure taken gives it warmth and elaboration, especially when used on cuffs, collars, or sleeves.
Final Thoughts
Alpine crochet stitch is one of the easiest and yet beautiful techniques of adding texture to your works. It appears to be hard, but it has simple stitches, and as soon as you get used to it, it becomes enjoyable. Viewing a video tutorial is one way of getting used to it quicker.
After realizing how to perform the alpine crochet stitch, you can apply it to a scarf, sweaters, or even the entire blanket. It also goes very well in granny squares, borders, or round patterns. It is a combined skill that is good to have in your arsenal. Happy Crocheting!


![The Best 30+ Free Crochet Cat Patterns [Beginner-Friendly Guide]](https://crochetmind.com/wp-content/uploads/2025/04/1-The-Best-30-Free-Crochet-Cat-Patterns-Beginner-Friendly-Guide.webp)


