


![Select Crochet Clothing Ideas: [Best Crochet Fashion] Crochet Clothing Ideas](https://crochetmind.com/wp-content/uploads/2025/07/Crochet-Clothing-Ideas-Best-Crochet-Fashion-in-2025-1-1.jpg)
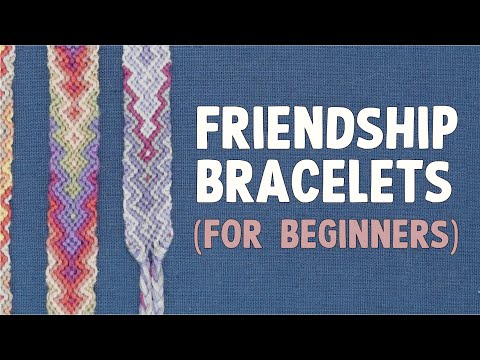
Friendship bracelets are an interesting and sentimental craft that kids, teens, and even adults can like. Tying knots is not the only thing about making a bracelet. Among the most significant elements is how to start and finish Friendship bracelets. Design Regardless of how pretty a design already is, a lack of a good beginning or a strong end can leave a design untidy.
To begin and finish friendship bracelets, a loop, knot, or teardrop buckle is created at the upper end. Connect the ends of brackets, triangle points, twisted ties, sliding knots, buttons, and clasps to end with a neat and lasting connection.
The definitive guide to creating and removing friendship bracelets is here, examining loops, buckles, beads, sliding knots, and more.
Key Takeaways:
- Discover how to begin and finish a friendship bracelet that may be fun & simple. Find loops, buckles, twist tops, and bead closures.
- Make your bracelet sturdy and comfortable enough to wear by its methods. Work on both simple beginnings and skilled strategies.
- Secure and elegant place for your bracelet. Discover several techniques to teach you to start and complete friendship jewellery that you can utilise in the future again.
In This Post
What Are Friendship Bracelets?
Friendship bracelets are accessories prepared by hand out of embroidery or even string. They are either given to friends as a source of care, love, and a special memory. There are many styles, and they can be made in stripes, chevron, and triangle patterns. Some will even add beads or buttons to create a bead bracelet.
It is actually where the crux of any friendship bracelet lies, as there are certain ways to start and end friendship bracelets. It will ensure your bracelet will not only look good, but also be long-lived.
Supplies You’ll Need to Start and End Friendship Bracelets
Gather supplies before you begin. There are not many tools required, only a couple of the simplest kinds.
| Supply | Use |
|---|---|
| Embroidery floss | The main string used for weaving the bracelet |
| Scissors | For cutting string neatly |
| Tape or clipboard | To hold the bracelet while you make it |
| Ruler or measuring tape | To measure string length |
| Beads or buttons | Used for finishing as a bead bracelet |
| Ribbon clamp or metal clasp | Used for professional finishes |
| Glue (optional) | Helps secure knots if needed |
| Safety pin | Another option for holding your bracelet in place |
With these supplies, you’re ready to learn all the different ways to start and end friendship bracelets.
Different Ways to Start Friendship Bracelets
There are several ways to start friendship bracelets. Each one gives a different look and function. The start is where everything begins, so it needs to be strong and neat. Here are the most popular and reliable methods to try.
How to Start with a Loop (aka Buckle)

It is one of the best ways to start and end friendship bracelets. It’s simple, clean, and strong.
Steps:
- Cut your strings and fold them in half.
- At the fold, tie a knot to form a small loop (about the size of a finger).
- Use this loop as the top of your bracelet.
- Tape the loop down or use a clipboard.
- Begin your knotting just under the loop.
This loop-end friendship bracelet method lets you close the bracelet with a bead or knot later.
How to Make a Teardrop Loop

The teardrop loop is perfect for fancier designs like chevron friendship patterns. It’s rounded and gives a stylish look.
Steps:
- Fold your threads in two.
- Pinch the shape to form a teardrop or soft V-shape.
- Just below the point, tie a knot
- Start knotting your design as normal.
The teardrop works great for bracelet loop closures, especially if you want to insert a bead or button later.
How to Start with a Barnacle Knot Buckle

Want something bold? Try the barnacle knot buckle. It’s a round, thick knot that locks your strings in place.
Steps:
- Cut and fold your threads.
- Twist the folded end tightly.
- Tie a bulky barnacle-style knot.
- Secure the top and begin knotting.
This knot adds strength, and it’s perfect for bigger bracelets that use many threads.
How to Make A Straight First Row

It is a clean, flat way to begin. It works well for wide or pattern-heavy bracelets.
Steps:
- Spread your threads across and tape them down.
- Begin your pattern with one full row of knots across.
- Keep knots even and tight.
- Continue to the second row and beyond.
It is great for chevron or triangle starts and makes your bracelet lie flat from the beginning.
How to Start a Wide Bracelet
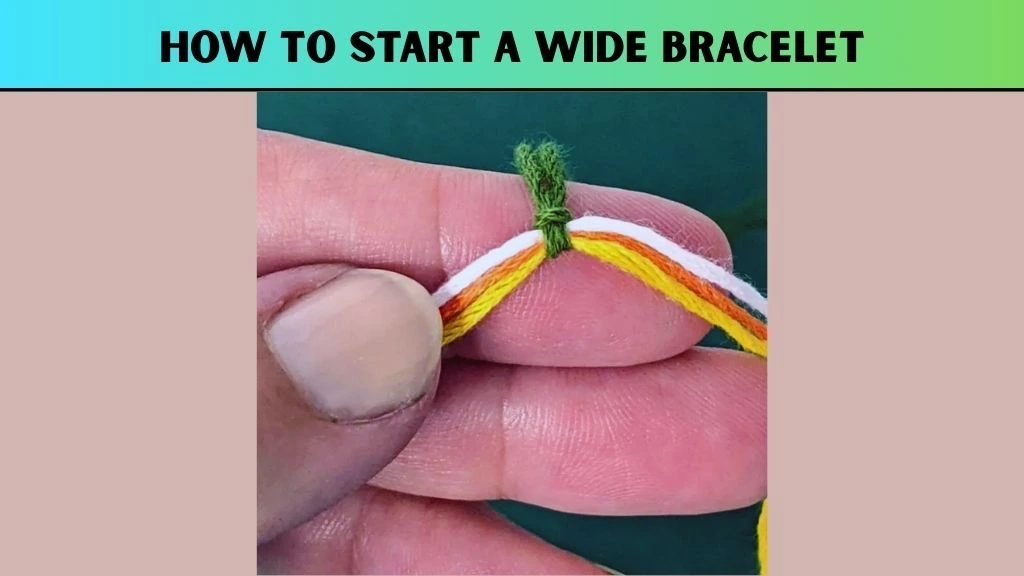
Wide bracelets need extra care at the start. Use more threads and a stronger method.
Steps:
- Use a wide bracelet loop or teardrop loop.
- Tape all threads down in a straight line.
- Make 2–3 full rows before starting your design.
This method reduces the twist, and the base becomes stable. It’s perfect for advanced bracelet making with complex designs.
Different Ways to End Friendship Bracelets
Just like the start, the end of your bracelet matters too. These ways to end friendship bracelets will help your design last longer and fit better. Here are the top different ways to end friendship bracelets that you can use:
How to Make Shaped Triangle Ends

This finish mirrors your starting triangle and looks very tidy.
Steps:
- As you near the end, reduce knots one string at a time.
- It forms a triangle.
- Tie a tight knot under the triangle.
- Trim the ends or leave them for tying.
Clean and simple finish that is so cute with patterned armbands.
How to Finish a Bracelet with Twisted Ends
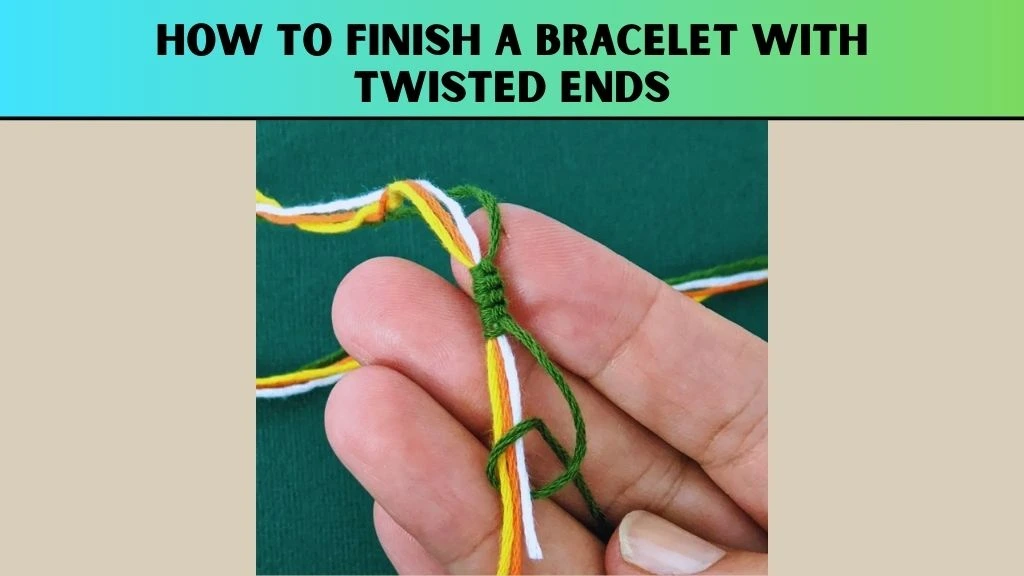
Give a casual and cool look by using twisted ends. They’re also easy to tie on your wrist.
Steps:
- Stop weaving and split the threads into two groups.
- Twist each group tightly.
- Twist both groups together.
- Tie a knot at the bottom.
This method works well with nearly any bracelet design.
How to Make a Button or Bead Closure
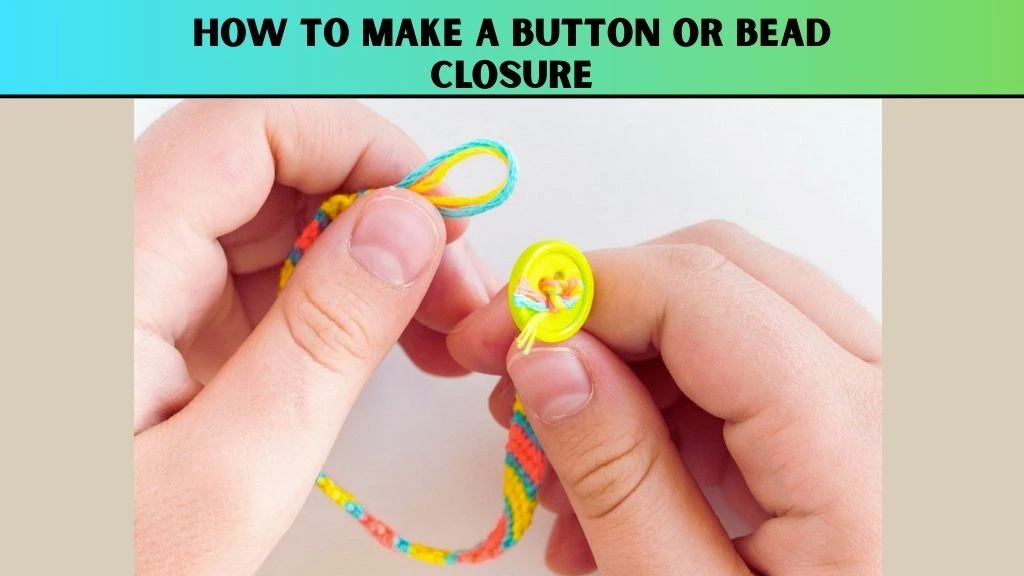
This method is fun and functional, especially when using the loop-end friendship bracelet start.
Steps:
- Finish your pattern and leave a few inches of thread.
- Press a bead or button onto one string.
- Knot below it to secure to you.
- Just use the starting loop to pinch or close and encircle your bracelet around the bead or button.
It is a favorite way to end a bead bracelet style.
How to Make an Adjustable Bracelet Closure

The flexible,one-size adjustable knot style makes the bracelet fit any wrist.
Steps:
- Cross the two ends of your bracelet.
- Use an extra string to tie sliding half-knots over both ends.
- Pull to tighten.
- Test the movement so that it slides rather freely.
It makes your bracelet highly movable and easy to put on and take off.
Finishing with a Metal Clasp or Ribbon Clamp

If you want a pro look, use a clasp or clamp to close your bracelet.
Steps:
- Trim and flatten the ends.
- Add glue if needed.
- Place the ends into the clamp.
- Press it closed with pliers.
- Attach a metal clasp to finish.
This method is perfect for gift bracelets or more polished styles.
Skills Needed to Start and End Friendship Bracelets
Friendship bracelets are cool to create. They show care and friendship. First, you need to learn how to start and end friendship bracelets. Also, a neat finish makes your bracelet last longer. So, let’s explore the best methods together!
- Tying Simple Knots: We Will Do Basic Knots such as the Overhand Knot, Forward Knot, Backward Knot, and Sliding Knot. It is these that attach your bracelet and cause sturdy starts and endings.
- Keeping Threads Even: Make sure your threads stay straight and don’t twist while you work. Consistent knot tightness helps the bracelet look neat.
- Patience and Practice: It takes time to get loops and triangle ends just right. Practicing helps improve your skills and speed.
- Thread Organization: Know how to arrange and manage multiple threads, especially for wide or complex bracelets.
- Attaching Beads or Buttons: Learn the art of sewing beads and buttons to your design as a decorative element or a shyness close.
- Applying Glue or Finishing Tool: It may require some glue or a finishing tool to fix the ends of the bracelets cleanly.
Frequently Asked Questions (FAQs)
Where do you start a friendship bracelet easiest?
A loop tied by folding the threads in half and knotting is the simplest method of finishing by joining pieces of thread. It is robust and convenient to close at a later time.
How do I keep my bracelets on the ends?
Wrap or knot the end tightly, cover with beads or buttons, or put glue to hold knots, so that knots may not come open.
What is the distinction between a regular loop and a teardrop loop?
A regular loop is circular and straightforward, whereas a teardrop loop is more curved and looks fashionable and is suitable with some patterns such as chevron.
Are friendship bracelets adjustable?
Yes! Sliding knots (with adjustable knots) allow you to create any-sized bracelets and still be comfortable.
Is it hard to make friendship bracelets?
No equipment is required. A tape or a clipboard, along with scissors and a piece of embroidery floss, is all that is necessary to get started. More decorative finishes may be sewn on it, such as beads, buttons, and clasps.
How do you terminate friendship bracelets most cleanly?
Pointed triangle ends, knotted ties, and beads or button closures are all ways to end your bracelet to make it look complete.
Final Thoughts
Knowing how and where to start as well as end friendship bracelets is a wonderful way to ensure the success of your creations, making them more reliable, appealing, and easier to wear. There are a lot of options to make your bracelet beautiful and finished, whether you like loops, buckles, teardrop beginnings, triangle closings, twisted bonds, or adjustable knots.
Think about it this way: each bracelet you make gets you better. Risk venturing and new methods of approaching it, find what suits you. But most importantly, just have fun with the process of creating something meaningful to someone or yourself.
You now know the best approaches for beginning and terminating friendship bracelets, so bring out your floss and create something beautiful. Your ideal bracelet is something that will be created!


![The Best 30+ Free Crochet Cat Patterns [Beginner-Friendly Guide]](https://crochetmind.com/wp-content/uploads/2025/04/1-The-Best-30-Free-Crochet-Cat-Patterns-Beginner-Friendly-Guide.webp)


