


![Select Crochet Clothing Ideas: [Best Crochet Fashion] Crochet Clothing Ideas](https://crochetmind.com/wp-content/uploads/2025/07/Crochet-Clothing-Ideas-Best-Crochet-Fashion-in-2025-1-1.jpg)
It is a fun and useful skill to crochet a triangle. A crocheted triangle can be things and things. You can make shawls, scarves, tops, and even blankets. In this article, we’ll teach you Step by Step how to crochet a triangle.
Using basic stitches, create a crocheted triangle. You are also capable of making bigger projects with a triangle. A triangle shape is ideal for those just starting. Triangle shapes are used in many patterns. Different stitches allow you to crochet a triangle.
In This Post
- What is a Crocheted Triangle?
- What Materials Are Required to Crochet a Triangle?
- Basic Triangle Crochet Skills
- How to Crochet a Triangle in Stitch?
- How to Crochet a Triangle for Beginners?
- Triangle Crochet Variations
- Triangle Crochet Patterns for Different Projects
- Special Triangle Crochet Techniques
- Crochet Triangle Amigurumi
- Final Thoughts
- Frequently Asked Questions (FAQs)
Key Takeaways:
- Knowing How to Crochet A Triangle helps you practice your crochet techniques.
- Crocheting a triangle requires the correct materials.
- With practice, you will crochet a great triangle.
- Triangles come in all sizes and shapes.
- Triangle shapes that can be used in the majority of projects.
What is a Crocheted Triangle?

A crocheted triangle is a figure created with yarn and a crocheting hook. It has three sides and three vertices. A simple triangle is all you can make with those basic stitches. So, triangles are used in a lot of crochet patterns. They’re a nice shape for shawls, scarves, and tops.
What Materials Are Required to Crochet a Triangle?
Before you get started, collect your materials. You will need:
- Yarn: Choose a soft and user-friendly yarn. You can use medium-weight yarn for beginners.
- Crochet Hook: When working on crochet, you will need a crochet hook.
- Scissors: You also will need scissors to cut your yarn.
- Tapestry Needle: This is for weaving in loose ends.
- Measuring Tape: It measures the size of your triangle.
Basic Triangle Crochet Skills
The basic techniques used to crochets a triangle are in the design. Knowing how to do increases and decreases, turning chains, and slip stitches will help you have smooth edges and a well-formed overall triangle crochet project.
- Increments: Increase stitches in certain segments to scale up the triangle’s shape so it can grow evenly. Two common methods are to do two stitches in one space and to make stitches in the edges of rows.
- Decreases: Decreases will strategically cinch the triangle up and shape its edges. These techniques involve skipping stitches, working two stitches together, or using an invisible reduction for a cleaner finish.
- Turning Chains: These chains create height at the new rows, making the stitches even. Depending on your stitch type—single, half-double, double crochet—different numbers of chains help you keep the right shape of your work while closing the edges without making them crooked.
- Slip Stitch: This is a basic stitch for connecting yarn, traversing stitches, or finishing edges cleanly. It holds work without building height, which is crucial for crisp transitions and clean details.
Once you’ve mastered these techniques, you can create everything from decorative motifs to larger triangular pieces for shawls, blankets, or embellishments.
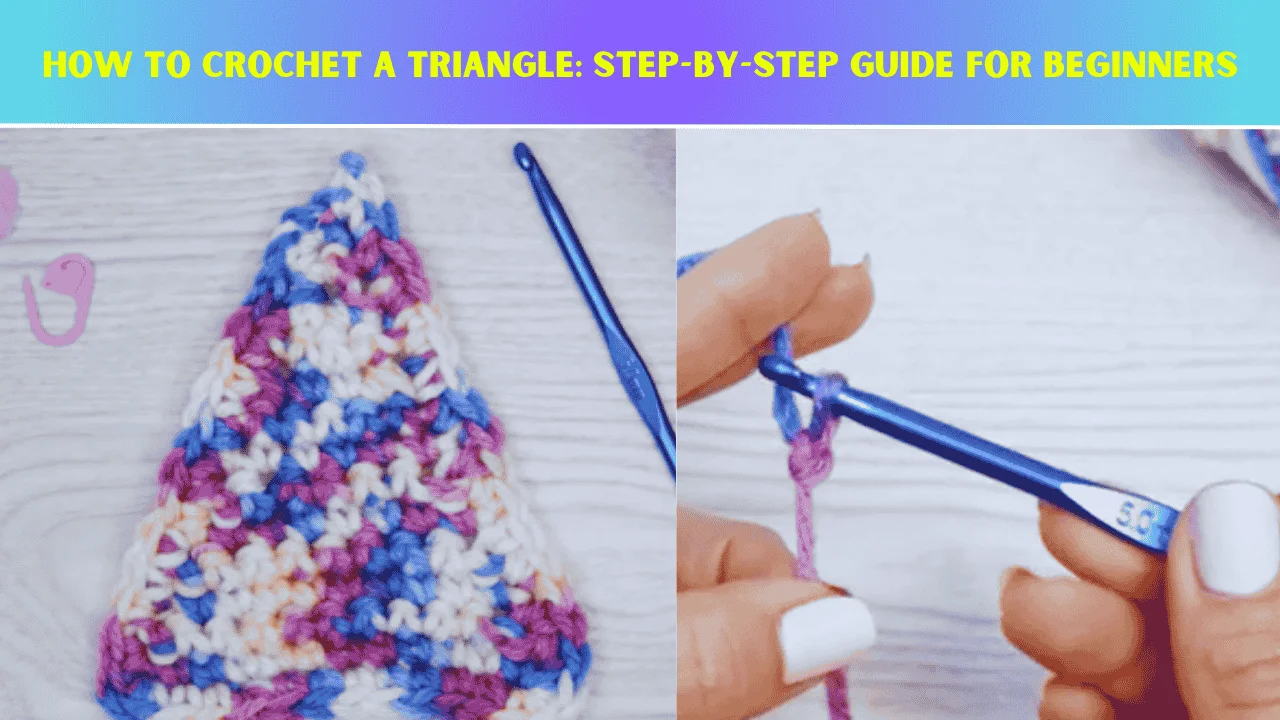
How to Crochet a Triangle in Stitch?
A simple crochet triangle is a step-by-step process using basic stitches. Beginning with a slip knot and foundation chain and consistently increasing stitches in every row, you end up with a nicely shaped triangle. Here is how to crochet a triangle pattern:
Step 1: Make a Slip Knot

This is done by creating a loop with the yarn. Pull the working yarn through to make a knot. Make the loop big enough to slide snugly over your crochet hook but not so big that it won’t hold its shape. This knot will keep the yarn on the hook and create an easier starting place for your triangle.
Step 2: Make a Foundation Chain

Do two chains with your crochet hook. The brief base forms the foundation of the triangle. While the number of chains establishes the base width, covering about two chains is the method that creates a tightly controlled start that lets you easily add stitches as you progress to later rows.
Step 3: Row 1
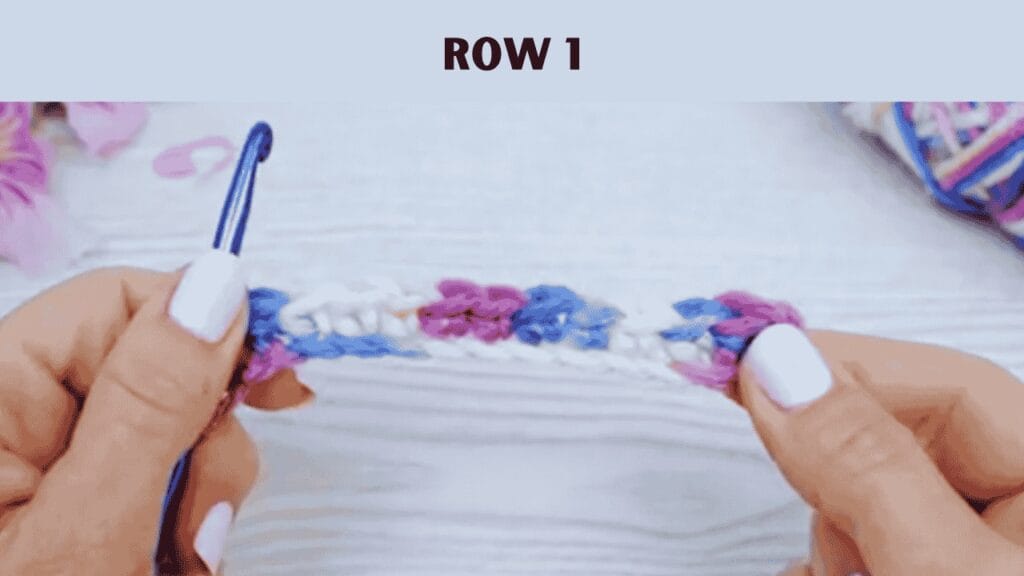
Insert the hook into the 2nd chain from the hook and make two single crochets in that stitch. This part begins the triangle shape with an increasing stitch count. If you do your turning at the end of your work, you have to work the next row the right way.
Step 4: Row 2
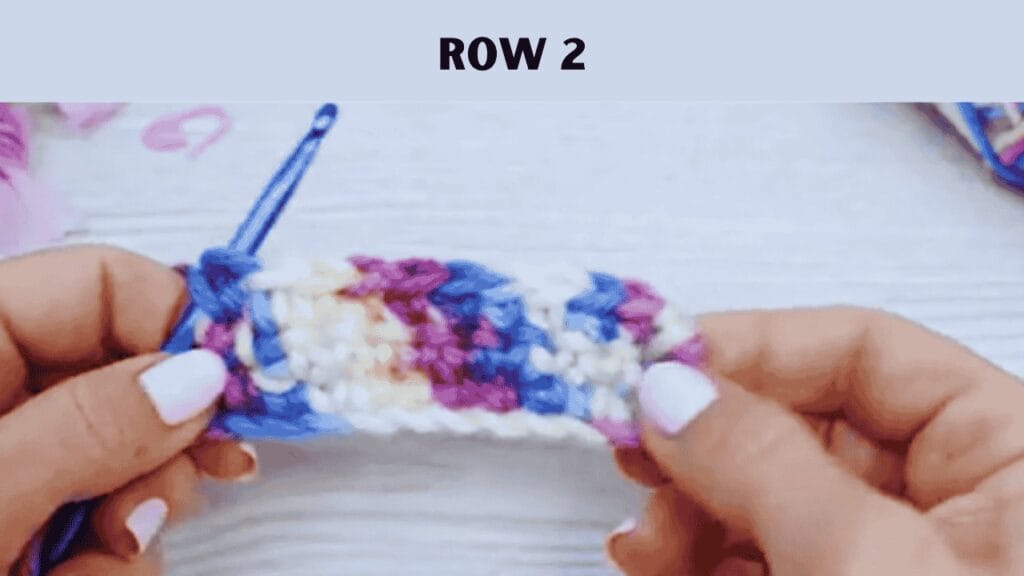
If you need the height for the next row, chain one. Sc across row, 2sc in the last stitch of the row. This Increase also enlarges the triangle. The turn of your work keeps the stitches aligned as you proceed.
Step 5: Repeat the Pattern

You keep chaining one at the beginning of each row, single crocheting all the way across, and adding two single crochet in the last stitch. Repetition of this boost slowly opens the triangle. Repeat this process, working to the triangle point to the size you are comfortable with (e.g., 8-10 inches), always checking that the sides are straight and the triangle is symmetrical.
How to Crochet a Triangle for Beginners?
Triangle patterns are the easiest for consumers to get started with. Now, you should use a big crochet hook and bulky yarn. This has the added benefit of making it easier to see stitches. Continue to practice your stitches until you feel confident. Small projects like coasters or dishcloths are good ways to learn.
Triangle Crochet Variations
There are infinitely creative possibilities for crocheting triangles, and the process of different methods leads to various shapes and textures. If you like to work in the round, a granny square triangle is great, and there’s also the flat triangle, which has a different look than the granny square. Each method is great for shawls, decorations, or motifs.
How to Crochet a Triangle in the Round?
A triangle crocheted in the round is seamless and symmetrical. This technique works well for motifs, appliques, or decorative details. Using a magic ring and increasing each round, you’ll create a nicely formed triangle with smooth edges.
- Create a Magic Ring: Loop the yarn around your fingers. Loop the hook through, pull up a loop, and chain one to secure. This simulates an adjustable center.
- Round 1: Chain one to begin. Work 3 sc in the magic ring. Then, pull the yarn tail to wrap the stitches and tighten the ring and the base of your triangle.
- Round 2: Chain one to increase height. Single crochet in the first stitch and two single crochets in the next stitch. Repeat this process until the end of the round. Join the round with a slip stitch, keeping the triangles’ shape nice and even.
- Repeat: Chaining one at the start of each round. Repeat the same increases evenly around each round of stitches to grow the triangle’s proportions but preserve its balance and smooth edges.
How to Crochet a Triangle Granny Square?
The Triangle granny square is a fun take on the classic granny square that utilizes clusters of double crochets to form an open, textured fabric. It is ideal for blankets, shawls, or decorative motifs, providing a classic yet elegant appearance.
- Foundation Ring: Chain 4, slip stitch to join and form a small ring. This is the basis for your triangle, maintaining the shape as you go around.
- Round 1: Make 3 chain stitches (this counts as the first double crochet). Double crochet twice into the ring, chain two. Repeat this sequence twice. Slip stitch to join and complete the round.
- Round 2: In each chain-two space from the last round, work 3 double crochets. Put a chain of two at each corner to keep the triangle-shaped, with the sides splaying outward evenly.
- Repeat: Work in rounds, increasing by placing three double crochet clusters in each chain space and ch 2 at the corners. Repeat until the triangle is the size you want it to be.
How to Crochet a Triangle Shape?
Using rows to crochet a triangle shape gives a structured, defined shape perfect for shawls, bunting, or other decorative pieces. By beginning with a foundation chain and decreasing, you will end up with a neat, even triangle with smooth edges.
- Make a Foundation Chain: Decide how wide you want your triangle’s base to be and chain that many stitches. This chain will be the base of the frets, detailing the width of the fret before diminishing through the rows.
- Row 1: Make row 1 by keeping the tension even. This makes the base of the triangle and should give a stable base before you start the gradual decreases in the next rows.
- Row 2 and Further: Reduce stitches at each end by working 1st and last rows. It gets narrower, forming a triangle, with each row you work tapering to a point.
Triangle Crochet Patterns for Different Projects
Triangle crochet patterns are useful for many types of creative projects. Items such as fashionable shawls and scarves, attractive tops, and warm blankets all have this shape, creating a unique look for any of your designs. Here, you can make practical and decorative elements of crochet. You can also modify the size, pattern of stitches, and joining ways.
How to Crochet a Triangle Shawl?
A stylish and warm accessory suitable for layering, a crochet triangle shawl. You can make a beautifully shaped shawl with a hang using increases. Change the size and yarn as per your style and taste. Here is how to crochet a triangle shawl for beginners:
- Chain: Create a slip knot and chain 4. This forms the basis of the shawl and acts as a base for whatever stitches you do in your first row.
- First Chain: Make a chain and make three double crochets into the first stitch. This is the first triangle created, leading to increases on either side, and the shawl grows evenly.
- Thicker Increase: Work 2 double crochets in the first and last stitches of your curving rows. This gradual height increase helps form the shawl’s triangular shape.
- Keep on: Work this in a pattern, with increased stitches in each row, until the shawl is the desired length. The design can be personalized with color changes, decorative edges, and textured stitch patterns.
How to Crochet a Triangle Scarf?
A crochet triangle scarf is a fashionable and adjustable piece of clothing that provides heat and panache to any ensemble. By making small increases, you’ll create a beautifully shaped, adjustable scarf that fits exactly how long and wide you want.
- Start with a Slip Knot: Loop the yarn around your fingers, pull a loop through, and draw it tight onto your hook. Then, create your base triangle scarf by chaining four.
- Make the Base: Row one: sc across the foundation chain, ensuring your tension is even. This makes your first row, creating the base of your scarf’s triangle shape.
- Increase: Add 1 extra stitch by working an ss into the first and last stitches at the start and finish of every row. This subtractive Increase is symmetric, allowing the triangle to expand outward.
- Keep Crocheting: Keep crocheting and increasing each row until the scarf is your desired size. You can play with stitch patterns, yarn colors, or decorative edging.
How to Crochet a Triangle Top?
The crochet triangle top is a unique summer piece. With two simple triangles and a couple of seams, you have a fashionable top with adjustable straps for the right fit.
- Create Two Triangles: Start cropping two identical triangles using any stitches. Increase stitches in each row to form the shape. Use an airy, comfortable yarn for a light, flattering design.
- Join the Triangles: Place the triangles upside down, then sew or crochet the sides together, leaving enough space for the bust. Ensure the seam is sturdy but not so sturdy that it doesn’t flex for comfort.
- Straps: For shoulder straps, attach a chain of whatever length you want to the top corner of the triangles. You can adjust the straps long or short for a form-fitting look or make a halter silhouette.
How to Crochet a Triangle Head Scarf?
The crochet triangle head scarf is a stylish and practical accessory for casual or bohemian wear. Increasing stitches create a featherweight and adjustable scarf that ties snugly around your head.
- Tiny Steps: Use a slip knot and a short foundation chain. This ensures the upper portion of your triangle remains compact while allowing for easy expansion as you go.
- Increase Rows: Work in rows, adding stitches on both ends to gradually widen the triangle. Regular Increase For a balanced shape that will sit comfortably on the shoulders.
- Stop at the Right Size: Keep growing until the triangle is large enough to tie around your head easily. Sew decorative edges or tassels to the edge for a stylish touch.
How to Crochet a Triangle Blanket?
A crochet triangle blanket is a creative and visually appealing project with multiple triangles. The blanket can be made for any size with endless color combinations and patterns to create this fun and unique geometric design blanket that will look great in your home.
- Create Many Triangles: You can crochet different triangle shapes based on your preferences, whether your stitch or color pattern. Ensure all triangles are the same size to fit perfectly when joined.
- Attach the triangles: To attach the triangles, you can sew or crochet them together in a blanket configuration using slip stitches or an invisible seam to produce a continuous, unified appearance.
- Finish Off: Crochet a decorative or simple border around the edges to complete the blanket. This adds durability, levels up the overall design, and gives it a polished, finished look.
Special Triangle Crochet Techniques
Amigurumi uses specialty triangle crochet techniques to create detailed features and 3D shapes. Whether we are working on a wee nose or a felted triangle, these techniques add character and structure to our crochet creations, which helps our project look fuller and nicer in terms of overall design and composition.
How to Crochet a Triangle Nose (for Amigurumi)?
To Crochet a Triangle Nose for Amigurumi Toys, gradually decrease and form a small triangle shape that connects to the rest of your crochet piece without seams to give your nose a polished look.
- Make a Little Triangle: Start with a slip knot, chain four. Create a single crochet across that forms the bottom of the triangle. This little foundation establishes the form of the nose.
- Nose Shaping: Work decrease stitches at the start and end of every other row to taper the triangle. Repeat until you have one stitch left, creating a defined shape for the nose in proper proportions and symmetry.
- Attach to Amigurumi: If you are doing a face for a toy, you need to attach the triangle to the face. Sew it with a yarn needle so that it will sit nicely.
Crochet Triangle Amigurumi
Amigurumi crochet triangles are an easy and interesting project that results in a soft and plush shape. You can make cute decorations, cushions, or amigurumi patterns by making two of the same triangles, stuffing, and stitching them together.
- Crochet Two Triangles: Using single or double crochet stitches, crochet two triangles that are the same size. When working with amigurumi, it is essential to maintain the symmetry and consistent shape of the piece by using pieces that are equal in size and shape.
- Fill with Fiberfill: Before closing the two triangles, insert a small quantity of fiberfill between them. Adjust the stuffing so it is soft but holds a little shape without stuffing it too much.
- Refine the Edges: Use a yarn needle to sew or crochet the triangles along the edges. Secure the stitches to ensure nothing escapes tightly.
Final Thoughts
Crochet triangles are easy and fun to create for beginners. You can make beautiful projects with straightforward stitches and practice from shawls and scarves to blankets. Try different patterns and techniques. The more you practice, the better your skills will be. Be creative, have fun, and make new and beautiful crochet projects.


![The Best 30+ Free Crochet Cat Patterns [Beginner-Friendly Guide]](https://crochetmind.com/wp-content/uploads/2025/04/1-The-Best-30-Free-Crochet-Cat-Patterns-Beginner-Friendly-Guide.webp)


