


![Select Crochet Clothing Ideas: [Best Crochet Fashion] Crochet Clothing Ideas](https://crochetmind.com/wp-content/uploads/2025/07/Crochet-Clothing-Ideas-Best-Crochet-Fashion-in-2025-1-1.jpg)
Have you ever wanted to make something cool with yarn? Like a scarf or a stuffed animal. It all starts with something called a crochet foundation chain! Think of it like the first row of a ladder. The foundation chain is the base that holds your whole crochet project together.
You’ll need a crochet hook and some yarn to make a foundation chain. First, you make a slip knot a loop that stays put on your hook. Then, you’ll pull the yarn through that loop repeatedly to make a chain of little “V” shapes. Each “V” is called a chain stitch!
Once you master the foundation chain, you’ll be ready to crochet anything—from coasters to cute keychains. So grab your hook, take a deep breath, and let’s chain our way to awesomeness!
In This Post
- What Is Foundation Chain?
- Why Should You Know The Foundation Chain?
- When Can You Use A Foundation Chain?
- How To Crochet A Foundation Chain?
- Advanced Foundation Stitches for Crochet
- How to Make Chainless Foundation Crochet Stitches
- Common Mistakes During Crocheting and How to Fix Them
- Practice Project Ideas To Start With Foundation Chain
- Tips And Tricks For A Perfect Foundation Chain
- In closing
- Frequently asked questions
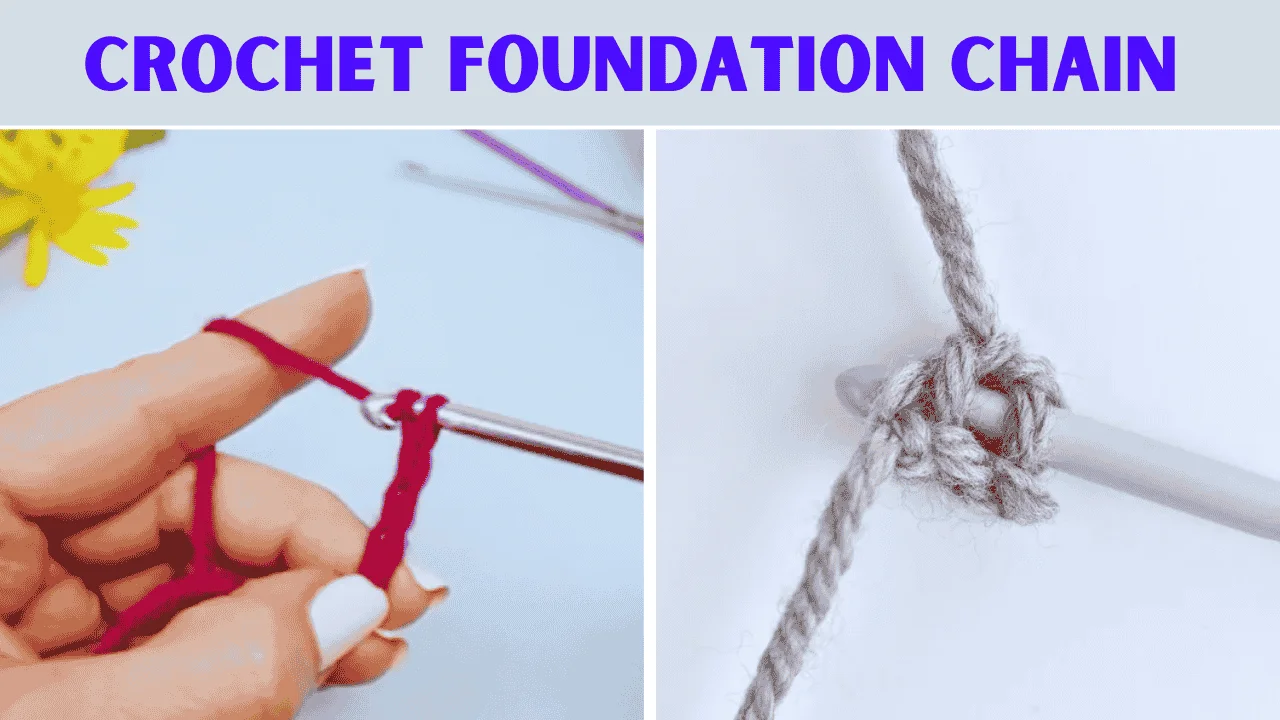
What Is Foundation Chain?
The foundation chain is the first row of foundation stitches. It is made up of rows of loops linked together looking like a real metal chain. Every individual loop is called a chain stitch.
It creates the base of the project where the other stitches will work. Depending on the pattern the number of stitches are needed. It can be made in a circle or straight line. A straight line is used for projects that go back and forth, like blankets or scarves. A circle is used for round or square projects, like hats or granny squares.
Why Should You Know The Foundation Chain?
The foundation chain is the most important thing in the crocheting phase. It is like the base of the building that holds your whole project together. Without the foundation, you can’t build any type of crochet project.
The foundation chain is the very first step of every crochet project. It sets the width of your project and helps you start stitches like single crochet or double crochet. If you learn it well, you’ll be ready to make cool things like scarves, blankets, or even stuffed animals! Plus, it’s easy to learn and makes crocheting way more fun!
When Can You Use A Foundation Chain?
You use a foundation chain every time you start a crochet project! It’s like the first row of building blocks for your yarn creation. If you’re making any project like a scarf, hat, blanket, or stuffed animal, you’ll begin with a chain. The chain gives you a base to add stitches (like single crochet or double crochet) and turns your yarn into something cool!
It’s also handy if you want to practice just making a chain, undo it, and start again. Even when you’re a pro, you’ll still use chains because they’re the first step for almost everything! So grab your hook, pick fun yarn, and start chaining to make magic happen!
How To Crochet A Foundation Chain?

A foundation chain is the first step to making cool yarn creations! It’s like the “starter row” that decides how big your project will be.
Use yarn and a hook that work together. Keep your loops even not too tight or too loose. Master this, and you’re ready to make cool stuff.
Materials You’ll Need:
- Yarn of your choice.
- A crochet hook suitable for your yarn 4-6 mm crochet hook is best.
Here is the in-depth guide to crocheting a foundation chain. Including –
Step 1: Make a Slip Knot

To make a foundation chain, first create a crochet slip knot. Place the yarn in your left-handed palm, leaving the loose end hanging down. Then, gently wrap the yarn around your first two fingers. Insert the hook through the loop. Use a crochet hook to pull the yarn from the loop.
Once you make the loop. Release the knot with your left hand. Pinch the yarn’s tail end and pull to tighten the knot. Finally, tug on the working yarn to secure the loop around the hook.
Note: Leave a 4 to 6-inch piece of yarn at the start. This will make it easier to weave it in when the project is finished.
Step 2: Hold the Hook and Yarn
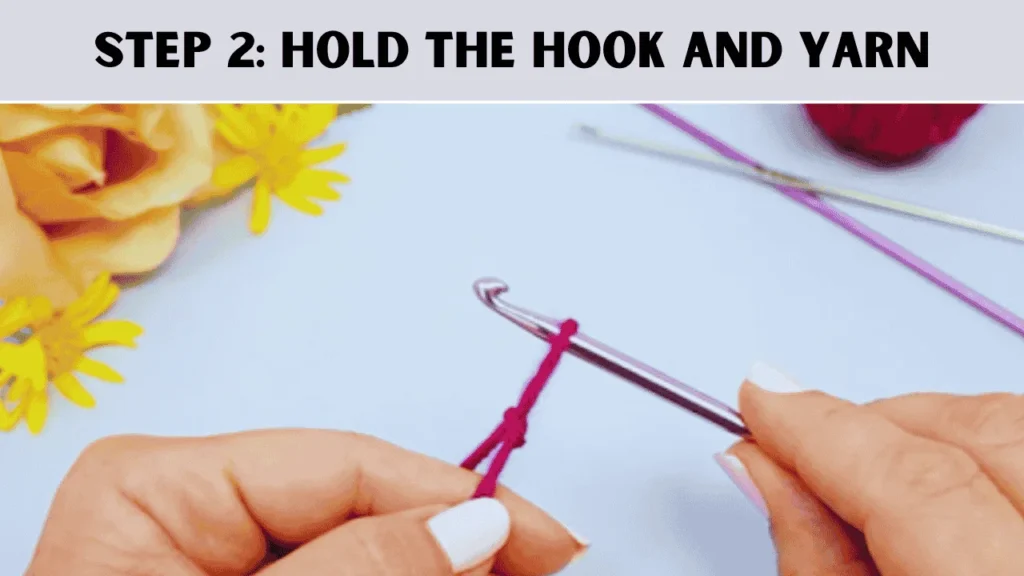
Hold the crochet hook with the loop of yarn about 1 inch (2.5 cm) below the curved end of the hook. Make sure it faces your other hand, and the long yarn stays behind the hook.
Step 3: Yarn Over and Pull Through

Take the long tail for the yarn and pull it over the hook to yarn over. The knot should stay below the hook and the remaining yarn will be in front of the hook.
Now, move the hook, catch the yarn, twist the yarn, and pull through the slip knot. This is your first complete chain.
Note: You can adjust the loop size by tugging the yarn to make it smaller and pulling the hook to make it bigger.
Step 4: Continue Chaining

Continue the yarning over and pull the yarn through the slip knot. Make as much foundation as you want.
Step 5: Counting Your Chains

Laid your foundation on your table and look of a “v” shape. Every v shape in the chain counts as a stitch.
After making the slip knot, start counting from the first full V and continue counting until you reach the end.
Note: The slip knot and the loop of the hook do not count as stitches. For better accuracy, you can use a stitch marker in every 10 stitches.
Advanced Foundation Stitches for Crochet
Foundation stitches make the first row flexible and strong without a long chain. Instead of chaining first, you can crochet the base and stitches at the same time.
Three types are foundation crochet stitches. Including single crochet foundation, half double crochet foundation, and double crochet foundation. These stitches help make projects neater and easier to start.
Single Crochet Foundation Chain (FSC)

Level: Easy
What You Need: Yarn, Crochet hook, Stitch marker.
Here is an in-depth guide on how to single-crochet a foundation chain. Including –
Step 1: Start the Row

At the start of making a foundation single crochet make a slip knot and chain 2. These two chains set up the foundation for your first stitch.
Step 2: Do the Chain Part of the Stitch
In the first chain of your yarn. Insert the hook into the yarn. In this way, the crochet hook will catch both the left of the first chain. The center stitch should be leading the next stitch. At this time you will see two strands of the yarn in your hook. One is on the right and the other is left.

Step 3: Start the Next Part of the Stitch
Now, at this step make sure you have 2 loops of your yarn. Yarn over the hook and make a loop.
At this point, you’ll have two loops on your hook.

Step 4: Finish the Single Crochet Part of the Stitch
Then again yarn over the hook and pull the hook through both loops of your hook. This is the complete foundation single stitch.

Step 5: Get Ready for the Next Stitch
Now, take a look at your first FSC. The stitch you just pulled the loop through on the right side. It is the top of the first stitch. This is where you’ll count your stitches.
On the bottom edge, the longer part is the chain part of the stitch. In this place, you’ll insert the hook for the next stitch.
Note: Single crochet foundation chain left-handed people need to pull the loop on the left side.

Step 6: Make the Next FSC
For the next FSC, insert the hook at the chain part of the first stitch. Repeat the same steps you did for the first stitch. Here’s a simple summary of the process:
- Insert the hook.
- Yarn over and pull up a loop.
- Yarn over and pull up another loop.
- Yarn over and pull through both loops.
Note: Make sure you go through the chain. So you have two stands on the left side of the hook. When you make more stitches it makes it easier.

Step 7: Work Vertically on Your Foundation Row
For making the foundation single crochet chain you need to work vertically. Because the process of making an FSC is more likely crocheting the foundation chain.
Once you finish the row with your FSC. You can start working horizontally from right to left if you’re right-handed.

Step 8: Continue Crocheting Your Project
Congrats, you have completed your first foundation row of stitches. You can continue crocheting your project. Remember that, what you just made is the first row of single crochet.

Half Double Crochet Foundation Chain (FHDC)

Level: Easy
What You Need
- Yarn
- Crochet hook
- Stitch marker
Here is the in-depth guide on how to do a half-double crochet foundation chain. Including –
Step 1: Start with a Slip Knot and Chain 2

At the start of making a foundation half double crochet make a slip knot and chain 2. These two chains set up the foundation for your first stitch.
Step 2: Yarn Over Into The Hook

In the next step, yarn over into the hook. Insert the hook into the first chain that you made. Then, again yarn over and pull up a loop. This creates the initial part of the foundation stitch, known as the chain stitch.
Step 3:Pull Through One Loop

In this step yarn over again and pull through one loop into the hook. At this point, you’ll have 3 loops into your hook.
Step 4: Pull-Through All Three Loops

Pull all the three loops insert from chain 2. This is the first foundation of a half-crochet stitch. It is the base of the stitch that combines both the chain and the half-double crochet chain.
Step 5: Make the Next FHDC

For the next FHDC, insert the hook into both strands of the chain stitch. Repeat the same steps as step 2. Here’s a simple instruction for the process:
- Insert the hook.
- Yarn over and pull up a loop.
Note: In this step, you should have 3 loops on the hook.
Step 6: Pull-Through One Loop

After pulling up a loop in step 5, yarn over again and pull through only one loop. This creates the chain part of the stitch.
Note: this step is most important. It keeps the stitches connected and makes the foundation row flexible.
Step 7: Pull-Through All Three Loops Again

Now, still, you have three loops into your hook. Yarn over again and pull through all three loops at once. This completes the half-double foundation stitch. Continue adding new stitches by following steps 5 – 7 until you reach the desired length of your piece.
Double Crochet Foundation Chain (FDC)
Level: Easy
What You Need
- Yarn
- Crochet hook
- Stitch marker
Here are the step-by-step Instructions for making a foundation double crochet. Including –

Step 1: Began with a slip knot
Began with a slip knot and made chain 2. This chain-2 works like the chain-2 at the start of a double crochet row. It gives the stitches their height. This acts as a base for the first foundation double crochet stitch.

Step 2: Yarn Over Into The Loop
Wrap the yarn over. Insert the hook under the back bump of the first chain you made. Then pull up a loop.

Step 3: Create the Bottom Chain
Chain 1 to form the base of the foundation stitch.

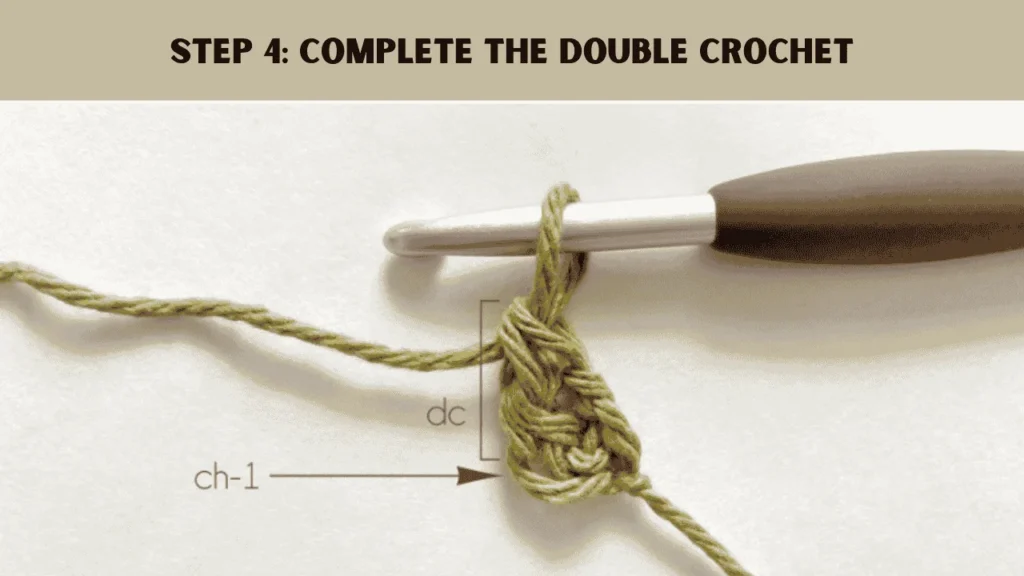
Step 4: Complete the Double Crochet
Now, yarn over and do a regular double crochet. Here’s a simple instruction for the process:
- Wrap the yarn around the hook.
- Insert the hook into the 3rd chain from the hook
- Yarn Over and Pull Up a Loop
- Yarn Over and Pull Through Two Loops
- Yarn Over and Pull Through the Last Two Loops
By following these steps you have completed your first double crochet loop.
Step 5: Make the Next FDC Stitch
To make the next foundation stitch, look at the bottom of the chain-1 you made it look like a “V”. Insert your hook into that “V” and yarn over. Pull up a loop, and then repeat the steps:
- Yarn over
- Pull through one loop
- Then again yarn over and pull through the last two loops.
This completes your next FDC.

Step 6: Repeat the steps 5
After making the next FDC, continue crocheting from step 5. Until you finish the row or as many stitches as you need.

How to Make Chainless Foundation Crochet Stitches
Chainless foundation crochet stitches are a type of base project without making a long chain. These stitches make the first row strong and flexible. There are 3 types of chainless foundation crochet stitches one is single. Another is a double and half double crochet chainless stitch.
Here are the in-depth instructions about how to make chainless foundation crochet stitches. Including-

Suggest Yarn:
- Worsted weight (4) yarn
Tools:
- Crochet hook
- Scissors
- Yarn needle
Materials: Stitch markers (optional)
Here are the step-by-step instructions for making chainless foundation stitches of single crochet, double crochet, and half double crochet. Including –
Step 1: start with a slip-knot

For making a chainless foundation chain, start with making a slip knot. Make chain 2 single crochet chainless foundation chain. For half double crochet chainless foundation and for double crochet chainless foundation make chain 3 or chain 4.
Step 2: Make The First Stitch

In this step, you need to insert the hook into the loop of the chain that you made. For a single crochet chain insert your hook in the top of the second chain. Insert your hook in the top loop of the fourth chain for a double crochet chainless chain.
Besides, for half double crochet chainless foundation insert your hook in the top loop of the third chain that you made.
Step 3: Yarn over again And pull A loop

Next, in this step yarn over again and pull a loop. If you crocheting double of half double chainless foundation chain then you’ll have 3 loops on the hook. For a single crochet chain, you will have 2 loops on the hook.
Step 4: Yarn Over Again

Next, again yarn over into the hook. In this step, you’ll have 3 loops of hook for a single stitch and 4 loops of double or half-double crochet chainless foundation.
Step 5: Pull-Through One

Next, pull through 1 loop from every foundation whichever you are doing. In this step, you will have 2 loops on the hook for a single crochet. For half-double and double crochet you will have 3 loops on the hook.
Step 6: Yarn Over again

In this step, again yarn over into the hook. At this time, you’ll have 3 loops for single crochet and 4 loops for double and half double crochet chains.
Step 7: Complete the first chainless foundation crochet stitch

In this step, you will need to pull through loops whichever chainless foundation chain you are doing. In a single crochet chain pull through 2 loops and for half double pull through all the 3 loops.
Again, for a double crochet chain, you need to pull through 2 loops and yarn over. Again pull through 2 loops. At this time, you will have one loop into the hook in every chain foundation chain.
This is your first chainless foundation stitch.
Step 8: Start The Next Stitch

In this step, start for the next stitch. You need to insert the hook into the loops at the bottom of the stitch for the single crochet chain.
Yarn over again for double and half double crochet foundation stitch. Insert the hook in the second loop into the bottom of the stitch.
Step 9: Finish the Seoucd stitch

This is the last step of chainless foundation stitches. In this step, yarn over into the hook for every crochet stitch. Pull through 2 loops and repeat steps 4 – 9 instruction as many times as needed.
Common Mistakes During Crocheting and How to Fix Them
Creating a foundation chain might seem simple. But even small mistakes can throw off your entire project.
Here’s a breakdown of common errors beginners make and how to fix or avoid them:
1. Mistake: The foundation chain is too tight

Why this happened:
If you hold the yarn too tightly or pull the hook too hard, you’ll end up with a tight crochet chain.
How To Fix:
1. To resolve the tightening issue, relax your hand. Allow the yarn to move smoothly through your fingers without gripping it.
2. Use a larger hook.
3. Instead of doing yarn over, do yarn under for a looser foundation chain.
2. Mistake: The foundation yarn is too loose

Why it happens: Inconsistent tension or letting the yarn slip too freely.
How to fix:
- Adjust your grip: Wrap the yarn around your non-dominant hand’s pinky for better control.
- Work closer to the hook tip to keep stitches snug.
3. Mistake: Twisted or Curling Foundation Chains

Why it happens: Chains naturally twist if tension is uneven or the hook rotates.
How to fix:
- Lay the chain flat and gently untwist it as you go.
- Work into the back bump of the chain when starting Row 1 for a straighter edge.
4. Mistake: Miscounting Foundation Chains

Why it happens: Distractions or losing track of the starting slip knot.
How to fix:
- Count aloud and place a stitch marker or safety pin every 10 chains.
- Skip the slip knot when counting (it doesn’t count as Chain 1).
5. Mistake: Inconsistent Stitch Size

Why it happens: Uneven tension or rushing.
How to fix:
- Check each “V” shape to ensure they’re the same size.
- Pause after every 5 chains to adjust tension if needed.
Practice Project Ideas To Start With Foundation Chain
Starting with a foundation chain is great for learning crochet. Simple projects help with stitch practice and tension control. Good ideas include washcloths, headbands, bracelets, and small scarves. These projects are easy, fun, and useful. They help build confidence before trying bigger patterns with more stitches and designs.
Here are some practice project ideas with which you can start your crochet foundation chain journey.
1. Two-Track Ear Warmer Crochet Pattern

Skill level: Easy to intermediate
Materials
- 1 skein of Lion Brand Hometown USA yarn in the color Portland Wine or Super Bulky Yarn less than 81 yards.
- crochet hook 11.5mm
- Needle to weave in ends
- Scissors
Gauge and Sizing
- Gauge: 8 sts x 5 rows 4 in
- The finished piece measures: 4 in wide x 8.5 in long while laying flat.
Abbreviations:
- I use US Terminology
- Ch(s): chain(s)
- Hdc: half doulble crochet
- Sl st: slip stitch
- BLO: back loop only
Instruction:
| Round | Instruction On Making A Two-Track Ear Warmer Crochet Pattern |
| Round 1 | Hdc in the 2nd chain from the hook and in each chain across. Be careful not to twist. Join the first HDC with slip stitch. |
| Round 2 | Chain 1, then work HDC in the back loop only (BLO) in the same stitch and each stitch around. Join with a slip stitch to the top of the first HDC. |
| Round 3 | Chain 1, then work HDC in the 3rd loop (or back bar) of the same stitch and each stitch around. Join with a slip stitch to the top of the first HDC. |
| Round 4 | Repeat the process of round 3. |
| Round 5 | Chain 1, then work HDC in the back loop only (BLO) in the same stitch and each stitch around. Join with a slip stitch to the top of the first HDC. Finish off and leave a long tail. Pinch the ear warmer along the seam and wrap the yarn tail around it a few times. Weave in the ends. |
2. Petoskey Lace Cowl
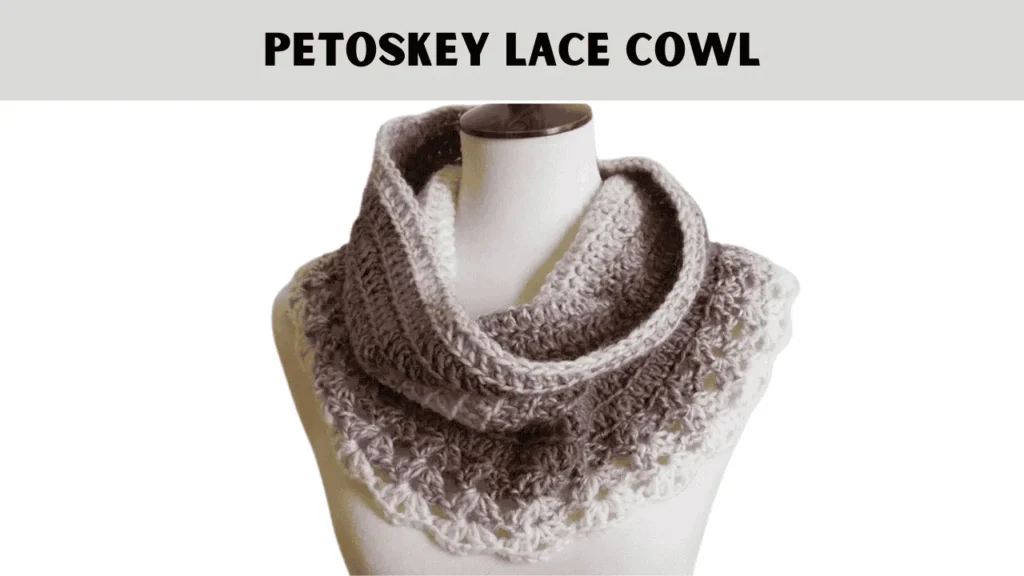
Skill level: Intermediate to difficult
Materials
- Less than 1 skein of Lion Brand Scarfie (5.29 oz/312yds) or can use similar yarn like #5 bulky weight yarn
- crochet hook 6.5 mm/K
- Needle to weave in ends
- Scissors
Gauge and Sizing
- Gauge: 11 stitches x 6 rows in alternating rows of back loop and front loop dc. = 4 inches
- The finished cowl measures: 15 in wide on non-increasing DC rounds x 11.5 in tall
Abbreviations
- Ch(s): chain(s)
- Dc: double crochet
- Sp: space
- Sl st: slip stitch
- BLO: back loop only
- St(s): stitch(es)
Instruction:
| Round | Instruction On Making Petoskey Lace Cowl | Stitch Count |
| Round 1 | Chain 80. Make a circle by joining the ends. Make sure not to twist. Chain 2. Work on double crochet in the same chain. Each chain around the chain. Make a slip stitch into the top of the third chain | 80 stitches |
| Round 2 – 10 | Chain 2, then work a double crochet. At the back loop only (BLO) of the same stitch and each stitch around your yarn. Make a slip stitch into the top of the third chain | 80 stitches |
| Round 11 | Chain 2, then work 2 double crochets in the back loop only (BLO) of the same stitch. Double crochet in the next 19 stitches. Make 2 double crochets in the next stitch, then double crochet in the next 19 stitches. Repeat from * to * around. Make a slip stitch into the top of the third chain | 84 stitches |
| Round 12 | Chain 2, work 2 double crochets in the back loop only (BLO) of the same stitch. Next, make a double crochet stitch in each of the next 20 stitches. Make 2 double crochets in the next stitch, then double crochet in the next 20 stitches. Repeat from * to * around. Make a slip stitch into the top of the third chain | 88 stitches |
| Round 13 | Chain 2, work 2 double crochets in the back loop only (BLO) of the same stitch. Next, make a double crochet stitch in each of the next 10 stitches.In the next stitch make 2 double crochets. Then double crochet in the next 10 stitches. Repeat from * to * around. Make a slip stitch into the top of the third chain | 96 stitches |
| Round 14 | Chain 3 (counts as 1 double crochet). In the same stitch as the chain 3, make (2 double crochets, chain 2, 2 double crochets). Skip 3 stitches, then make (2 double crochets, chain 2, 2 double crochets) in the next stitch. Repeat from * to * around. Skip the last 3 stitches. Make a slip stitch into the top of the chain 3. | |
| Round 15 – 16 | Slip stitch into the chain-2 space. Chain 3, then make 1 double crochet. Next chain 2, do 2 double crochets in the same chain-2 space. Make 2 double crochets in chain 2. Do 2 double crochets in each chain-2 space around. Make a slip stitch into the top of the third chain. In the last round. Finish off and weave in the ends. |
Tips And Tricks For A Perfect Foundation Chain
Creating a flawless foundation chain takes practice. But these tips and tricks will help you master it faster and avoid frustration. Let’s refine your technique for smooth, even chains every time!
Here are the tips and tricks for a perfect foundation chain. Including –
1. Tension Mastery
Tight chains are hard to work into while loose chains look sloppy. To maintain control hold the yarn with a “pencil grip” over your non-dominant index finger. Let the yarn flow freely. Avoid pulling it too tightly. Imagine guiding the yarn rather than yanking it. Start by practicing on bulky yarn to see the stitch structure clearly, then switch to finer yarn.
2. The Magic Hook Swap
Start with a hook 1-2 sizes larger for your foundation chain. For example, if your pattern uses a 4mm hook, chain with a 5mm hook, then switch back to Row 1. This prevents tight chains and makes inserting the hook easier in the first row.
3. Stitch Markers Save Lives
Losing count during crocheting the foundation chain? Place a stitch marker every 5 or 10 chains. Use scrap yarn, safety pins, or commercial markers.
Note: Mark the right side of your chain to avoid twisting.
4. Work Into the Back Bump
Most tutorials teach working into the top loop of the chain, but this leaves a bumpy edge. Instead, insert your hook under the back bump for a flat, polished edge.
5. The Flick Method for Speed
Advanced crocheters use a wrist flick to yarn over quickly. Practice rotating the hook slightly with your wrist, not your whole arm to catch the yarn. This reduces hand fatigue and speeds up chaining.
6. Avoid the Starting Chain Curse
Chains curling into a spiral is a common problem that beginners face while crocheting. For this lay the chain flat on a table and gently stretch it sideways to relax the twists. Use a foundation stitch like FSC or FDC instead of a traditional chain for stretchy, stable edges.
7. Perfect Your Slip Knot
A loose or tight slip knot ruins your chain’s start. After making the knot, tug both the tail and working yarn to adjust it. The loop should slide smoothly on the hook but not fall off.
8. Check Your “V” Shapes
Each chain should look like a neat V with even arms. If your chains look like Y’s or loops, you’re pulling the yarn too tightly. Undo and restart don’t settle for messy chains!
9. Try the Chainless Foundation
Skip the traditional chain altogether with a Foundation Single Crochet (FSC) or Foundation Double Crochet (FDC). These stitches combine the chain and first row, creating stretchy, professional edges.
10. Block Your Chain
For ultra-polished projects, lightly steam-block your foundation chain before working into it. Pin it flat on a mat, hover a steam iron above it, and let it dry. This evens out tension quirks.
In closing
The foundation chain is your crochet starting line! With practice, steady hands, and patience, you’ll create smooth chains for awesome projects. Remember while crocheting the foundation chain relax your grip, count carefully, and don’t stress mistakes they’re part of learning. Now grab your hook, chain like a pro, and let your creativity unravel.
Frequently asked questions
How many foundation chains do I need to start a project?
The number of foundation chains depends on your pattern and project type. Before making chains check your pattern instruction. It will tell you how many chains you need. If you don’t have a pattern then count the stitches you want to do in every inch.
Can I use a foundation chain for all crochet projects?
The foundation chain is the most common starting method, it’s not always the best choice for every project. It is best for the projects like blankets or scarves. This is also best for beginners to start their crochet.
Why do we need to use a foundation single crochet?
A foundation single crochet (FSC) is useful because it creates the starting chain and first row of stitches at the same time. This makes the edge stretchier, which is great for projects like hats, cuffs, and blankets. It also helps avoid a tight starting chain and makes counting stitches easier.


![The Best 30+ Free Crochet Cat Patterns [Beginner-Friendly Guide]](https://crochetmind.com/wp-content/uploads/2025/04/1-The-Best-30-Free-Crochet-Cat-Patterns-Beginner-Friendly-Guide.webp)


