


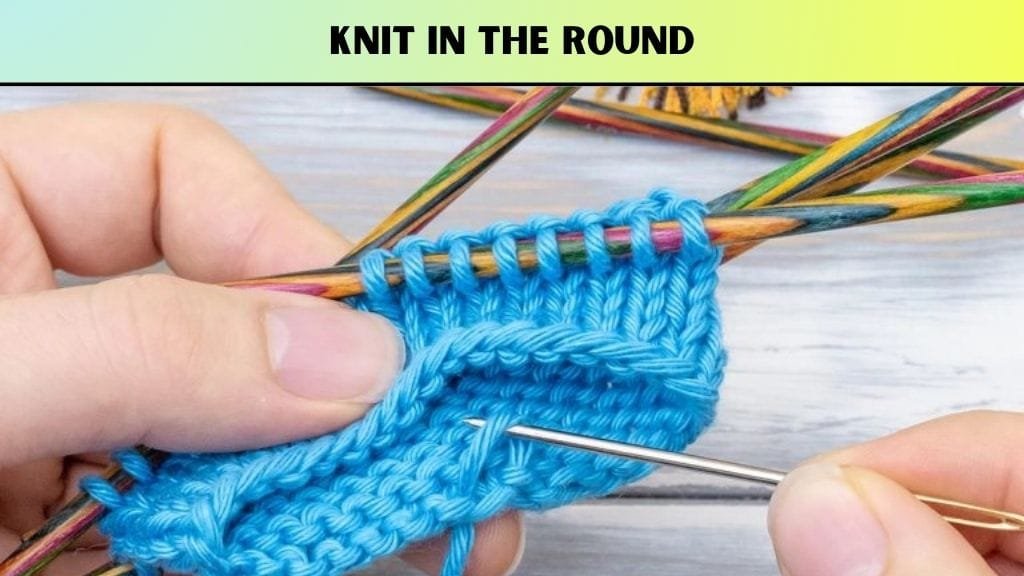
Joining knitting in the round is one of the most helpful and fun skills for anyone who likes knitting. In cases when we want to make hats, socks, sleeves, or warm cowls, we can join knitting in the round properly so that our knittings seem to have no seams. It needs no fancy tools and hard steps. It becomes simple with simple things like yarn, knitting needles and a stitch marker. They can make pretty things that do not need to be sewn together. We know how to knit in the round, so how?
To join knitting in the round,
- The first one is Cast On the Right Number of Stitches.
- Test Your Stitches To See That They Are Not Tangled.
- Insert a Stitch Marker to indicate the Start.
- Weave the First Stitch to tie the Circle.
- Continue Knitting Around Without Turning the work.
This is great for a newbie. You have only to take your stitches, and then knit them and join them, and then knit them in a circle. Your project will soon shoot well up.
That’s not all. This guide will have you joining knitting in the round in various methods, such as circular needles, double-pointed needles, and the magic loop step-by-step. We are also going to provide you with some tips to prevent gaps or jogs to make your knitting look smooth and nice. So, let’s get started and learn this easy skill for beginners.
Key Takeaways:
- Knitting in the round is easy to join, entertaining, and does not require a lot of equipment. It is also essential to use the proper needles and yarn to ensure that the join is even and solid.
- Circular needles, double-pointed needles, or magic loop can be used to knit in a circle.
- Ensure that your joint is tight and is compact without gaps and twists. Both novices and advanced knitters have a great ability to love making hats, socks, and so on.
In This Post
- What is the Joining of Knitting in the Round?
- Supplies You Will Need to Join Knitting in the Round
- How to Join Knitting in the Round? [ Easy 5 Steps]
- Smart Project Joining Technology for a Cleaner Start
- How to Join Knitting in the Round on Double Pointed Needles (DPNs)
- FAQs
- What Does It Mean To Join Knitting In The Round?
- What Do I Do To Prevent My Knitting From Twisting When Joining?
- Can I Join Knitting In the Round Without a Gap?
- How Can You Join Up Knitting In The Round As a Beginner?
- Which Needles Should I Use to Join in the Round?
- How Can I Escape a Jog in Striped Knitting?
- Can I Practice Joining in the Round First Before I Start My Real Project?
- Final Thoughts
What is the Joining of Knitting in the Round?
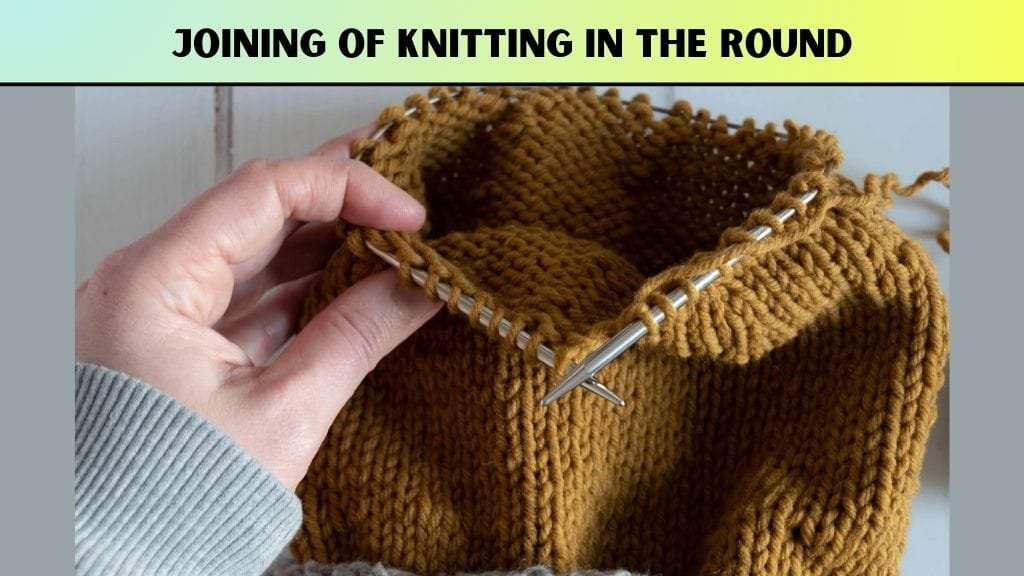
Joining knitting in the round is the action of attaching your cast-on stitches into a circle to allow you to continue knitting without having to turn your work, unlike flat knitting, which is done at a 90-degree angle. Knitting around is continuous.
It is also among the most common techniques among novices because it is easy to master and generates smooth projects. Such an approach is favoured by a large proportion of people, who like to create hats, socks, cowls, or sleeves. However, you may make special and comfortable things in your favourite colour and style of yarn, all knitted in one circle.
Supplies You Will Need to Join Knitting in the Round
You will begin with some simple knitting apparatus. To start with, select your yarn with the colour and texture of your preference. Then choose the correct knitting needles, circle needles, double-pointed needles, or long circular needles, magic loop. You also have to have a stitch marker. Then, keep scissors and a tapestry needle at hand. As soon as you have all the logistics ready, you can commence your knitting on a round project.
| Item | Why You Need It |
|---|---|
| Yarn | Your project will be based on the following key resource. |
| Hypodermic needle | To knit circular (circular, DPNs, or long circular to make a magic loop) |
| Stitch marker | Marks the start of each round |
| Scissors | To cut yarn when needed |
| Tapestry needle | For weaving in yarn ends |
| Measuring tape (optional) | Help, check the size of your project |
These tools provide simple methods of getting to know how to knit in the round so that you can produce smooth and seamless projects without any fear.
How to Join Knitting in the Round? [ Easy 5 Steps]
It is not difficult to learn how to join knitting in a circle, provided that you take every step one by one. This technique joins up your stitches into a loop so that you can knit one continuous circle with no turning of your work. You will prevent such errors as twists, gaps or loose joins by doing each step slowly. The following is a simple method of doing it from the beginning to the end. Start with a simple backward loop around your needle.
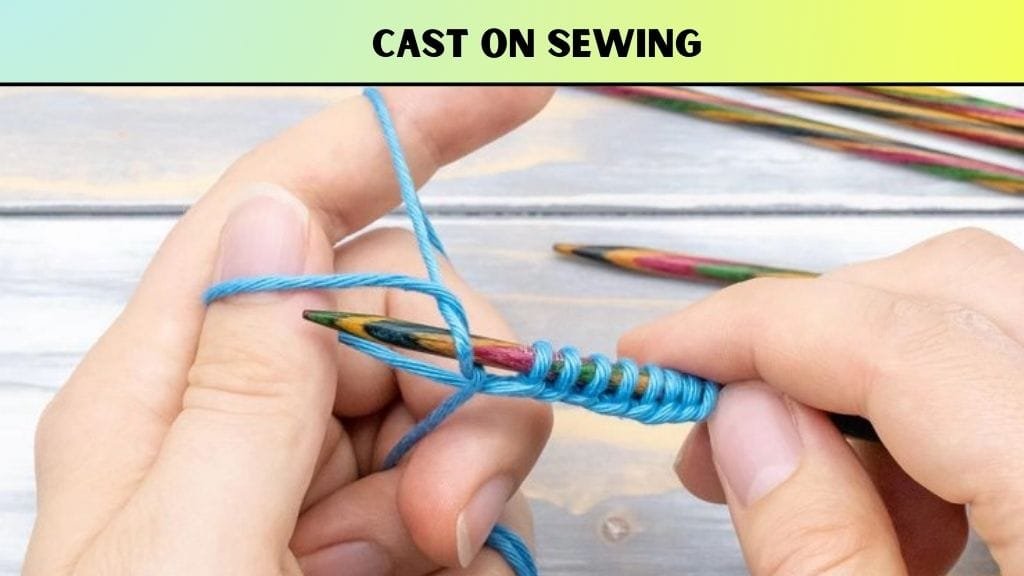
Step 1: Cast On Sewing
Start with the number of stitches needed by your pattern. The cast-on method that you use may be any that you want to use, and may be the long-tail cast-on or the knit cast-on. The point is that you are to make sure that there are enough stitches to make sure that your project will be the right size. Be sure that you have equal stitches and they should be neither too tight nor too loose, since they would be easy to combine.
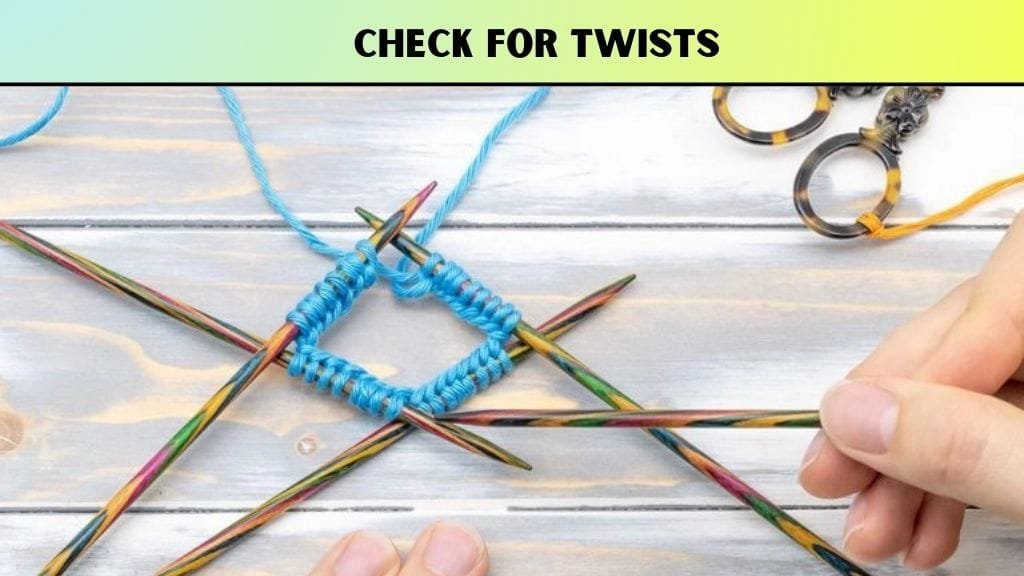
Step 2: Check for Twists
Before joining, make sure that the edge of the cast-on is flat. Even the loops should turn in one direction around the needle. The twisting of one loop will give your project an unending twist in the cloth. Now is the time to straighten out any twists that may be there, because once you start knitting in the round, you cannot do it.
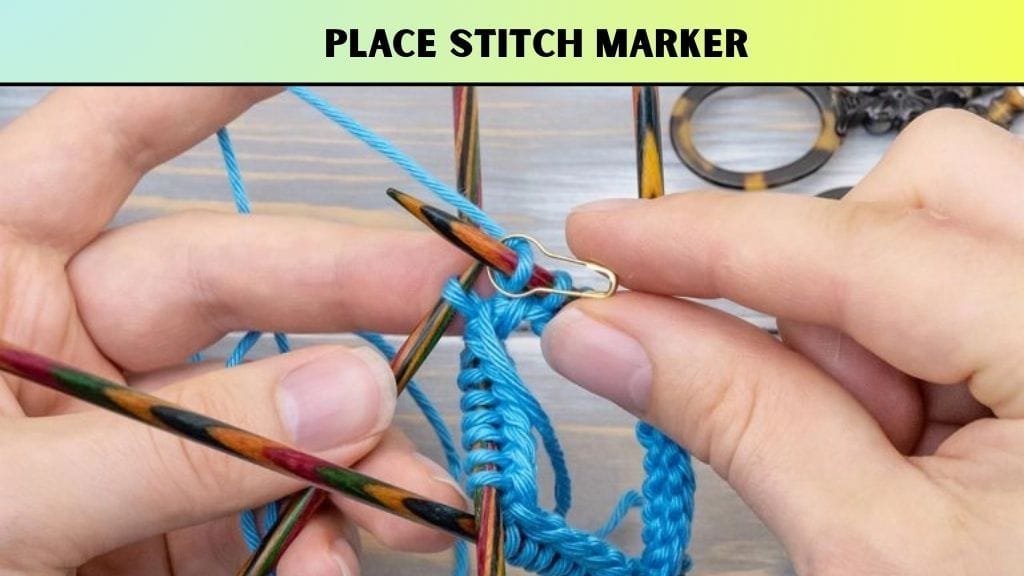
Step 3: Place Stitch Marker
Take a stitch marker and slide it on the right needle tip. This is a marker on where each round begins. Making a note with a marker will assist you in tracking rows, increases, and decreases. It is a little gadget, yet it simplifies knitting in the round an entire level and organizes it in a better manner.
Step 4: Join
To join, hold together, with the right needle, the last stitch on the right needle, and bring the first stitch on the left needle as near as possible to that. You are going to hold your yarn like you are going to knit, and you are going to knit the first stitch on the left needle. This will join the two ends in the form of a loop, and your knitting can now be joined in the round. Tug the yarn, but not too tightly to form a gap.
Step 5: Knit in the Round
Now keep on knitting around without inverting your work. As you are at the stitch marker, move it over to the right needle and continue on. You will knit a round, and the fabric will grow upwards in a tube manner. Even your stitches look professional.
Smart Project Joining Technology for a Cleaner Start
When you begin knitting in the round, the join may appear to be untidy. These easy tricks will assist in making your work appear clean and smooth. Both methods have their application, and you may experiment with them to determine the best one. These joins will be easy and natural with practice. Very soon, you will be able to begin your projects without thinking of loose or sloppy joins.
How to Join Knitting in the Round with an Extra Stitch?
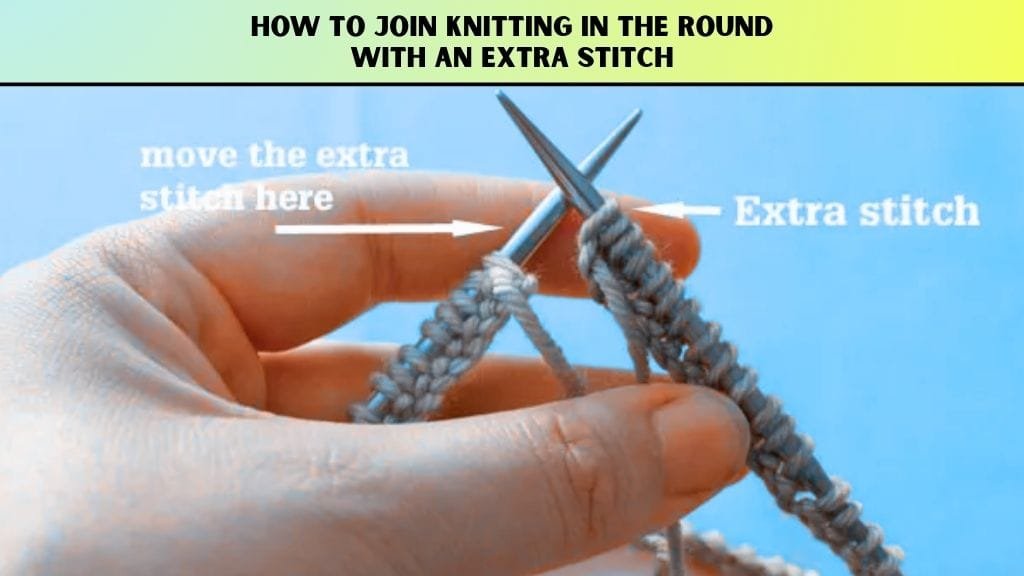
Adding an extra stitch to your pattern can assist in making the join tighter. This helps prevent the small holes that appear at the beginning. It is an easy trick that makes your knitting appear cleaner. This technique is effective in plain and patterned knitting. It can be applied to the hat, sleeves, and even necklines to help in making a smooth start.
- Cast on one extra stitch.
- Pass the left-hand stitch to the right-hand needle.
- If you have the right needle, pass the stitch (right needle) over the slipped stitch.
- Start knitting as usual.
This technique provides your knitting with a professional look. As soon as you have tried it, you will never miss the extra-stitch trick again.
How to Join Knitting in the Round Without a Gap
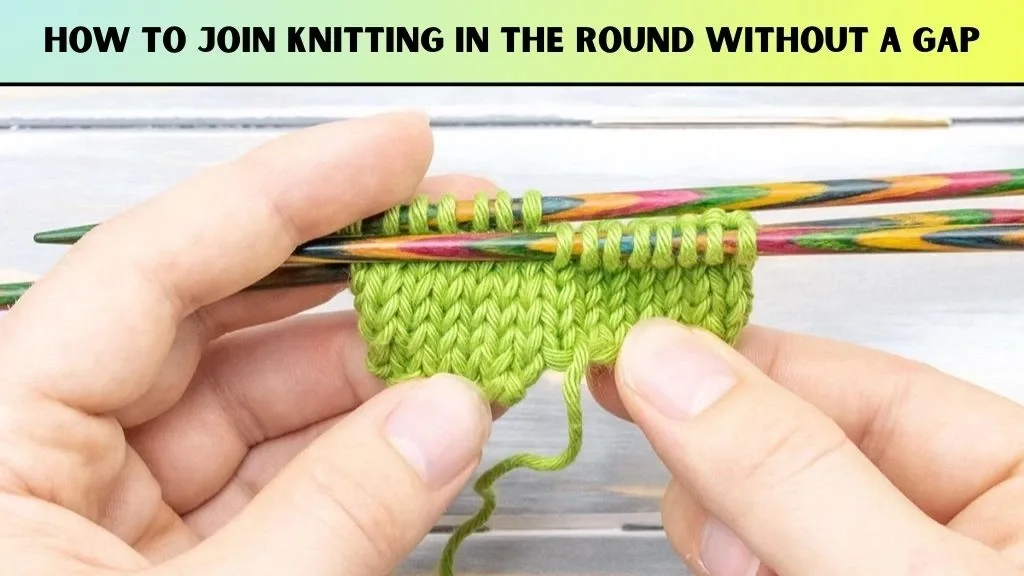
Gaps can happen when your yarn is too loose at the join. You can stop this by holding the yarn tail tight when you start knitting. The first stitch is also snugged by pulling the working yarn. Performing both the first and second rounds of this will make your work even. This little practice can help you avoid holes in the future.
- For the first few stitches, you should hold firmly on the yarn tail.
- Take the first stitch like usual.
- Tug lightly on the working yarn to tighten the join.
- Continue knitting around.
This will eventually become a habit, and your joins will never appear messy. It is a small gesture that brings a huge visual impact.
How to Join Knitting in the Round Without a Jogging
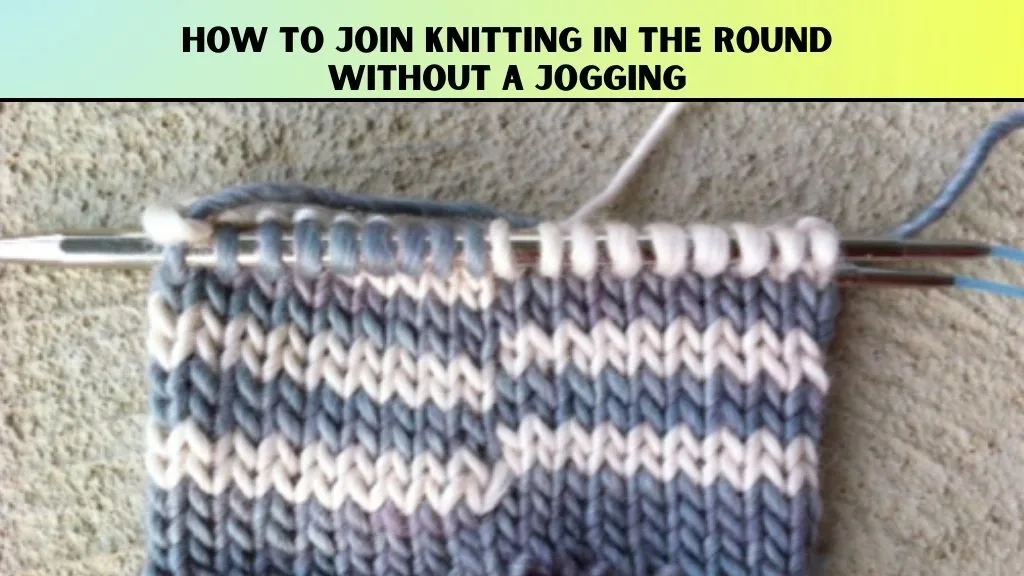
When you switch colours in stripes, a small step (called a jog) will appear. This may bring lopsomeness in your work. To line up the stripes, you may simply slide the first stitch of the second round. It is a step that helps a lot in the striped knitting projects. When you try it you will see that your stripes are so much neater.
- Knit up the first round in your new colour.
- When beginning the second round, slip the first stitch purlwise (without knitting it).
- Keep on with the remaining round of knitting.
- This reverses the change of colour and maintains the stripes straight.
This technique ensures that you have straight and clean-looking stripes. It is a popular knitterly gimmick.
How to Join Knitting in the Round on Circular Needles

Circular needles are best for larger work. It is easier to select the appropriate cable size, which will not result in a stretched set of stitches. They are easy to carry around and prevent the dropping of stitches. Circular needles are easier on the hands than straight needles for many knitters.
- Select a cable that is smaller than the width of the project.
- Cast on the needed stitches.
- Make sure there are no twists.
- Add a stitch marker to indicate the beginning.
- Join the first stitch to round.
Circular needles are easy to use once you have gotten used to them, and they make the process of knitting easier and quicker. They are an all-purpose solution to projects of any scale.
How to Join Knitting in the Round on Double Pointed Needles (DPNs)
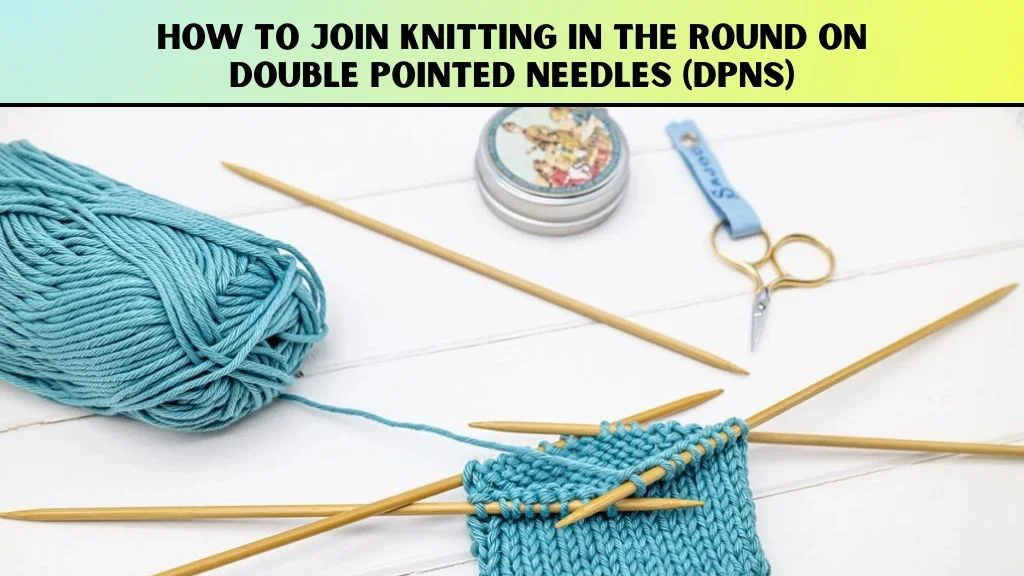
Small projects, such as socks or gloves, are best done using DPNs. You put the stitches on several needles, and knit using another. They are also quick and user-friendly once you get used to them. They are also useful in working on small and thin sections of your work.
- Share out the stitches equally among three or four needles.
- Keep the needles in a triangle or square shape.
- Knit the stitches using a fifth needle.
- Stitching: Be sure not to leave a gap between the first few stitches.
DPNs may be awkward initially, but once in a while, they become instinctive. They put all the power in your hands, regarding little circular knitting projects.
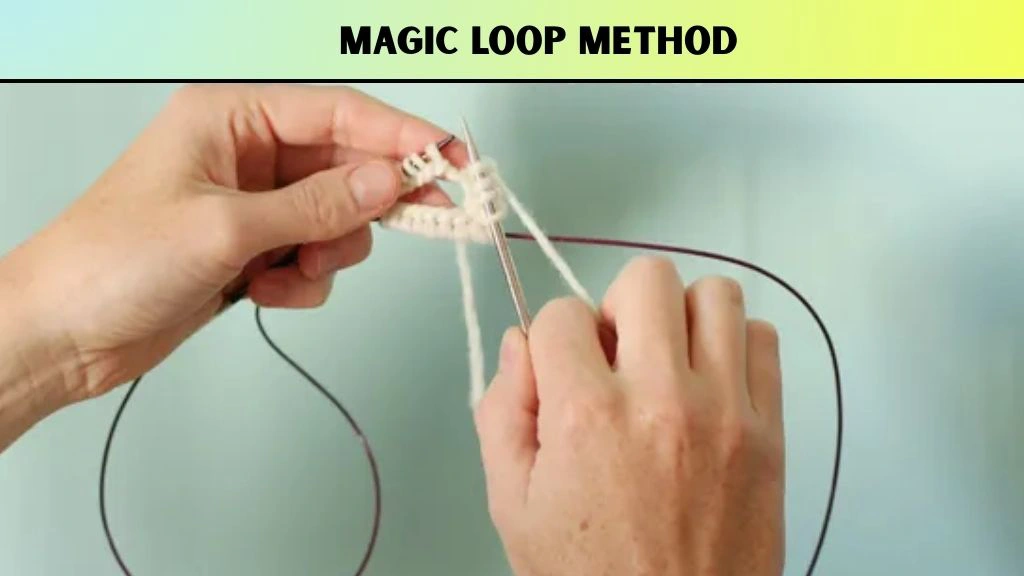
How to Join Knitting in the Round Using the Magic Loop Method
The magic loop technique is applicable when dealing with small projects with a single, long circular needle. It allows you to knit in circles without having to use short needles. This is a convenient way in case you do not intend to purchase a great number of various needle sizes. It is also very good for travelling knitting as you can do it with one set of needles.
- Take a long cable circular needle (approximately 32 inches or above).
- Half the cable and drag it out between the stitches to form two loops.
- Cross the stitches of the first row.
- Move the cable and knit over the second set.
- Continue repeating and sliding the loops.
As soon as you learn it, you will be able to use the magic loop as a way to knit on the fly. It is versatile, portable, and can be used on numerous projects.
FAQs
What Does It Mean To Join Knitting In The Round?
When you join knitting in the round, you are taking your cast-on stitches and circling them round and round so that you will not have to turn the work. This is commonly used on hats, socks, sleeves, and cowls.
What Do I Do To Prevent My Knitting From Twisting When Joining?
Prior to joining, place your cast-on edge on the needle flat and ensure the loops are all placed facing the same direction. You will save time having to restart later by taking a moment to check.
Can I Join Knitting In the Round Without a Gap?
Yes! With one hand, hold the yarn tail and ensure that the first few stitches are tight. Another way that you can use to close any space is to tug slightly on the working yarn after the first stitch.
How Can You Join Up Knitting In The Round As a Beginner?
A few amateurs use the additional stitch technique, in which you cast on an extra stitch than you actually need, and then simply slide the first stitch to the right needle, then just go over the last stitch. This provides a cleaner, tighter join.
Which Needles Should I Use to Join in the Round?
With larger projects, circular needles with a cable that is shorter than the project width would work. In small projects, you can use double-pointed needles or double the magic loop technique using a long circular needle.
How Can I Escape a Jog in Striped Knitting?
When stripes fail to match in circular knitting, it is referred to as a jog. In order to correct it, slip the first stitch of the second round, then knit it. This renders the transformation of the colour change smooth.
Can I Practice Joining in the Round First Before I Start My Real Project?
Absolutely. Try it with scrap yarn and various ways to join until you are sure. In this fashion, your final project will have a clean look at the very beginning.
Final Thoughts
Knitting in the round offers a new market of things you can create without any trouble. And on cosy hats to warm socks, the technique is practical and pleasant. When you know the easy methods of joining without twists and maintaining even stitches, then it will be an easy yet fulfilling process.
Now, go and get your needles and your yarn, and jump over into circular knitting. It is incomparable to the pleasure of seeing your work developing in a steady stream. You will soon be making beautiful, round-knit products that pass as a polished and professional product.


![The Best 30+ Free Crochet Cat Patterns [Beginner-Friendly Guide]](https://crochetmind.com/wp-content/uploads/2025/04/1-The-Best-30-Free-Crochet-Cat-Patterns-Beginner-Friendly-Guide.webp)


