
A lovely edge completes a crochet edging blanket better than anything else. It’s the blanket’s finishing touch that makes everything come together. Whether you’re wrapping up a cozy throw or a baby blanket, the right border adds charm and personality. These crochet blanket edgings can range from delicate lace to bold scallops. Each transforming your project with a unique vibe. They’re not just pretty; edgings can reinforce edges and hide imperfections. They even add a touch of stretch or structure.
Choosing the perfect edging is all about matching the blanket’s style and purpose. A simple single crochet border keeps things clean and modern. While a ruffled picot edge screams vintage romance. Even beginners can dive in with easy patterns that work up quickly, adding that handmade glow without the fuss.
Ready to elevate your blanket beauty? Explore some inspiring crochet edging ideas below. From classic to creative, all are designed to make your project shine.
Table of Contents
- What Is Crochet Blanket Edging?
- Tools And Materials For Crochet Blanket Edging
- How To Make A Crochet Blanket Edging?
- 50 Popular Crochet Blanket Edging Patterns
- 1. Single Crochet Blanket Edging
- 2. Crab Stitch Crochet Blanket Edging Border
- 3. Puff Stitch Crochet Blanket Edging
- 4. Linen Stitch Crochet Blanket Edging Border
- 5. Wavy Crochet Blanket Edging Border
- 6. Crochet Blanket Edging Stitch
- 7. Camel Stitch Crochet Blanket Edging Pattern
- 8. Double Crochet Blanket Edging Post Ribbing Border
- 9. Alpine Stitch Crochet Blanket Edging
- 10. Moss Stitch Crochet Blanket Edging Pattern
- 11. Herringbone Crochet Border
- 12. C2C Afghan Block Border
- 13. Rib Crochet Border
- 14. Linen Stitch Border
- 15. Grannie Patches Border
- 16. Simple Shell Border Pattern
- 17. Granny Blanket Edging
- 18. Cute Bobble Edging Crochet Pattern
- 20. Crochet Pom Pom Border
- 21. Cosy Blanket Edging
- 22. Simple Crochet Border
- 23. Reverse Shell Crochet Border
- 24. Crochet Simple Shell Border
- 25. C2C Triangle Border
- 26. Pompom Edging
- 27. Crossed Double Crochet Border
- 28. Crochet Chain Border
- 29. Double Crochet Mesh
- 30. Triple Picot Crochet Blanket Edging
- 31. Coronet Lace Trim Pattern
- 32. Treble Scallop Edge Pattern
- 33. V-Stitch and Picot Edging
- 34. Spike Stitch Crochet Blanket Edging Tutorial
- 35. Floral Afghan Border
- 36. Front Bottom Half Loop Double Crochet Blanket Edging
- 37. Clusters and Puffs Dot Border
- 38. Tulip Blanket Trim
- 39. Pom-Pom Crochet Blanket edging Stitch
- 40. Tassel Border
- 41. Fringed Crochet Blanket Edging
- Cute Crochet Blanket Edging for Baby Blankets
- 42. Mini Heart Edging
- 43. Crochet Blanket Edging Flower Pattern
- 44. Rose Flower Crochet Blanket Edging
- 45. Little Stars Trimming Crochet Blanket Edging
- 46. Gumdrop Crochet Blanket Edging
- 47. Lacy Loops & Bridges Crochet Blanket Edging Pattern
- 48. Falling Leaves Crochet blanket Edging Pattern
- 49. Iris Stitch Crochet Blanket Edging
- 50. Afghan Crochet Blanket Edging
- In Closing
- Frequently Asked Questions About Crochet Blanket Edging
What Is Crochet Blanket Edging?
Crochet blanket edging is the cool border you add around a blanket to make it look neat and pretty. You use yarn and a hook to create special stitches along the edges. It keeps the blanket from fraying and adds a fun, decorative touch. You can choose different patterns to make it unique.
Tools And Materials For Crochet Blanket Edging
For crocheting the edging, you don’t need fancy or extra-special material. You can use those materials that are using while crocheting the base of the blanket. But if you change the yarn type or follow a different pattern, then obviously follow the pattern instructions and check if the hook matches with the yarn or not.
Here are the tools and materials that you need for crocheting blanket edging. Including –
Crochet Hook: Pick a hook that vibes with your yarn—probably the same size you used for the blanket, or maybe one notch bigger if you want it a bit looser.
Crochet Yarn: Use yarn that’s the same thickness as your blanket or one that looks nice with it. It could be soft or cotton yarn. Now, in your mind, surely pop the question, how much yarn do I need for edging? For a medium blanket, you might need 1 or 2 balls of yarn. If you want a super fancy edge, you might need more.
Scissors: While crocheting, you also use scissors. This helps you to snip the yarn when you’re done.
Big Needle: A special needle to tuck in loose yarn ends.
Stitch Markers (if you want): Little clips to mark spots, like corners. This is also needed if your edge is fancy.
How To Make A Crochet Blanket Edging?
For crochet blanket edging, there are different ways to crochet. For your blanket project, you can use any type of stitch or pattern that suits your blanket. In there, I’ll give you the easiest edging instruction that is suitable for any project and can be done easily.
Here are the step-by-step instructions on how to crochet a blanket edging. Including –
Materials:
- Crochet hook
- Crochet yarn
- Scissors
Begin: Start With a Single Chain
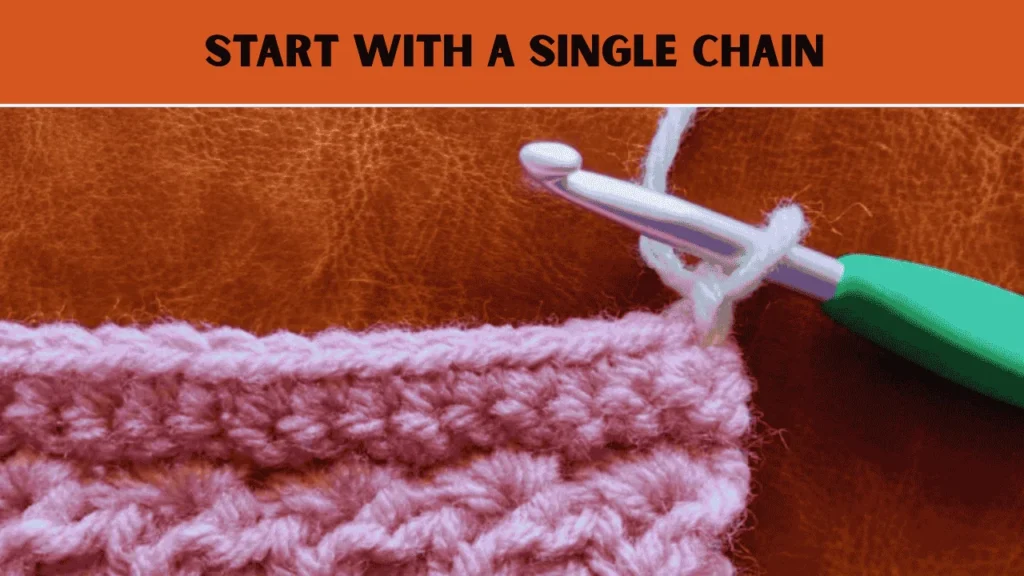
When you begin a new crochet row with the same yarn, start with a single chain stitch. This one loop helps you keep going smoothly. Moreover, the chain helps you begin the row smoothly. Keep using the same yarn color to continue your work.
Step 1: Crochet Sc2tog For Combining The Stitches
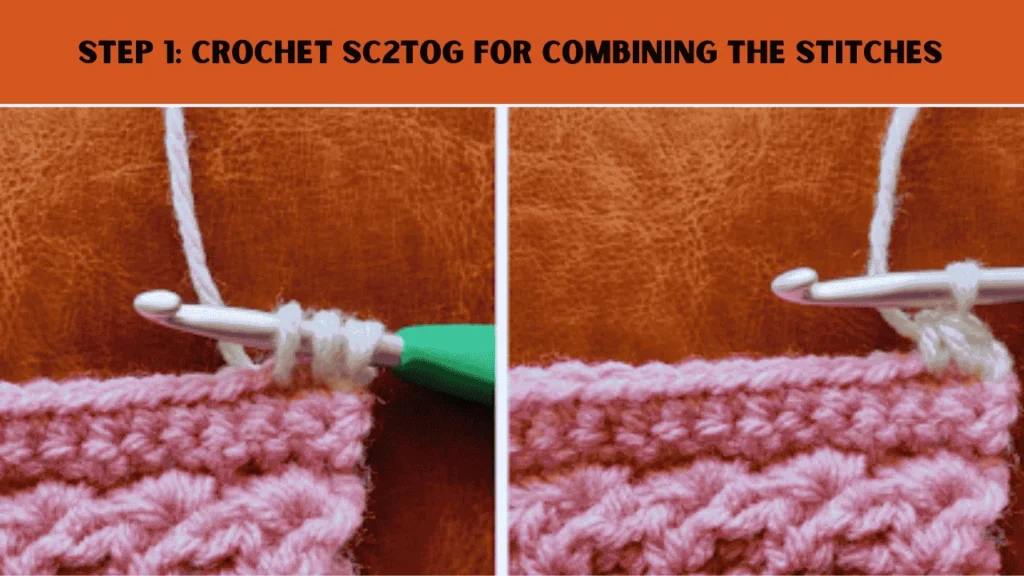
Then, you need to crochet sc2tog. The sc2tog is a fun crochet trick that squishes two stitches into one to shape your project. Start by sliding your hook into the next stitch and pulling up a loop—you’ll have two loops on your hook. Then, do it again in the next stitch, pulling up another loop so you’ve got three loops total.
Now, wrap the yarn over your hook and gently pull it through all three loops in one go. Just like that, you’ve turned two stitches into one. This makes your work nice and snug.
Step 2: Connect the Sc2tog
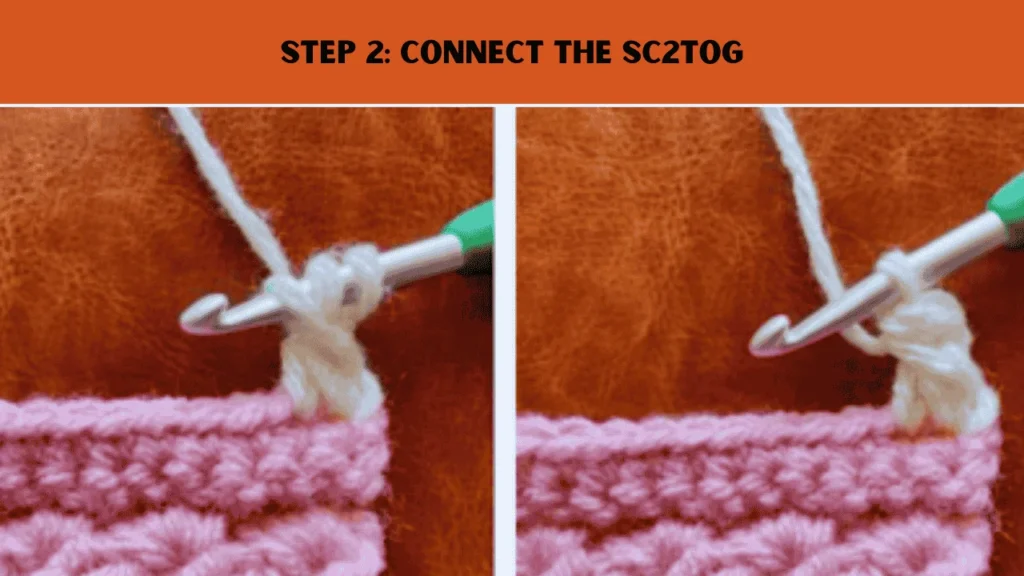
First, make one chain stitch to start this crochet step. Next, wrap the yarn over your hook, then slide your hook from front to back around the sc2tog stitch you just made and pull up a loop. You’ll have three loops on your hook now. Then, wrap the yarn over again and pull it through all three loops at once. This creates a neat new stitch that connects to your sc2tog.
Step 3: Squeezing Two Stitches Together Into One
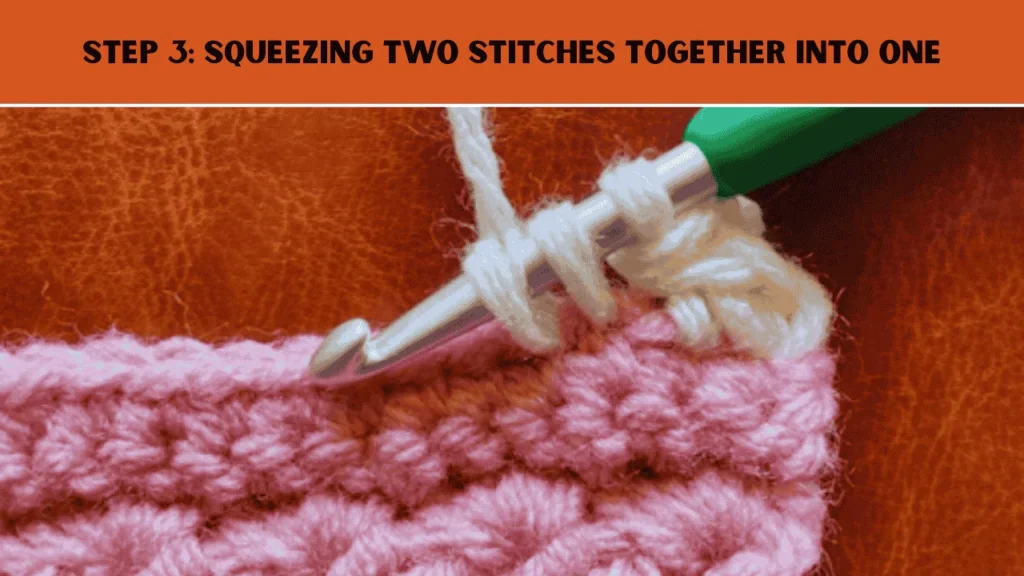
The sc2tog is a cool crochet move where you turn two stitches into one. You start by pushing your hook into the next stitch and pulling up a loop. So there are two loops on your hook. Then, do the same thing in the next stitch to get three loops total. After that, wrap the yarn over your hook and pull it through all three loops together. This makes your project a bit smaller and tighter!
Step 4: Wrap and Pull Through Stitch
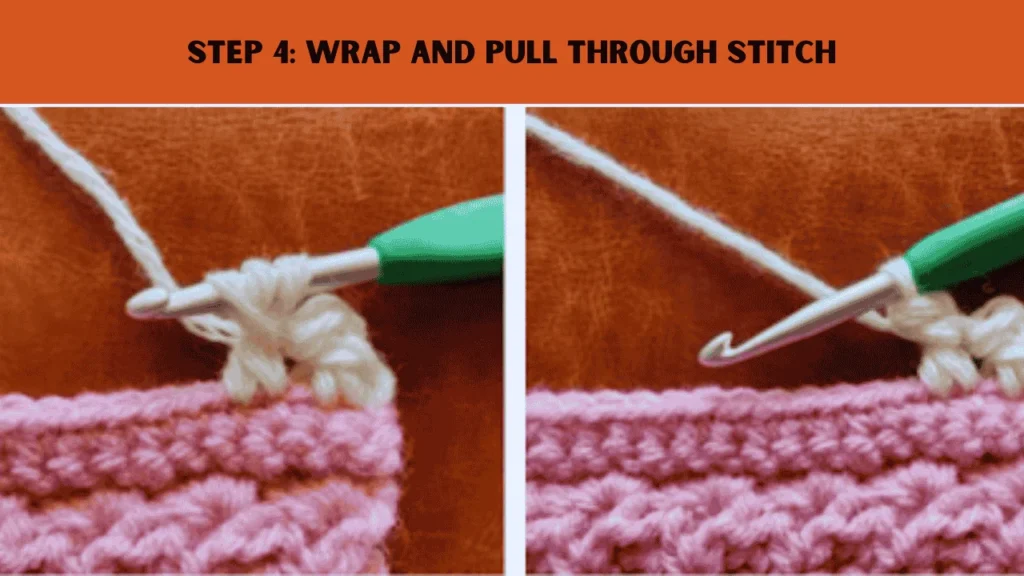
In this step, first, you need to wrap the yarn around your hook once. Next, put the hook through the special stitch you just made. You will be going from the front to the back. Then again, pull the yarn through to make a new loop on your hook.
After that, you need to again wrap the yarn around the hook, then pull it through all three loops on your hook to finish the step. This makes a cool new stitch for your crochet project.
Step 5: Repeat Border Stitch
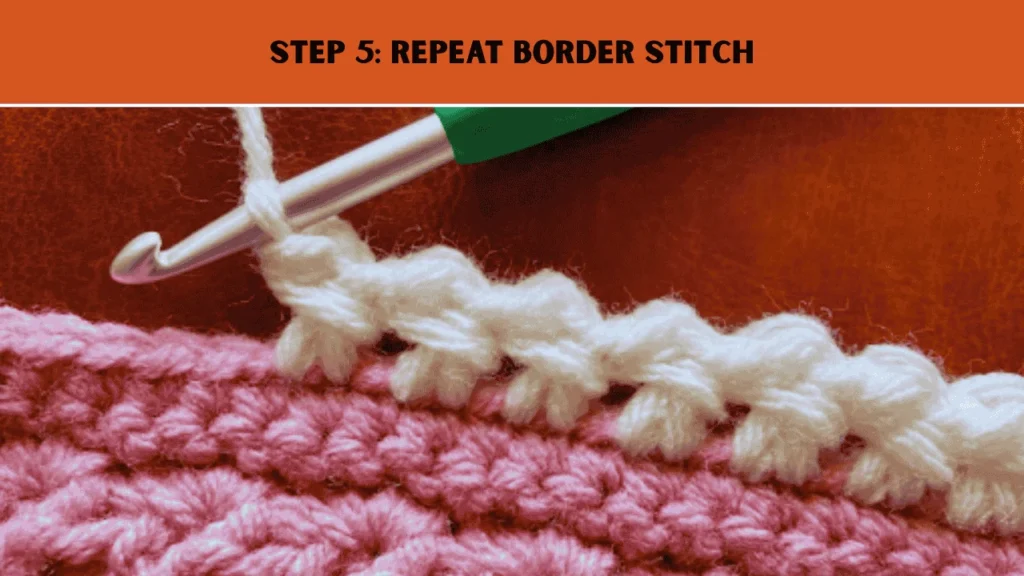
Keep doing steps 3 and 4 all the way around the edge of your crochet project. Make sure to repeat them carefully for each stitch on the border. This will give your project a nice, finished look.
After completing all around the blanket, you need to cut the yarn. Your crochet blanket is ready with beautiful edging. If you want to know or want to explore different types of edging patterns, then just read on below.
50 Popular Crochet Blanket Edging Patterns
Looking for the perfect crochet blanket edging pattern for your blanket? Look no further! Read on to find beautiful crochet edging patterns that will complete your project.
Here are 50 popular crochet blanket edging patterns fr your next project. Including –
1. Single Crochet Blanket Edging
Are you having a hard time with your blanket’s edges curling up? This easy single crochet blanket edging can help! It works perfectly on blankets that have double crochet rows. By following this simple tutorial, you’ll learn how to create a nice border that helps your blanket stay flat and look great. No more wavy edges! It’s a fun and satisfying way to finish off your cozy project.
2. Crab Stitch Crochet Blanket Edging Border
Want a cool, twisted rope look for your blanket or hat? Try the crab stitch crochet blanket edging pattern. The crab stitch border, also called reverse single crochet. This stitch gives your projects a cool twisted rope look. You will need to crochet backwards to crochet this stitch. At first, this might feel a bit strange. But don’t worry! You can follow the video tutorial to learn how to do it. This border is great for finishing off different things like C2C blankets and even the necklines of sweaters. You can even use it to add a nice touch to a knit blanket. A handy tip is to first crochet a round of single crochet around your project to make the crab stitch easier to do.
3. Puff Stitch Crochet Blanket Edging
Do you want to give your blanket a textured border? Try this puff stitch crochet blanket edging pattern. This stitch produces tiny, delicate “puffs” that add a decorative touch to your piece. It’s a straightforward method that adds a pleasingly rough feel to your work. It’s ideal for both beginner and expert crocheters. Try using puff edging to give your goods a more adorable and distinctive appearance.
4. Linen Stitch Crochet Blanket Edging Border
Looking for a clean, pretty border for your blanket? Try the linen stitch crochet blanket edging pattern. This crochet blanket edging pattern is also called moss stitch or seed stitch. It makes a nice and tight edge that looks fancy but is actually easy to do. You can use one color or switch colors to make stripes – whatever you like best. One of the best things about this border is that you can make this border as skinny or as wide as you want to fit your blanket perfectly.
5. Wavy Crochet Blanket Edging Border
The Wavy Crochet Border is another crochet blanket edging which one you can try for your crochet blanket. This is a fun and easy way to add an attractive edging touch to your crochet projects like blankets or pillows. This border creates fun wave-like shapes that make everything look extra special! Even novices can attempt it because it’s really easy to learn. To really make those waves stand out, you may also select different colors. Adding this border makes your items look more complete and unique. If you want to spice up your crochet creations, the Wavy Crochet Border is a great choice.
6. Crochet Blanket Edging Stitch
Looking to spruce up your crochet blanket edging? The Crochet Blanket Stitch Edging is where it’s at! It’s a super-easy way to add a clean, cozy border that makes your blanket look totally put-together. You just need single crochet—easy peasy, even if you’re still getting the hang of crocheting. The cool part? Spike stitches. You work them a little below the edge, and they give your blanket this subtle, textured vibe that’s just a chef’s kiss. It’s a quick trick to make your project feel extra special—definitely give it a whirl!
7. Camel Stitch Crochet Blanket Edging Pattern
The Camel Stitch Blanket Border is such a dope way to level up your blanket. It uses this half double crochet stitch that’s kinda special, but the best part? The Camel Stitch Crochet Blanket Edging is such a sweet way to make your blanket look totally awesome. It’s got this cool half double crochet stitch that’s super chill since you don’t have to stress about counting stitches perfectly—it works with whatever stitch count you’ve got. So, it’s a breeze to slap this border on any blanket you’ve made.
8. Double Crochet Blanket Edging Post Ribbing Border
The Camel Stitch Blanket Border is another way to make your blanket look awesome! This border uses a special stitch called half double crochet. But during the work you don’t need to count stitches carefully because this border works with any number of stitches. That makes it really easy to add to any blanket you’ve made.
The pattern looks a bit like knitting. This gives your blanket a neat and textured edge. If you want to make your blanket look even more special, the Camel Stitch Blanket Border is a fantastic choice.
9. Alpine Stitch Crochet Blanket Edging
The Alpine Stitch Crochet Blanket Edging is a cool way to make your blanket look fancy and feel bumpy. For crocheting this border, you will need to start with a simple row of single crochet stitches. Then you build the border by mixing different stitches. This will create a neat and textured pattern. It works best if your blanket has an odd number of stitches on each side. You can use one color or switch colors for each round to make it super pretty.
10. Moss Stitch Crochet Blanket Edging Pattern
Want to give your blanket a nice, textured edge? Try the moss stitch border! It makes a simple but pretty frame around your blanket. The stitch is easy (just single crochets and chains) and works best if you have an even number of stitches.
This pattern is perfect for making plain blankets look fancier or adding a neat finish to colorful projects.
11. Herringbone Crochet Border
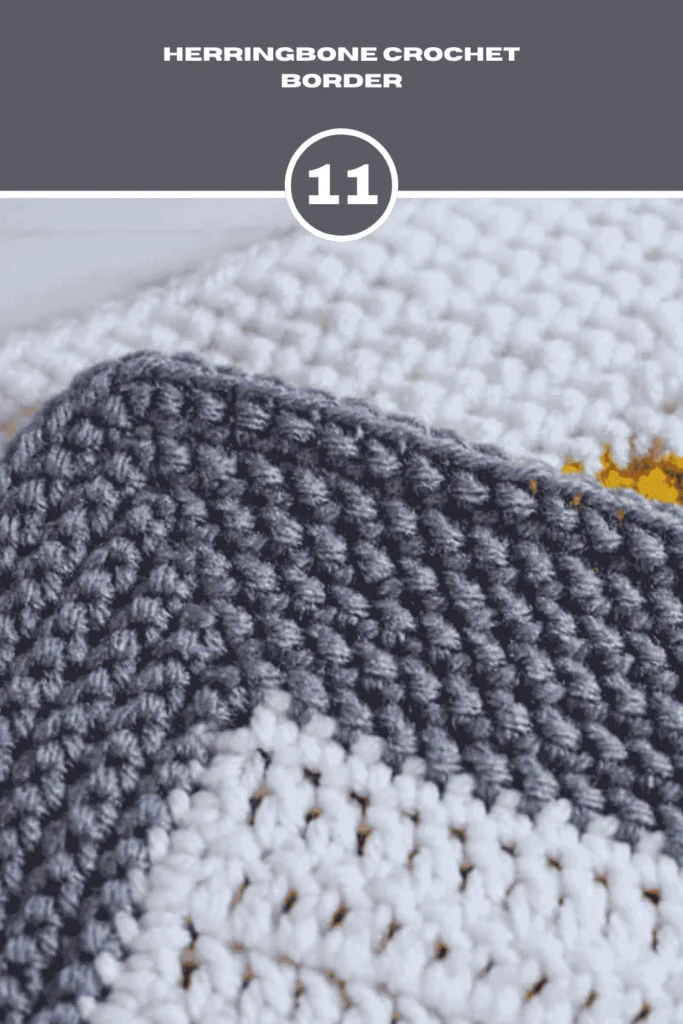
Want to add a neat, woven look to your blanket? The herringbone stitch makes a cool diagonal pattern that’s perfect for borders! It uses a special half-double crochet stitch that lies sideways to create the effect. You know what is best thing about this pattern is. It works on any number of stitches. So, if you’re struggling and get confused by the numbers thing, then try out this pattern.
12. C2C Afghan Block Border
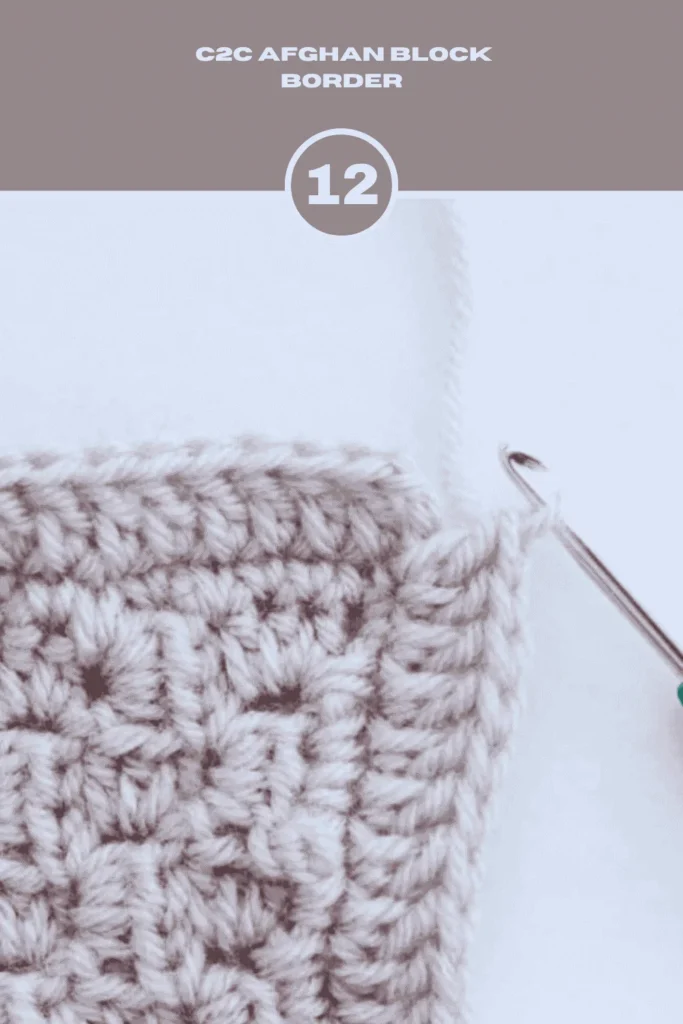
Want to make your C2C blanket look super neat? The C2C Afghan Block Border is like giving each square a cool frame! This easy guide from Make & Do Crew shows you how to put a border around each C2C block before you sew them together to make a big blanket. You can use the same color as your block for a clean look or pick a different color to make each square pop. It’s simple to follow with step-by-step pictures, and it works for blocks made with half double crochets or double crochets. You can even use this border idea to edge a whole blanket if you want
13. Rib Crochet Border

The Rib Crochet Border is an easy and pretty way to finish off your crochet projects, like blankets or scarves! It makes a bumpy, stretchy edge that looks neat and feels soft. You can add it to any project, no matter how many stitches you have. This border uses special stitches called Front Post Double Crochet and Back Post Double Crochet. To start, you add a single crochet row around your project to make it even. Then, you follow a simple pattern that repeats to build the border. If you make it too long, it might curl, so keep it around 7 rows or add extra stitches at the corners.
14. Linen Stitch Border
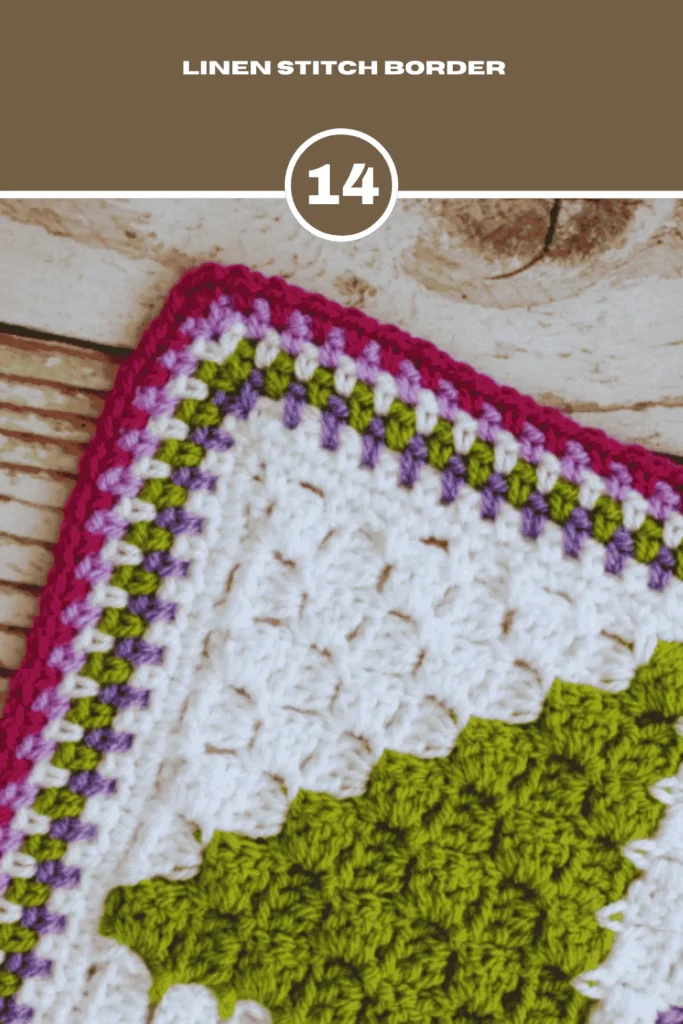
The Linen Stitch Border is a super-easy and pretty way to finish your crochet blanket. It’s also called the moss stitch. It makes a nice, neat edge that looks like little woven lines. You can use one color or mix a few colors from your blanket to make it pop. It’s great because it adds a fun, tidy look without being too hard to do.
15. Grannie Patches Border
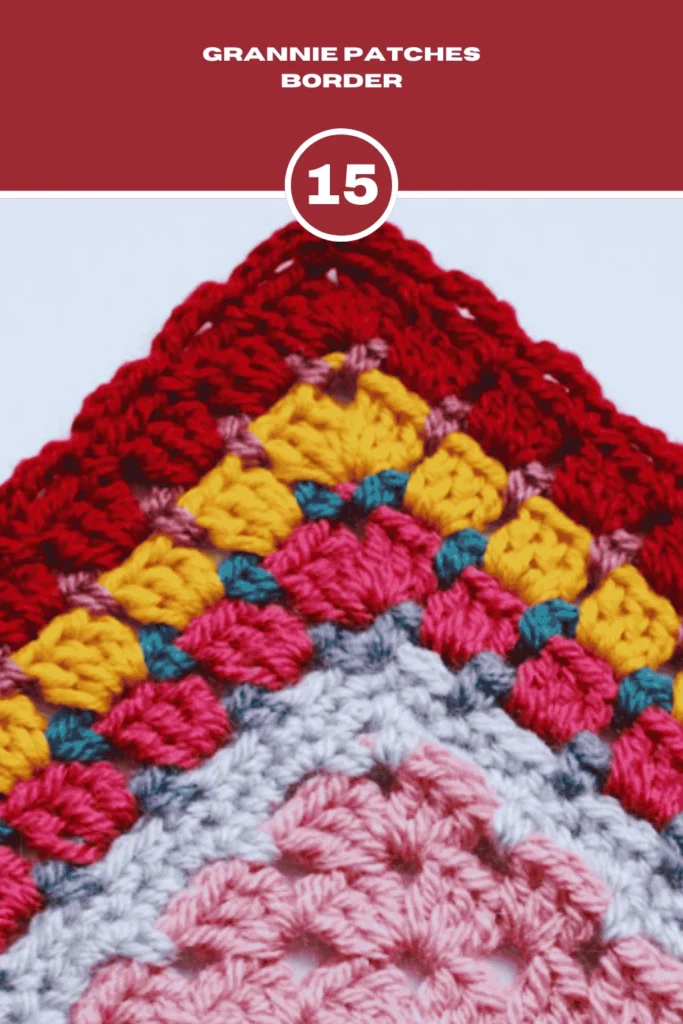
Looking to tie your granny square project together? This herringbone border matches the classic granny square look while adding a neat, woven texture. It’s a great way to make all your squares look like they belong together in one beautiful blanket!
The best thing about this border is that you can make this border as skinny or as wide as you want. Need to make your blanket bigger? Just add more rounds of this pretty edging.
16. Simple Shell Border Pattern
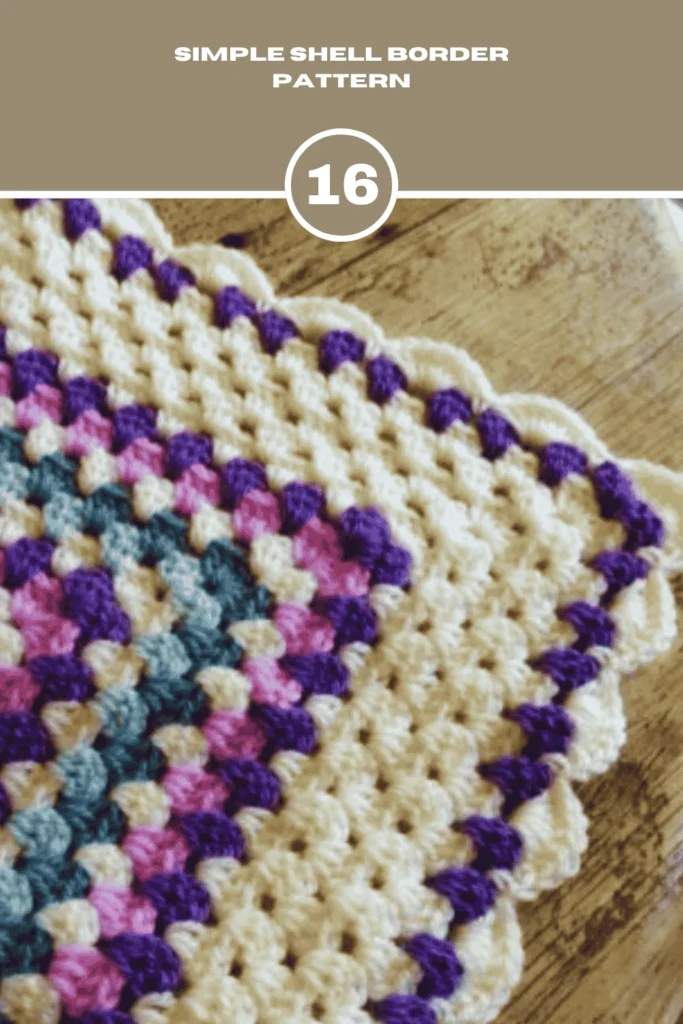
Want to give your crochet blanket a gorgeous, lacy finish? This shell border adds elegant scallops that look amazing on granny square blankets or any project with open spaces. The shells fit perfectly into the gaps you’ve already made while crocheting.
Super easy to work up – just follow the simple pattern to create those pretty waves along your edges.
17. Granny Blanket Edging
Give your granny square blanket a fun, lacy edge with this simple border. It only takes three quick rounds to create a special frilly design that makes your blanket extra pretty. With this pattern, you will add a fancy touch to any granny square project. This also works up super fast and uses basic stitches anyone can do.
18. Cute Bobble Edging Crochet Pattern
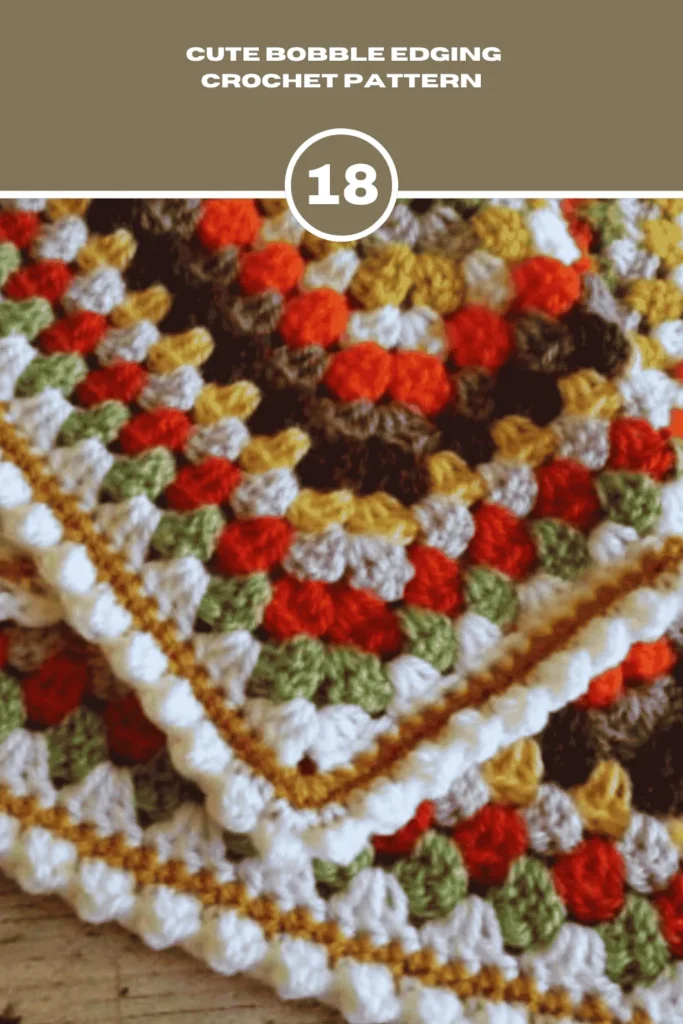
The Cute Bobble Edging Crochet Pattern is another beautiful pattern that you can try for your crochet blanket border. Bobble stitches are not used to crochet these bubbles. It’s a double crochet stitch and a slip stitch made with two basic stitches. If you wish to crochet a bubble border but lack the necessary skills, you can still use the bubble stitch. Then give this a try. It creates tiny, spherical lumps that resemble tiny decorations, similar to cupcake sprinkles. Together, they produce this adorable, uneven edge.
19. Crochet Border Happily Ever Afghan
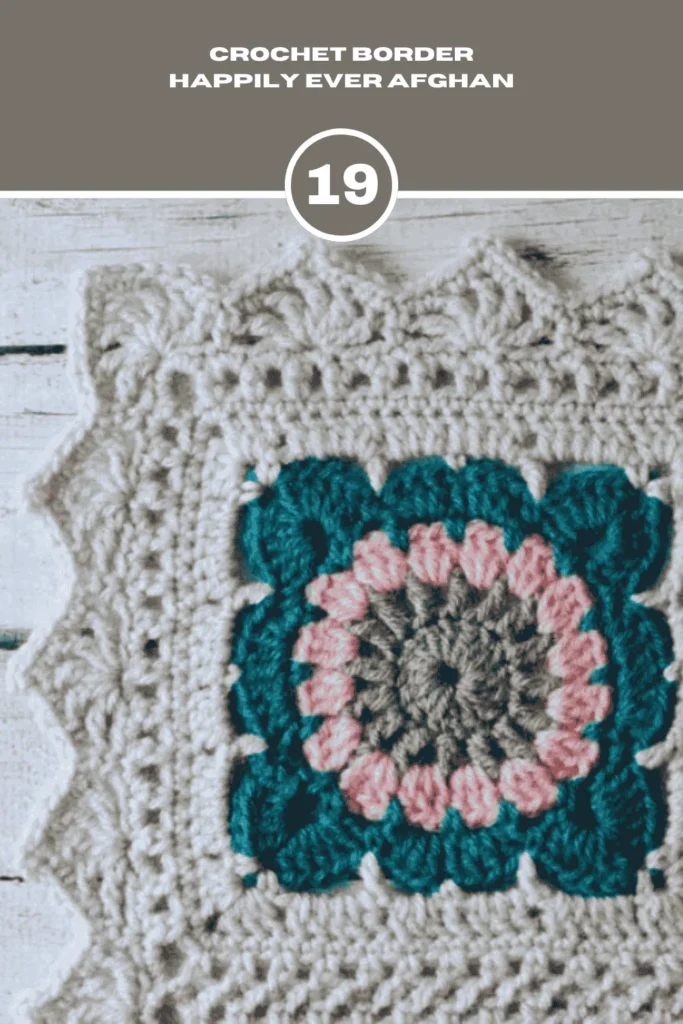
The Crochet Border for the Happily Ever Afghan is a super pretty way to finish your blanket! It was made to go around a special afghan with square blocks. But you can use it on any crochet project to make it look fancy. This border has a lacy and wavy design that adds a fun touch to plain edges. You can make it the same color as the yarn that connects your blanket squares, or use a different color to make it stand out. It’s simple to crochet and makes your blanket look awesome.
20. Crochet Pom Pom Border
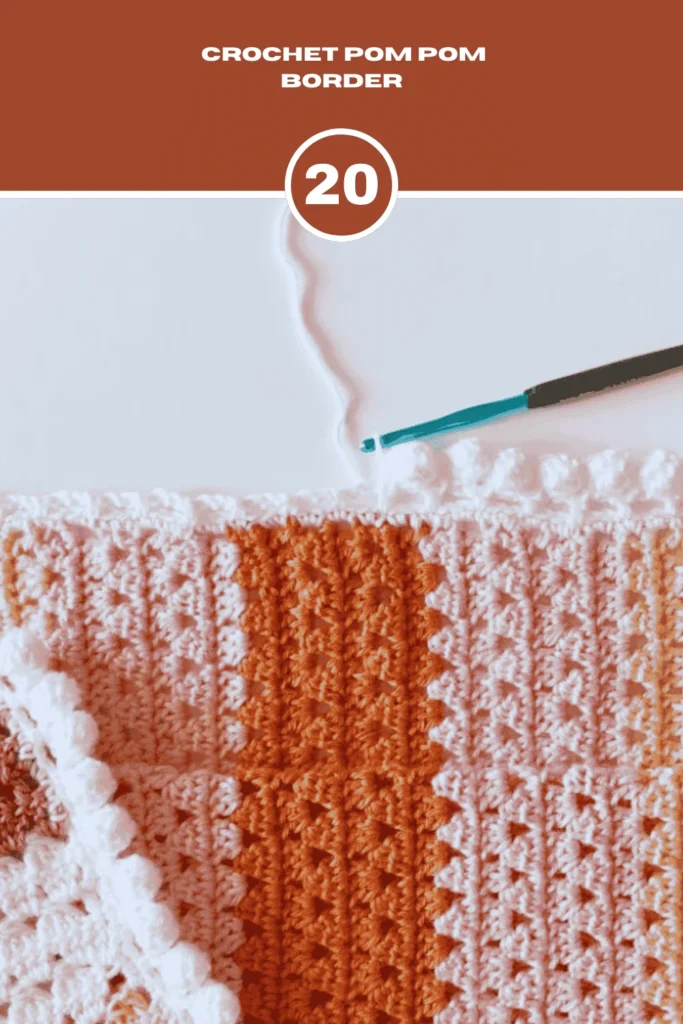
This fun border has cute little pom-pom bumps made by crocheting clusters and squishing them together! It’s a playful edging that would look great on a baby blanket—kids will love touching the soft, bouncy pom-poms. You can use any color yarn to match your project or pick a bright one to make the pom poms pop. It’s simple to learn and makes everything look so cheerful.
21. Cosy Blanket Edging
Alright, the Cosy Blanket Edging is such a fun way to make your blanket look totally rad! It’s like tying a cute ribbon around a present, but with yarn. You just crochet a few rows that create these little bumps and loops, giving your blanket a super warm and playful vibe. You can keep it simple with one color for the edge to match your blanket, or go wild and switch up colors for each row to make it pop with all sorts of shades. It’s not hard at all, and it transforms your blanket into something so snuggly and awesome you’ll wanna show it off!
22. Simple Crochet Border
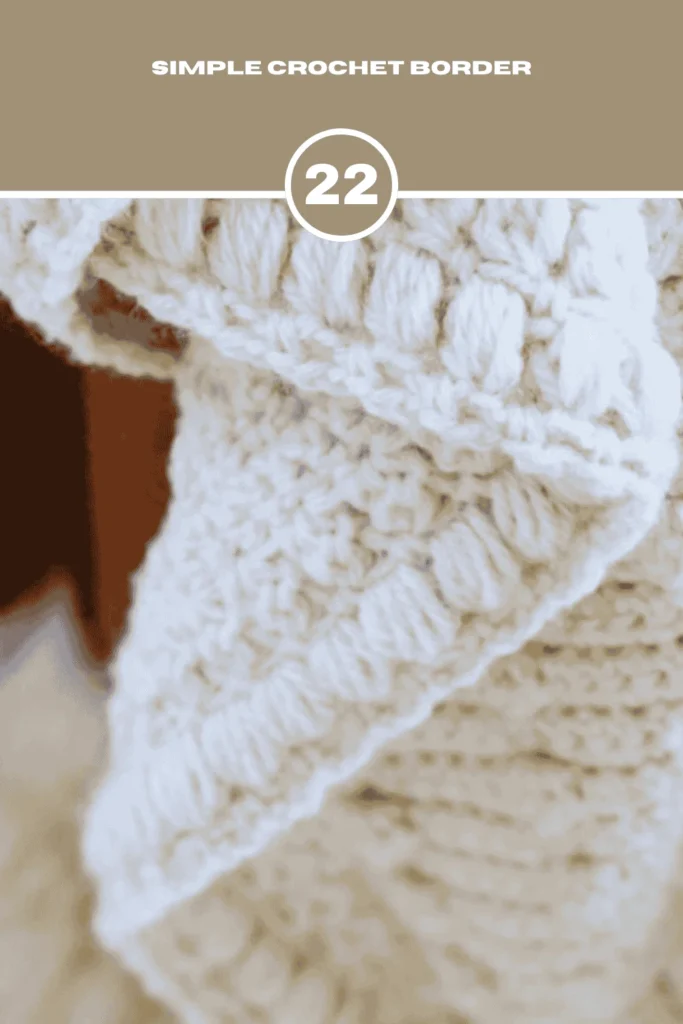
The Simple Crochet Border is a really nice and easy way to make your blanket look awesome! It gives your project a clean, cozy edge that feels just right. You just do a few rounds of basic stitches, and it’s so simple that anyone can try it. Want a thicker border? Just add more rounds! It’s great for blankets you love to curl up with, and it makes everything look neat and pretty.
23. Reverse Shell Crochet Border
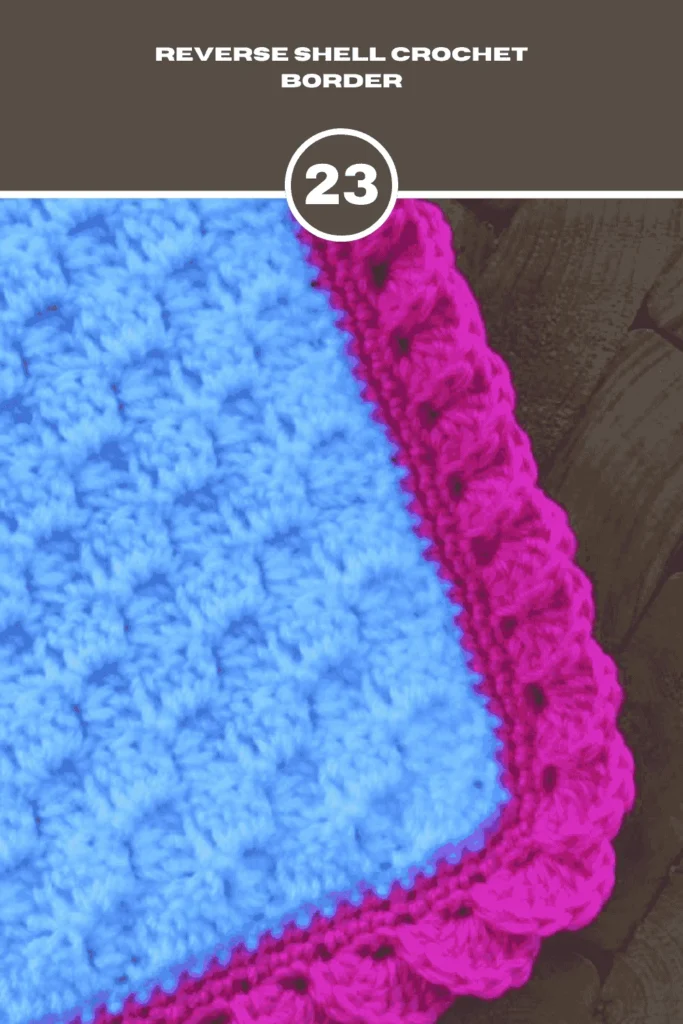
The Reverse Shell Crochet Border is such a cool way to make your crochet stuff look amazing! It has these cute, wavy shell shapes that seem fancy but are actually pretty easy to do. You just need to know how to do single crochet, and you can make this awesome border. It’s great for sprucing up blankets, scarves, or whatever you’re working on. Pick a yarn color that goes with your project or one that pops to make it extra fun. It’s simple to learn and makes everything look so pretty
24. Crochet Simple Shell Border
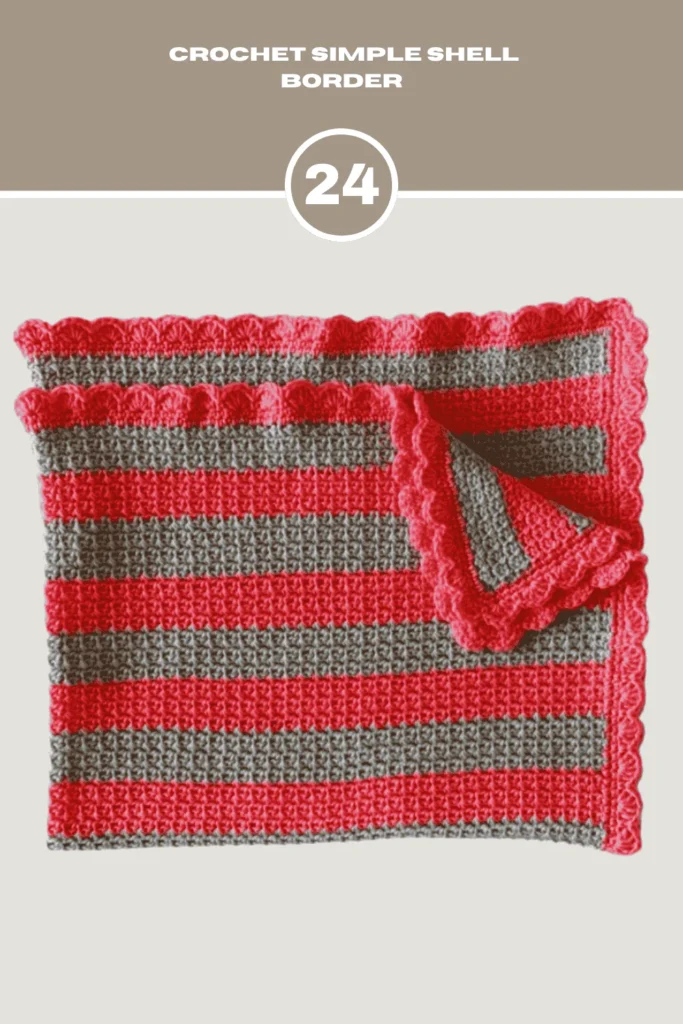
The Crochet Simple Shell Border is a super pretty way to finish your blanket! It makes cute, curvy shell shapes that look like little waves around the edge. This border is perfect for adding a soft, fancy touch to a plain crocheted blanket. You can find easy steps to follow, and there’s even a video to show you how to do it. It’s simple to learn and makes your project look extra special.
25. C2C Triangle Border
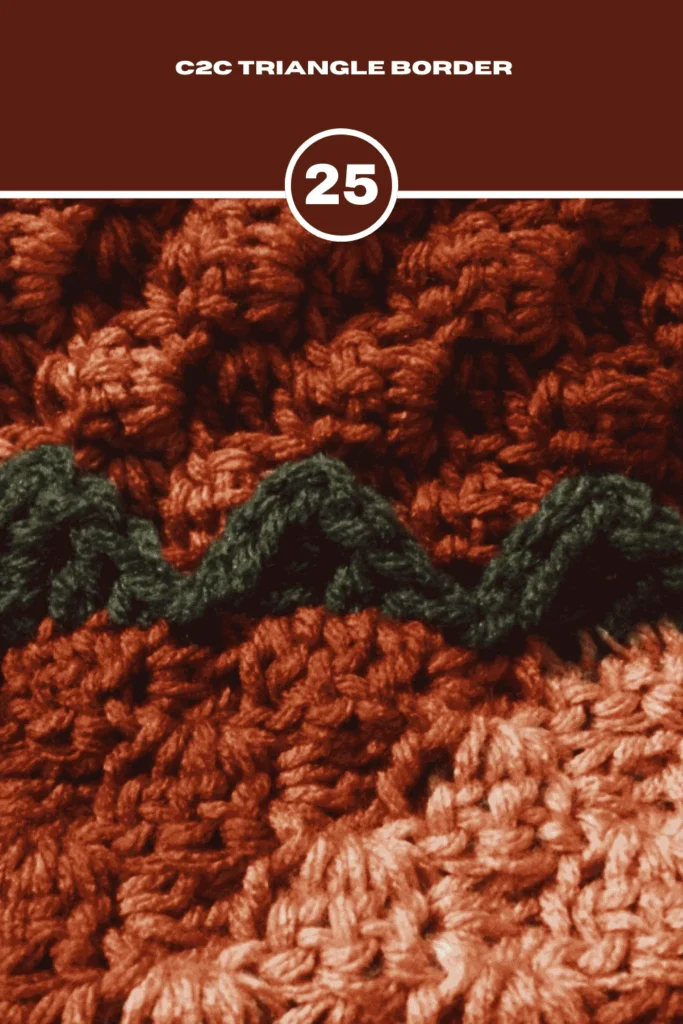
The C2C Triangle Border is a cool way to finish your corner-to-corner crochet project! After you’ve made all those little squares, this border adds a row of tiny triangles that match up perfectly with your work. It makes your blanket or scarf look neat and fun. Its border pattern is easy to crochet for experts to beginners.
26. Pompom Edging
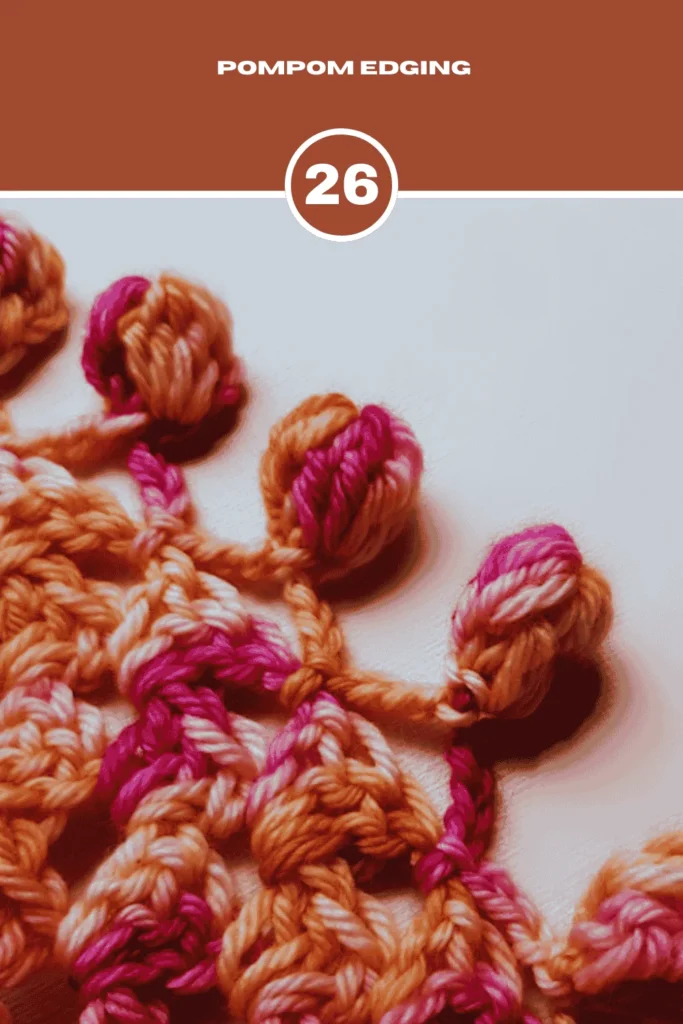
So, the Pompom Edging Crochet Pattern? It’s this really fun way to stick cute, squishy little balls on your crochet projects. We’re talking blankets, scarves, maybe even a hat if you’re feeling wild. You use these special stitches that kinda scrunch up into puffy pompoms. Sounds intense, right? But nah, once you mess around with it, it’s honestly a breeze and so darn satisfying. Match the color to your project for a cozy look, or grab some loud, bright yarn to make those pompoms pop like crazy. Give it a shot—it’s gonna make your stuff look so stinkin’ adorable.
27. Crossed Double Crochet Border
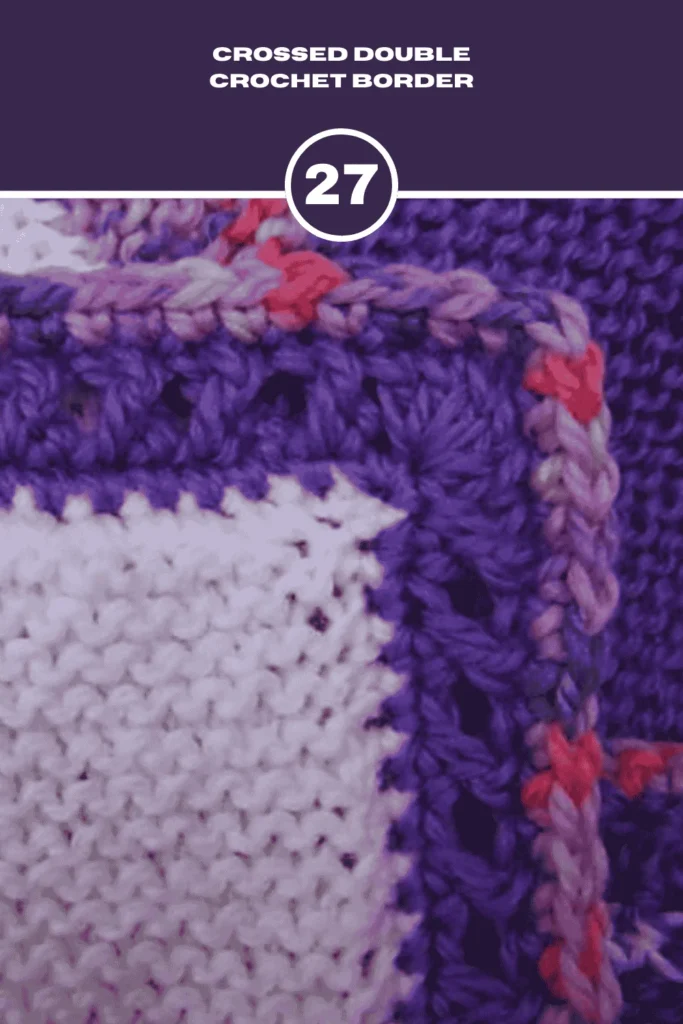
An interesting method to complete your crochet blanket is with the Crossed Double Crochet Border! It creates a colorful, amazing-looking crisscross pattern. To keep it basic, use just one hue; to make it bright and cheery, consider using a variety of colors. Even a yarn with a variety of colors would look fantastic. This border adds a unique touch to your project and is simple to construct.
28. Crochet Chain Border
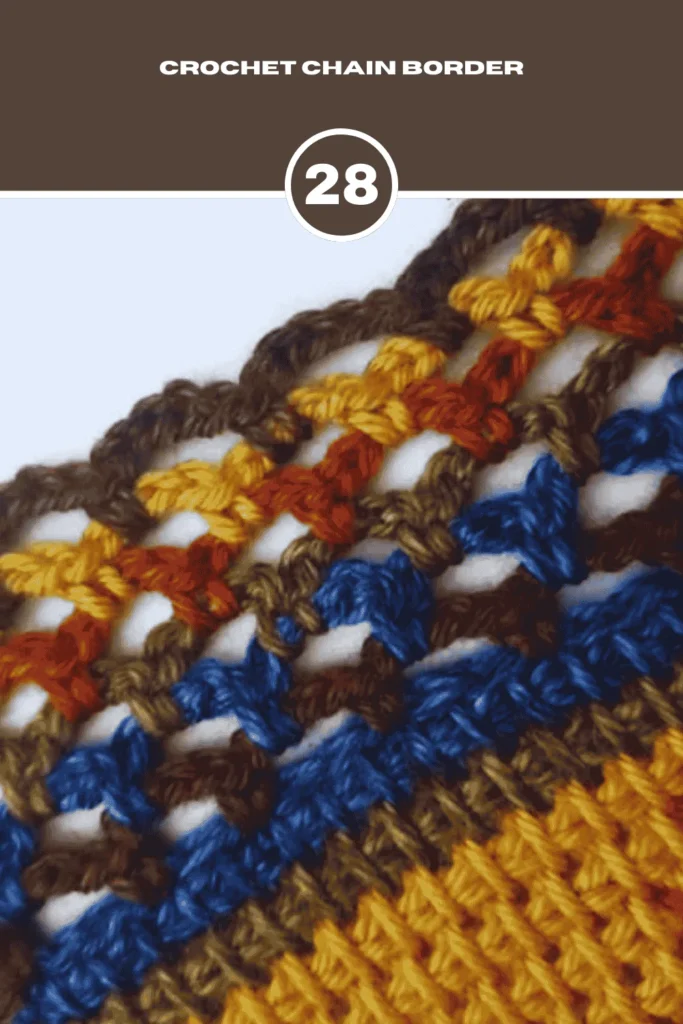
The Crochet Chain Border is seriously the easiest way to wrap up your crochet projects! It’s just chain stitches and single crochets, so if you’re new to crocheting, this is totally your jam. It gives your blanket or scarf these cute little loops that make the edges look all tidy and kinda fancy.You can make it in any color to match your project or use a bright one to make it stand out. It’s simple and makes everything look extra nice. “Tie dye shirt patterns“
29. Double Crochet Mesh

The Double Crochet Mesh is a great way to add a pretty, lacy look to your projects using just two simple stitches! This border is made with chain stitches and double crochet stitches, making it easy to follow even for beginners. It creates a light and airy design that gives your blanket or scarf a classic lace effect without being too tricky. If you want a beautiful finish that feels elegant but is simple to stitch, this is the perfect choice!
30. Triple Picot Crochet Blanket Edging
It takes a bit of counting to get it just right, but using simple crochet stitches makes it easy to follow along. The triple picot design gives your project a fancy touch that looks really nice. It’s a great way to add a special finishing detail to your blankets or scarves!
31. Coronet Lace Trim Pattern
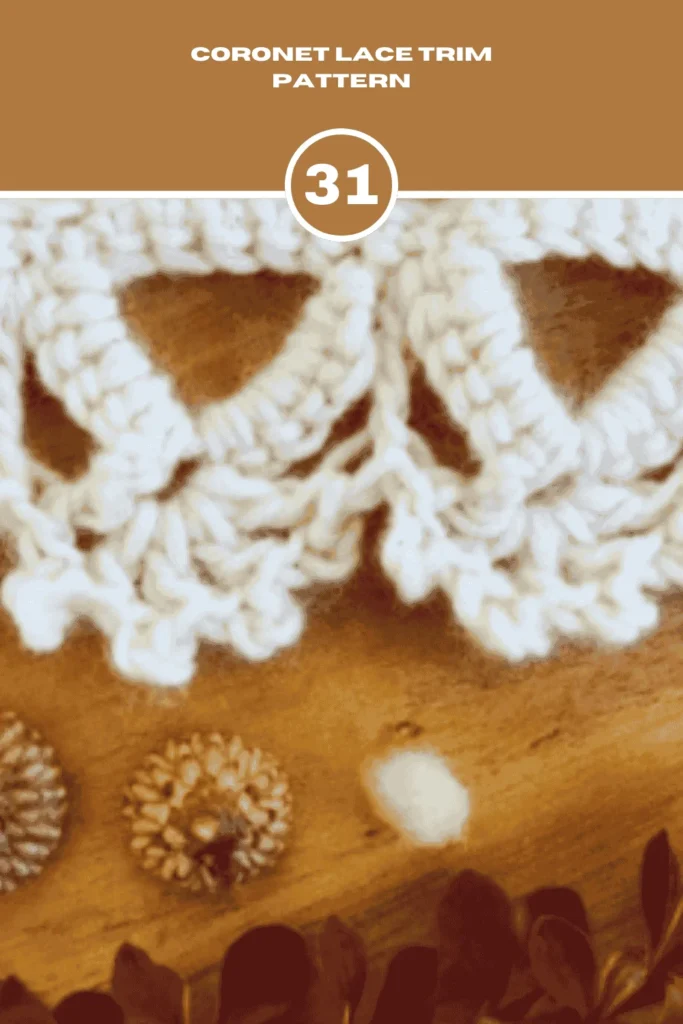
The Coronet Lace Trim Pattern is a beautiful and elegant way to finish off your blanket! Even though it looks fancy, it’s actually quite simple to make. This trim adds a lovely touch to any blanket and is great for those who are just starting to work with lace. If you want to make your blanket shine with a bit of charm, this pattern is perfect for you!
32. Treble Scallop Edge Pattern
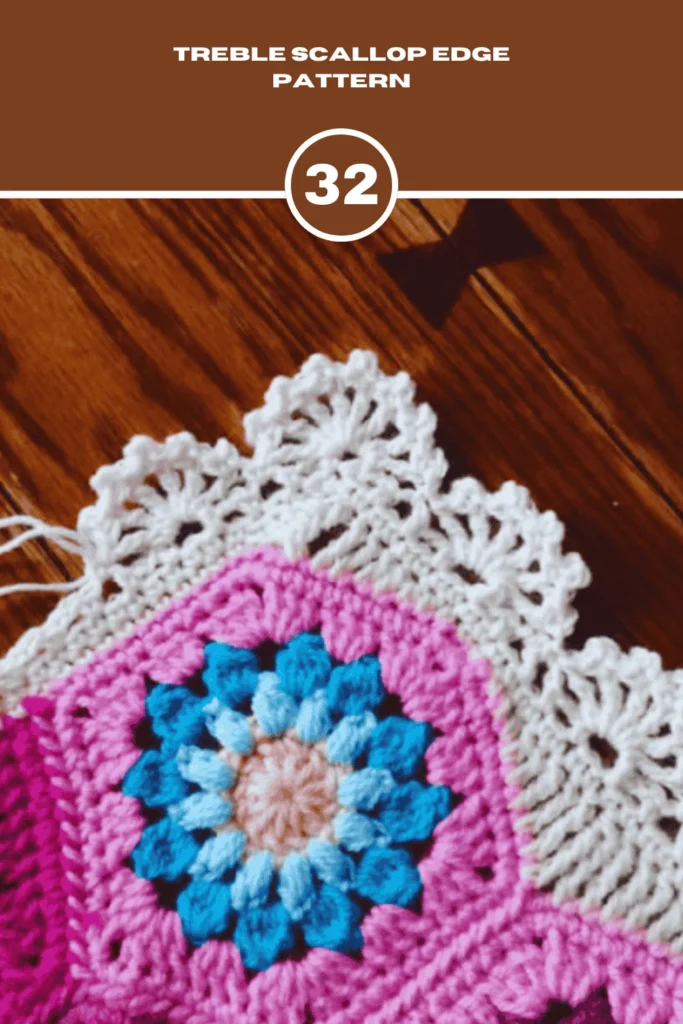
The Treble Scallop Edge Pattern is a beautiful way to add a fancy touch to your crochet projects! This pattern makes lovely scallops that look like delicate lace, giving your work an elegant look. If you pay attention to your stitches, you can even make these scallops go around the corners of your blankets or shawls. Once you get the hang of it, you’ll feel proud of creating such a pretty border that really makes your project stand out!
33. V-Stitch and Picot Edging
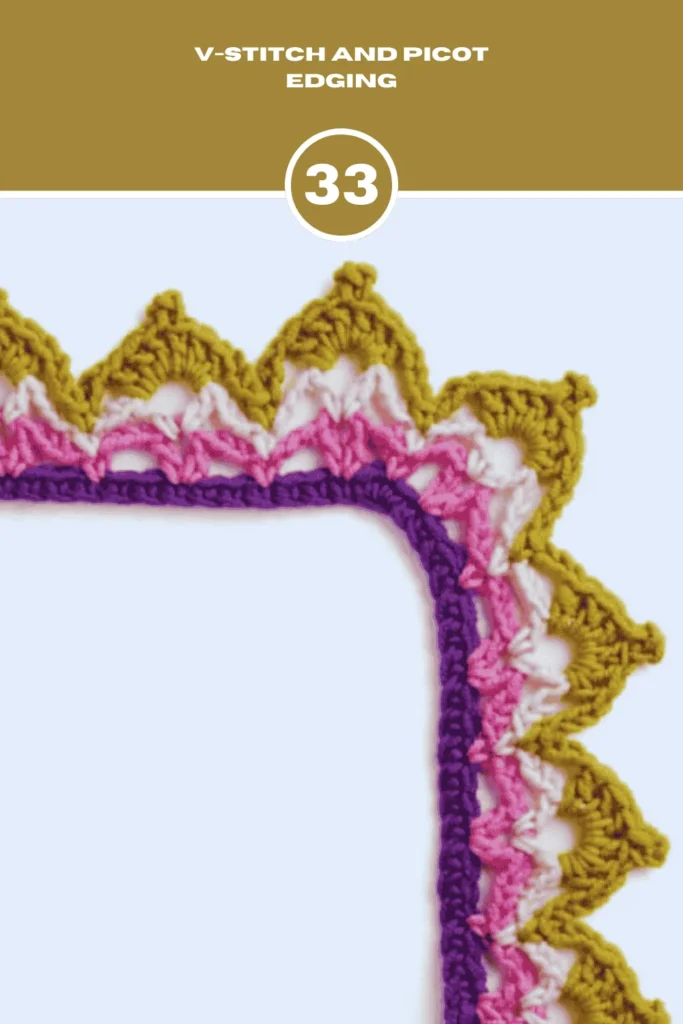
The V-Stitch and Picot Edging is a beautiful way to add a special touch to your crochet projects! This border combines fun V-stitches and cute picot stitches to create a lovely lacy scallop effect. It’s perfect for making baby blankets feel extra pretty and delicate. If you want to make your blankets stand out, this edging is a super fun choice that will make them look even more charming!
34. Spike Stitch Crochet Blanket Edging Tutorial
In this Spike Stitch Edging tutorial, you’ll discover how to use a spike single crochet stitch to make cool, fun stripes for your project! The tutorial includes an easy-to-follow pattern and a video to help you see how it’s done. This unique edging will give your blankets or pillows a special touch that really stands out. Get ready to add some flair to your crochet creations!
35. Floral Afghan Border
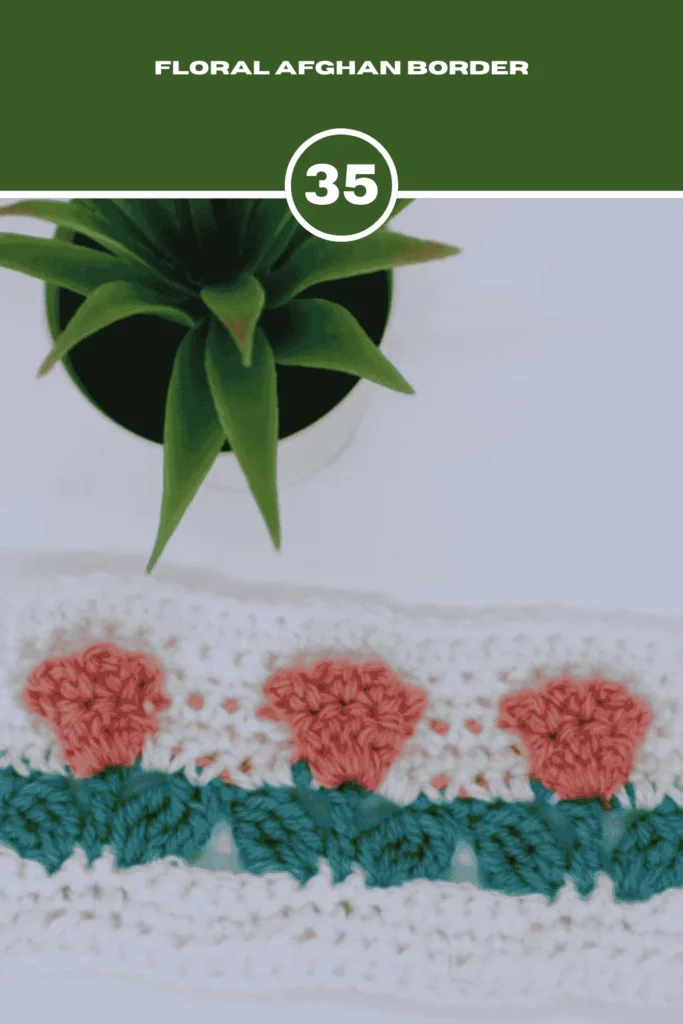
The Floral Afghan Border is a beautiful way to add a special touch to your blanket! This lovely border creates a lovely row of flowers all around, making it perfect for a springtime vibe. Not only does it look amazing, but there are also video tutorials available for those who are left-handed or right-handed. It’s a fun and easy way to make your afghan stand out and feel extra special!
36. Front Bottom Half Loop Double Crochet Blanket Edging
The Front Bottom Half Loop Double Crochet Border is a great way to give your blanket a nice finishing touch! This border is wide enough to add some extra flair without hiding the beautiful work you’ve already done. The instructions are really clear and easy to follow, and there’s even a video tutorial to help you see how to create it step by step. This fun border will make your blanket look even more amazing.
37. Clusters and Puffs Dot Border
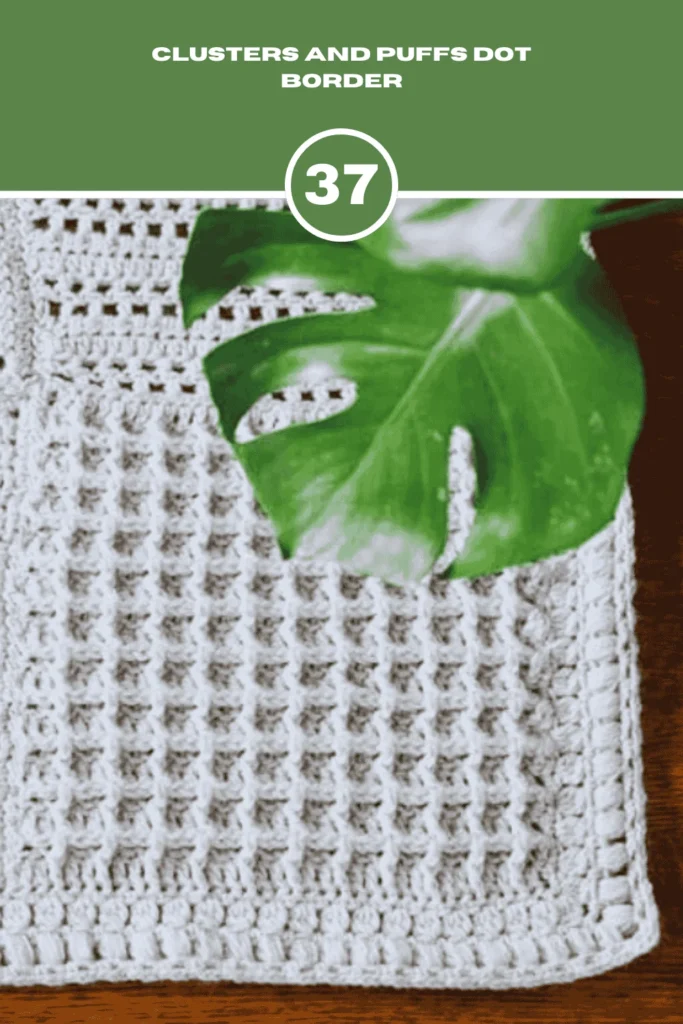
The Clusters and Puffs Dot Border is a fun and stylish way to add flair to your crochet projects! Don’t worry about the puff stitches and clusters—they might look tricky, but they’re actually easy to learn, even if you’re just starting out. This pattern helps you make a lovely, textured border that will make your blanket or project stand out. It’s super satisfying to create something beautiful with just a few simple stitches!
38. Tulip Blanket Trim
The Tulip Blanket Trim is a lovely way to finish any blanket! When you get to the border part of this pattern, you’ll find a simple and fun way to crochet a pretty flower edge. This trim is perfect for adding a springtime touch to your blankets, and it can also brighten up a towel or even the hem of a little dress! With these cute tulips, your blanket will look extra special and cheerful!
39. Pom-Pom Crochet Blanket edging Stitch
The Pom-Pom Crochet Border Stitch is a super cute way to finish off your blankets! This charming trim is easy to make but adds a lot of fun and style. It’s perfect for giving any blanket a playful touch! I especially love using this border on C2C crochet projects, like graphgans, because it makes them look even more special. If you want to brighten up your blankets, this pom-pom border is a fantastic choice!
40. Tassel Border
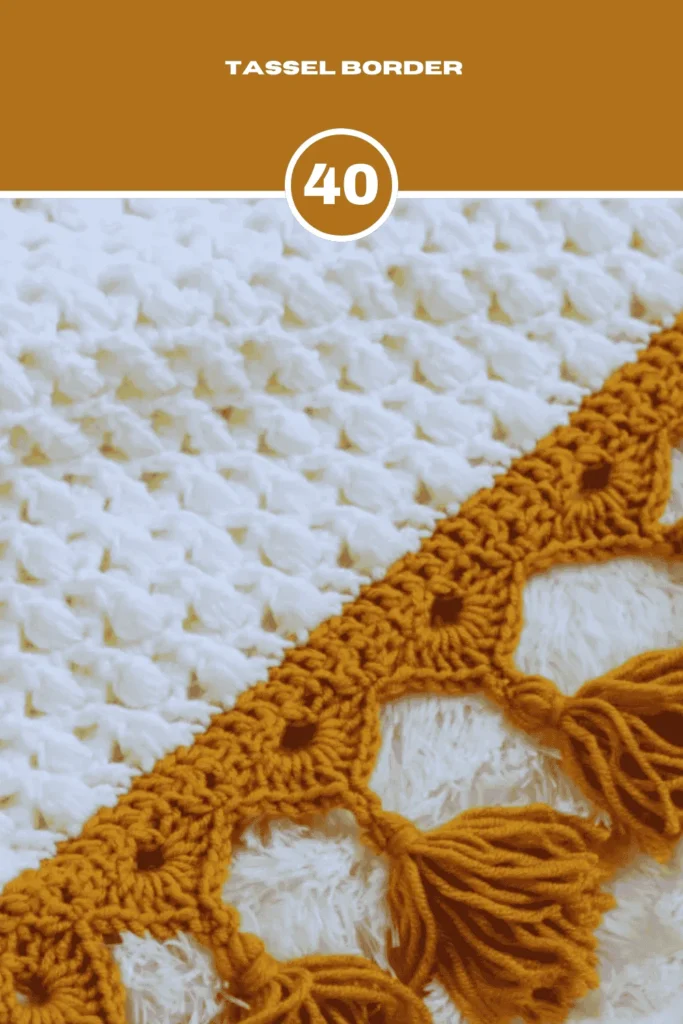
A tassel border adds a neat touch to your blanket! You put it on just the two ends, not all the way around. It’s an easy way to make your blanket or scarf look extra special in no time.
41. Fringed Crochet Blanket Edging
Fringed edging is a fun way to decorate the edges of a blanket or scarf with crochet. You make a row of little loops using a simple stitch, kind of like making a chain. These loops hang off the edge and look like tassels or fringe. You can make them all one color or switch colors to make it look extra cool. It’s an easy trick to make your project look fancy.
Cute Crochet Blanket Edging for Baby Blankets
Here are some popular crochet blanket edgings that you can choose for your baby blanket. Including –
42. Mini Heart Edging
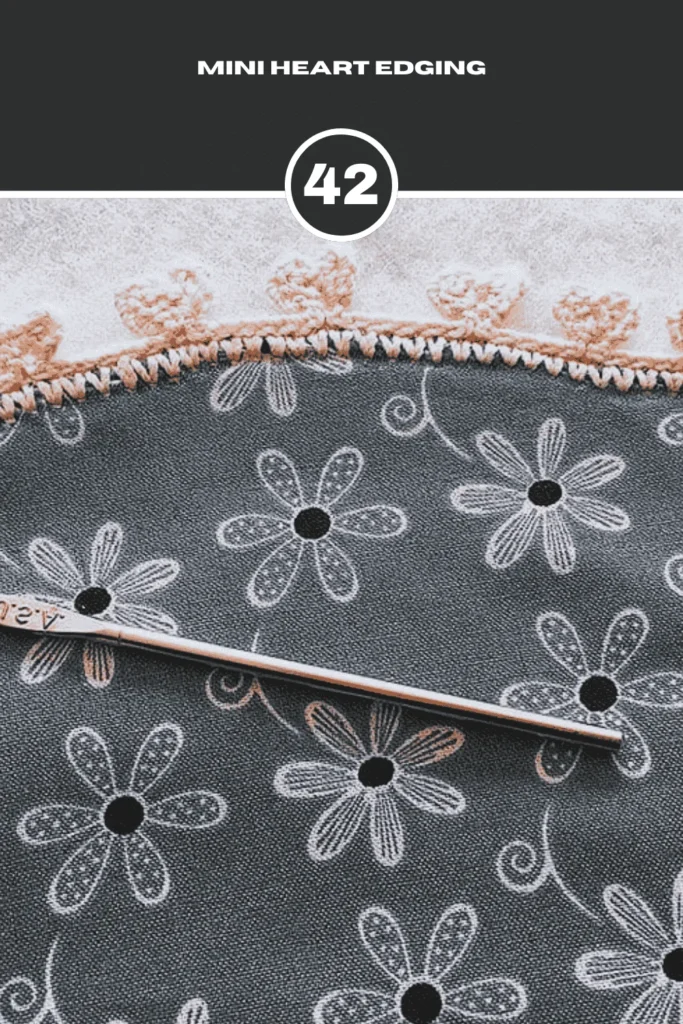
The Mini Heart Edging Crochet Pattern is a super sweet way to add tiny hearts to your projects! It’s quick to make and really easy, even if you’re new to crochet. You can put this adorable border on things like baby blankets, burp cloths, or little dresses. The hearts look so cute and make your work extra special. Use the same color as your project or a fun different color to make the hearts pop.
43. Crochet Blanket Edging Flower Pattern
The Crochet Flower Border is a super pretty way to decorate your crochet blanket edgings! It adds cute, puffy flowers along the edges that look like they’re popping out. You can put this border on blankets, scarves, or anything you make with crochet. It’s perfect for making your work look bright and cheerful. You can use any color yarn to match your project or pick a fun, different color to make the flowers shine. It’s simple to learn and makes everything look so sweet!
44. Rose Flower Crochet Blanket Edging
The Rose Flower Border is a super pretty crochet blanket edging pattern that adds a line of cute roses to your project! It’s perfect for making blankets, scarves, or anything else look extra fancy. The roses are made with yarn and have a wavy edge that looks like soft petals. Use a thin yarn to make the roses nice and clear. This crochet blanket edging is so sweet and makes your crochet stuff look like a garden.
45. Little Stars Trimming Crochet Blanket Edging
The Little Stars Trimming is a super cute crochet blanket edging pattern that adds tiny star shapes to your projects! It’s perfect for making baby blankets, scarves, or even fun things like a superhero cape look extra special. You can make the stars with the same yarn color as your project or pick a bright color to make them shine. This easy crochet blanket edging pattern is great for kids’ stuff or holiday decorations.
46. Gumdrop Crochet Blanket Edging
The Gumdrop Border is a super cute crochet pattern that looks like little candies on the edge of your project! It’s perfect for making blankets, like the ones you see on Pattern Center’s Sweet Striped Blankets for Beginners, or even other stuff like scarves. This border is easy to make, but it looks really pretty and makes your work stand out. The edges are simple to crochet into, and the border stays nice and flat. You can use bright colors to make it look extra fun. Try it out and enjoy.
47. Lacy Loops & Bridges Crochet Blanket Edging Pattern
The Lacy Loops & Bridges Border is a super pretty crochet blanket edging pattern that makes your projects look fancy and fun! It’s like adding a delicate, lacy edge to your blanket, pillow, or shawl. You can use bright, happy colors to make it stand out, or soft, calm colors for a gentle look. This border has loops and little bridges that give it a light, airy feel. It’s perfect for making any project extra special and beautiful!
48. Falling Leaves Crochet blanket Edging Pattern
The Falling Leaves Border is just so lovely for your crochet projects! It’s like you’re stitching a little row of leaves tumbling around the edges of your blanket, scarf, or cozy afghan. This Afghan pattern is perfect for baby blanket edging.
49. Iris Stitch Crochet Blanket Edging
The Iris Stitch Crochet Blanket Edging is such a gorgeous way to spruce up your crochet projects! It’s awesome for giving blankets, scarves, or whatever you’re working on a fancy, flowery vibe that’s honestly not that tough to pull off. It comes together pretty quickly, so you can wrap up your project and show it off in no time. Pick any color you’re feeling—something to blend with your piece or a bold one to make it pop. Give it a go, and your stuff’s gonna look so darn cute!
50. Afghan Crochet Blanket Edging
The Afghan Blanket Baby Edging is just the sweetest way to finish off a baby blanket! It’s got this soft, airy vibe with little loops and waves that make it look so delicate and cozy—perfect for snuggling up a little one. You can use super soft yarn in any color, like a gentle pastel pink or blue, to match the blanket or keep it classic. It’s not too tricky to crochet, even if you’re still getting the hang of things, and it adds this adorable, heartfelt touch that’ll make everyone go “aww.
In Closing
Crochet blanket edging makes blankets look finished and beautiful. It can be simple or fancy, depending on the style wanted. Good edging also helps the blanket stay strong and neat. Choosing the right yarn, stitch, and pattern is important. With careful work, edging can turn any blanket into a special, cozy piece that lasts a long time.
Frequently Asked Questions About Crochet Blanket Edging
How Do I Choose The Right Edging For My Blanket?
Choose an edging that matches the blanket’s style and colors. Simple borders look neat, while fancy ones add flair. Soft yarn works best. Pick an edging that feels nice, looks pretty, and fits the blanket’s size and design.
Can I Add Edging To A Knitted Blanket?
Yes, edging can be added to a knitted blanket. It makes the blanket look nicer and helps the edges stay strong. Choose a simple or fancy border and use matching yarn to keep everything soft and pretty.
How Much Yarn Do I Need For A Blanket Border?
Usually, about 10% to 20% extra yarn is needed for a blanket border. Bigger or fancier borders will need more yarn. It is smart to get a little extra yarn to make sure there is enough to finish.
Why Is My Edging Wavy Or Tight?
Edging gets wavy if there are too many stitches and tight if there are too few. It can also happen if the yarn is pulled too hard or too loosely. Counting stitches and using even tension helps fix it.
Are There Crochet Edging Patterns For Baby Blankets?
Yes, there are many crochet edging patterns for baby blankets. Some are simple and soft, while others are fancy and fun. Pretty borders like scallops, shells, and picots are very popular for making baby blankets extra special.


![How to Crochet Sunflower Bouquet [6 Easy Steps]](https://crochetmind.com/wp-content/uploads/2025/06/How-to-Crochet-Sunflower-Bouquet-6-Easy-Steps-150x150.jpg)